Chopsticks
Introduction
Chopsticks, developed by the Acala Foundation, is a versatile tool tailored for developers working on Polkadot SDK-based blockchains. With Chopsticks, you can fork live chains locally, replay blocks to analyze extrinsics, and simulate complex scenarios like XCM interactions, all without deploying to a live network.
By streamlining testing and experimentation, Chopsticks empowers developers to innovate and accelerate their blockchain projects within the Polkadot ecosystem.
Key Features
- Local chain forking: Fork live Polkadot SDK chains locally for testing and development.
- Block replay: Replay specific blocks to analyze state changes and debug extrinsics.
- XCM testing: Simulate cross-chain messaging between multiple parachains and relay chains.
- Storage manipulation: Override storage values to test specific scenarios.
- WebSocket commands: Control the forked environment with specialized RPC methods.
- Time travel: Manipulate block timestamps for testing time-dependent logic.
- Build block modes: Choose between batch, instant, or manual block production.
Warning
Chopsticks uses Smoldot light client, which only supports the native Polkadot SDK API. Consequently, a Chopsticks-based fork doesn't support Ethereum JSON-RPC calls, meaning you cannot use it to fork your chain and connect Metamask.
Prerequisites
Before you begin, ensure you have the following installed:
Installation
You can install Chopsticks globally or locally in your project. Choose the option that best fits your development workflow.
Tip
This documentation explains the features of Chopsticks version 1.2.7. Make sure you're using the correct version to match these instructions.
Global Installation
To install Chopsticks globally, allowing you to use it across multiple projects, run:
Now, you should be able to run the chopsticks command from your terminal.
Local Installation
To use Chopsticks in a specific project, first create a new directory and initialize a Node.js project:
Then, install Chopsticks as a local dependency:
Finally, you can run Chopsticks using the npx command. To see all available options and commands, run it with the --help flag:
Get Started
Configuration Options
To run Chopsticks, you need to configure some parameters. This can be set either via a configuration file or the command-line interface (CLI). The parameters that can be configured are as follows:
genesis: The link to a parachain's raw genesis file to build the fork from, instead of an endpoint.timestamp: Timestamp of the block to fork from.endpoint: The endpoint of the parachain to fork.block: Use to specify at which block hash or number to replay the fork.wasm-override: Path of the Wasm to use as the parachain runtime, instead of an endpoint's runtime.db: Path to the name of the file that stores or will store the parachain's database.config: Path or URL of the config file.port: The port to expose an endpoint on.build-block-mode: How blocks should be built in the fork: batch, manual, instant.import-storage: A pre-defined JSON/YAML storage path to override in the parachain's storage.allow-unresolved-imports: Whether to allow Wasm unresolved imports when using a Wasm to build the parachain.html: Include to generate storage diff preview between blocks.mock-signature-host: Mock signature host so that any signature starts with0xdeadbeefand filled by0xcdis considered valid.
Configuration File
The Chopsticks source repository includes a collection of YAML files that can be used to set up various Polkadot SDK chains locally. You can download these configuration files from the repository's configs folder.
An example of a configuration file for Polkadot is as follows:
endpoint:
  - wss://rpc.ibp.network/polkadot
  - wss://polkadot-rpc.dwellir.com
mock-signature-host: true
block: ${env.POLKADOT_BLOCK_NUMBER}
db: ./db.sqlite
runtime-log-level: 5

import-storage:
  System:
    Account:
      - - - 5GrwvaEF5zXb26Fz9rcQpDWS57CtERHpNehXCPcNoHGKutQY
        - providers: 1
          data:
            free: '10000000000000000000'
  ParasDisputes:
    $removePrefix: ['disputes'] # those can makes block building super slow
The configuration file allows you to modify the storage of the forked network by rewriting the pallet, state component, and value that you want to change. For example, Polkadot's file rewrites Alice's system.Account storage so that the free balance is set to 10000000000000000000.
Create a Fork
To run Chopsticks using a configuration file, utilize the --config flag. You can use a raw GitHub URL, a path to a local file, or simply the chain's name:
Alternatively, you can create a fork using CLI flags. For example, to fork Polkadot at block 100:
If the fork is successful, you will see output indicating the RPC is listening:
You can now access the running Chopsticks fork using the default address: ws://localhost:8000.
Interact with a Fork
You can interact with the forked chain using various libraries such as Polkadot.js.
To interact with Chopsticks via the hosted user interface, visit Polkadot.js Apps and follow these steps:
-
Select the network icon in the top left corner.
-
Scroll to the bottom and select Development.
- Choose Custom.
- Enter
ws://localhost:8000in the input field. -
Select the Switch button.
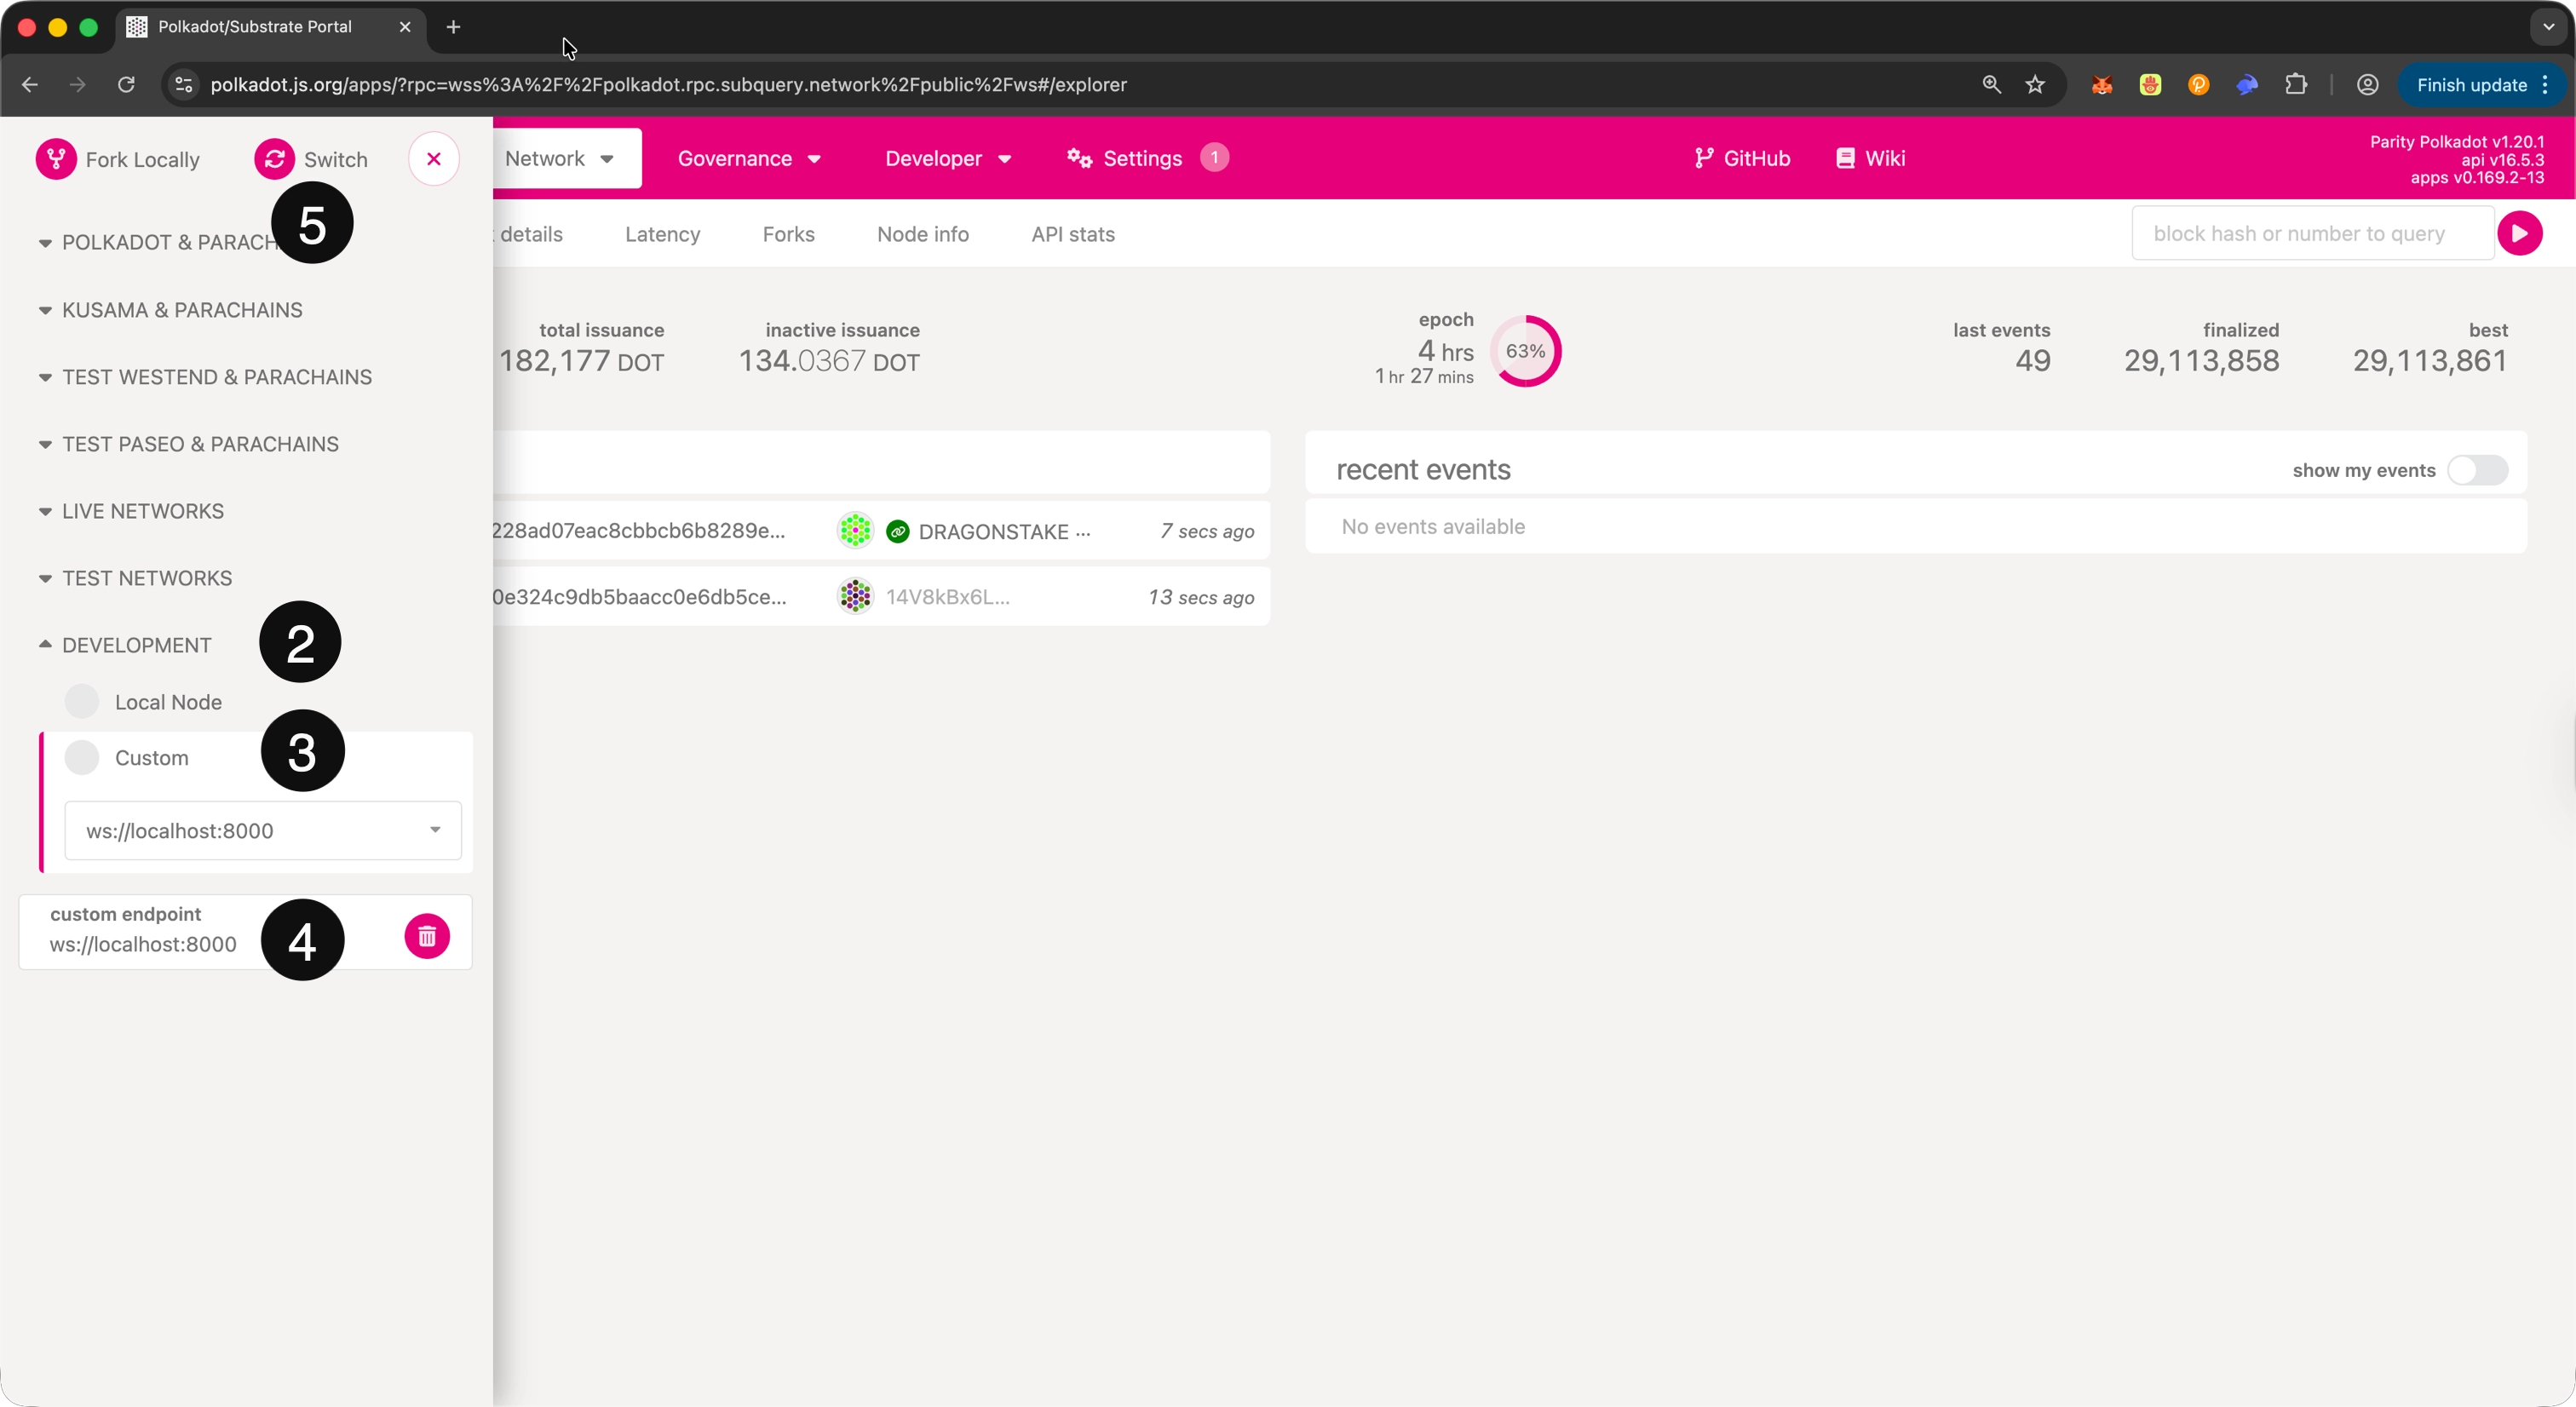
You should now be connected to your local fork and can interact with it as you would with a real chain.
For programmatic interaction, you can use the Polkadot.js library:
import { ApiPromise, WsProvider } from '@polkadot/api';

async function connectToFork() {
  const wsProvider = new WsProvider('ws://localhost:8000');
  const api = await ApiPromise.create({ provider: wsProvider });
  await api.isReady;

  // Now you can use 'api' to interact with your fork
  console.log(`Connected to chain: ${await api.rpc.system.chain()}`);
}

connectToFork();
Replay Blocks
Chopsticks lets you replay specific blocks in a chain, which is useful for debugging and analyzing state changes. Use the run-block subcommand with the following options:
output-path: Path to print output.html: Generate HTML with storage diff.open: Open generated HTML.
For example, to replay block 1000 from Polkadot and save the output to a JSON file:
npx @acala-network/chopsticks run-block \
--endpoint wss://polkadot-rpc.dwellir.com \
--output-path ./polkadot-output.json \
--block 1000
The output will include detailed information about the block execution, storage changes, and runtime logs.
Test XCM
To test XCM (Cross-Consensus Messaging) messages between networks, you can fork multiple parachains and a relay chain locally using Chopsticks.
Use the xcm subcommand with:
-r/--relaychain: Relay chain config file-p/--parachain: Parachain config file (can be specified multiple times)
For example, to fork Moonbeam, Astar, and Polkadot, enabling XCM between them:
After running it, you should see output indicating connections between the chains:
Now you can interact with your forked chains using the ports specified in the output and test XCM messages between them.
WebSocket Commands
Chopstick's internal WebSocket server has special endpoints that allow manipulating the local Polkadot SDK chain.
dev_newBlock
Generates one or more new blocks.
Parameters:
newBlockParams(NewBlockParams): The parameters to build the new block with, including:count(number): The number of blocks to builddmp({ msg: string, sentAt: number }[]): The downward messages to include in the blockhrmp(Record) : The horizontal messages to include in the blockto(number): The block number to build totransactions(string[]): The transactions to include in the blockump(RecordunsafeBlockHeight(number): Build block using a specific block height (unsafe)
Example:
dev_setBlockBuildMode
Sets block build mode.
Parameters:
buildBlockMode(BuildBlockMode): The build mode. Can be:Batch: One block per batch (default)Instant: One block per transactionManual: Only build when triggered
Example:
import { ApiPromise, WsProvider } from '@polkadot/api';

async function main() {
  const wsProvider = new WsProvider('ws://localhost:8000');
  const api = await ApiPromise.create({ provider: wsProvider });
  await api.isReady;
  await api.rpc('dev_setBlockBuildMode', 'Instant');
}

main();
dev_setHead
Sets the head of the blockchain to a specific hash or number.
Parameters:
hashOrNumber(string | number): The block hash or number to set as head
Example:
dev_setRuntimeLogLevel
Sets the runtime log level.
Parameters:
runtimeLogLevel(number): The runtime log level to set
Example:
import { ApiPromise, WsProvider } from '@polkadot/api';

async function main() {
  const wsProvider = new WsProvider('ws://localhost:8000');
  const api = await ApiPromise.create({ provider: wsProvider });
  await api.isReady;
  await api.rpc('dev_setRuntimeLogLevel', 1);
}

main();
dev_setStorage
Creates or overwrites the value of any storage.
Parameters:
values(object): JSON object resembling the path to a storage valueblockHash(string): The block hash to set the storage value
Example:
import { ApiPromise, WsProvider } from '@polkadot/api';
import { Keyring } from '@polkadot/keyring';

async function main() {
  const wsProvider = new WsProvider('ws://localhost:8000');
  const api = await ApiPromise.create({ provider: wsProvider });
  await api.isReady;
  const keyring = new Keyring({ type: 'ed25519' });
  const bob = keyring.addFromUri('//Bob');
  const storage = {
    System: {
      Account: [[[bob.address], { data: { free: 100000 }, nonce: 1 }]],
    },
  };
  await api.rpc('dev_setStorage', storage);
}

main();
dev_timeTravel
Sets the block's timestamp to a specific date. All future blocks will be sequentially created after this point in time.
Parameters:
date(string): Timestamp or date string to set
Example:
import { ApiPromise, WsProvider } from '@polkadot/api';

async function main() {
  const wsProvider = new WsProvider('ws://localhost:8000');
  const api = await ApiPromise.create({ provider: wsProvider });
  await api.isReady;
  await api.rpc('dev_timeTravel', '2030-08-15T00:00:00');
}

main();
Where to Go Next
-
External Chopsticks Support
For further support and information, refer to the official resources.
| Created: January 14, 2026