Convert Assets on Asset Hub
IntermediateIntroduction
Asset Conversion is an Automated Market Maker (AMM) utilizing Uniswap V2 logic and implemented as a pallet on Polkadot's Asset Hub.
This guide will provide detailed information about the key functionalities offered by the Asset Conversion pallet on Asset Hub, including:
- Creating a liquidity pool.
- Adding liquidity to a pool.
- Swapping assets.
- Withdrawing liquidity from a pool.
Prerequisites
Before converting assets on Asset Hub, you must ensure you have:
- Access to the Polkadot.js Apps interface and a connection with the intended blockchain.
- A funded wallet containing the assets you wish to convert and enough available funds to cover the transaction fees.
- An asset registered on Asset Hub that you want to convert. If you haven't created an asset on Asset Hub yet, refer to the Register a Local Asset or Register a Foreign Asset documentation to create an asset.
Create a Liquidity Pool
If an asset on Asset Hub does not have an existing liquidity pool, the first step is to create one.
The asset conversion pallet provides the createPool extrinsic to create a new liquidity pool, creating an empty liquidity pool and a new LP token asset.
Tip
A testing token with the asset ID 1112 and the name PPM was created for this example.
As stated in the Test Environment Setup section, this tutorial is based on the assumption that you have an instance of Polkadot Asset Hub running locally. Therefore, the demo liquidity pool will be created between DOT and PPM tokens. However, the same steps can be applied to any other asset on Asset Hub.
From the Asset Hub perspective, the Multilocation that identifies the PPM token is the following:
The PalletInstance value of 50 represents the Assets pallet on Asset Hub. The GeneralIndex value of 1112 is the PPM asset's asset ID.
To create the liquidity pool, you can follow these steps:
-
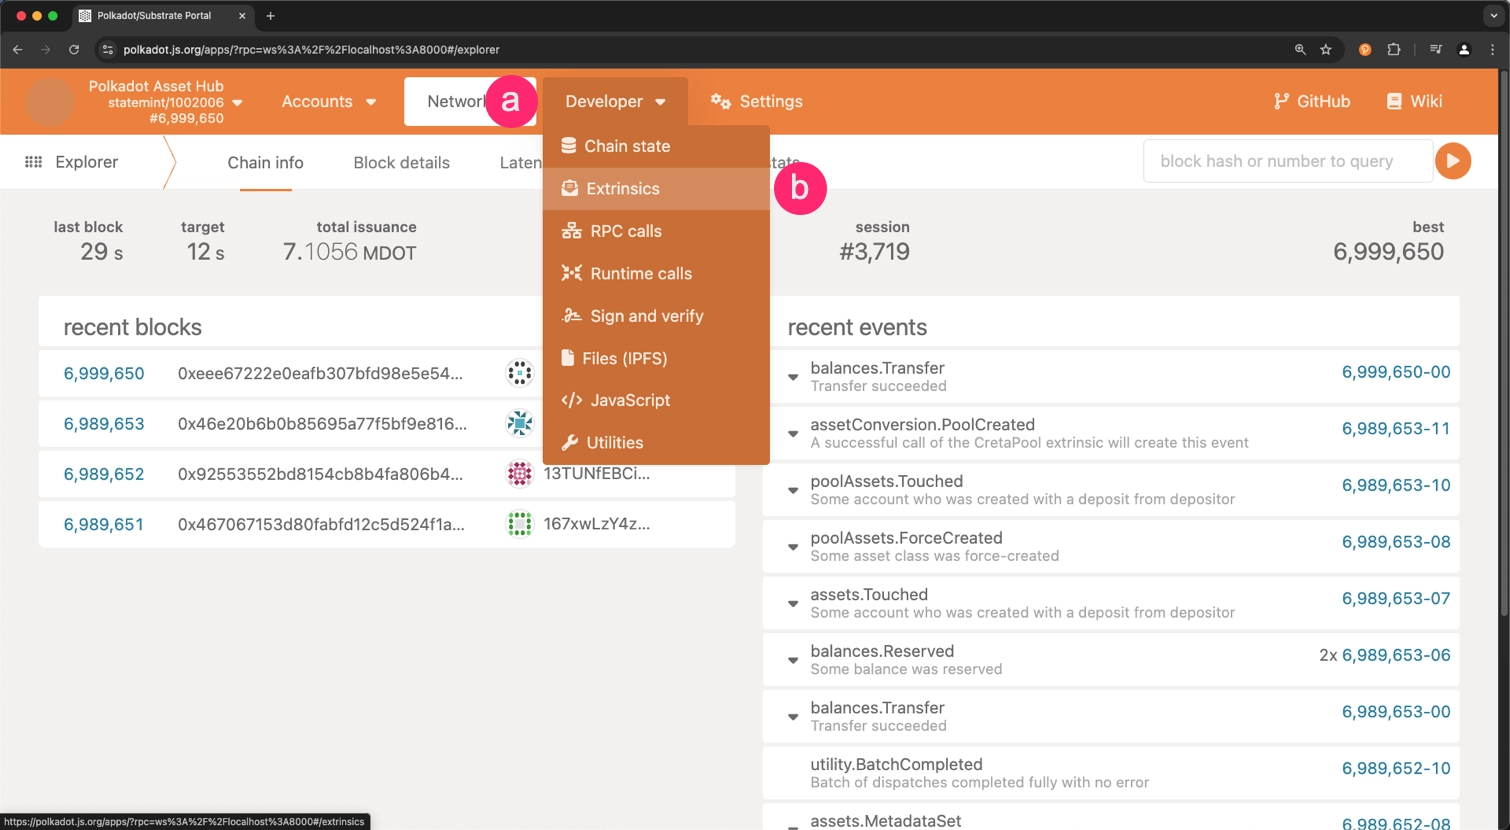
Navigate to the Extrinsics section on the Polkadot.js Apps interface:
- Select Developer from the top menu.
- Click on Extrinsics from the dropdown menu.
-
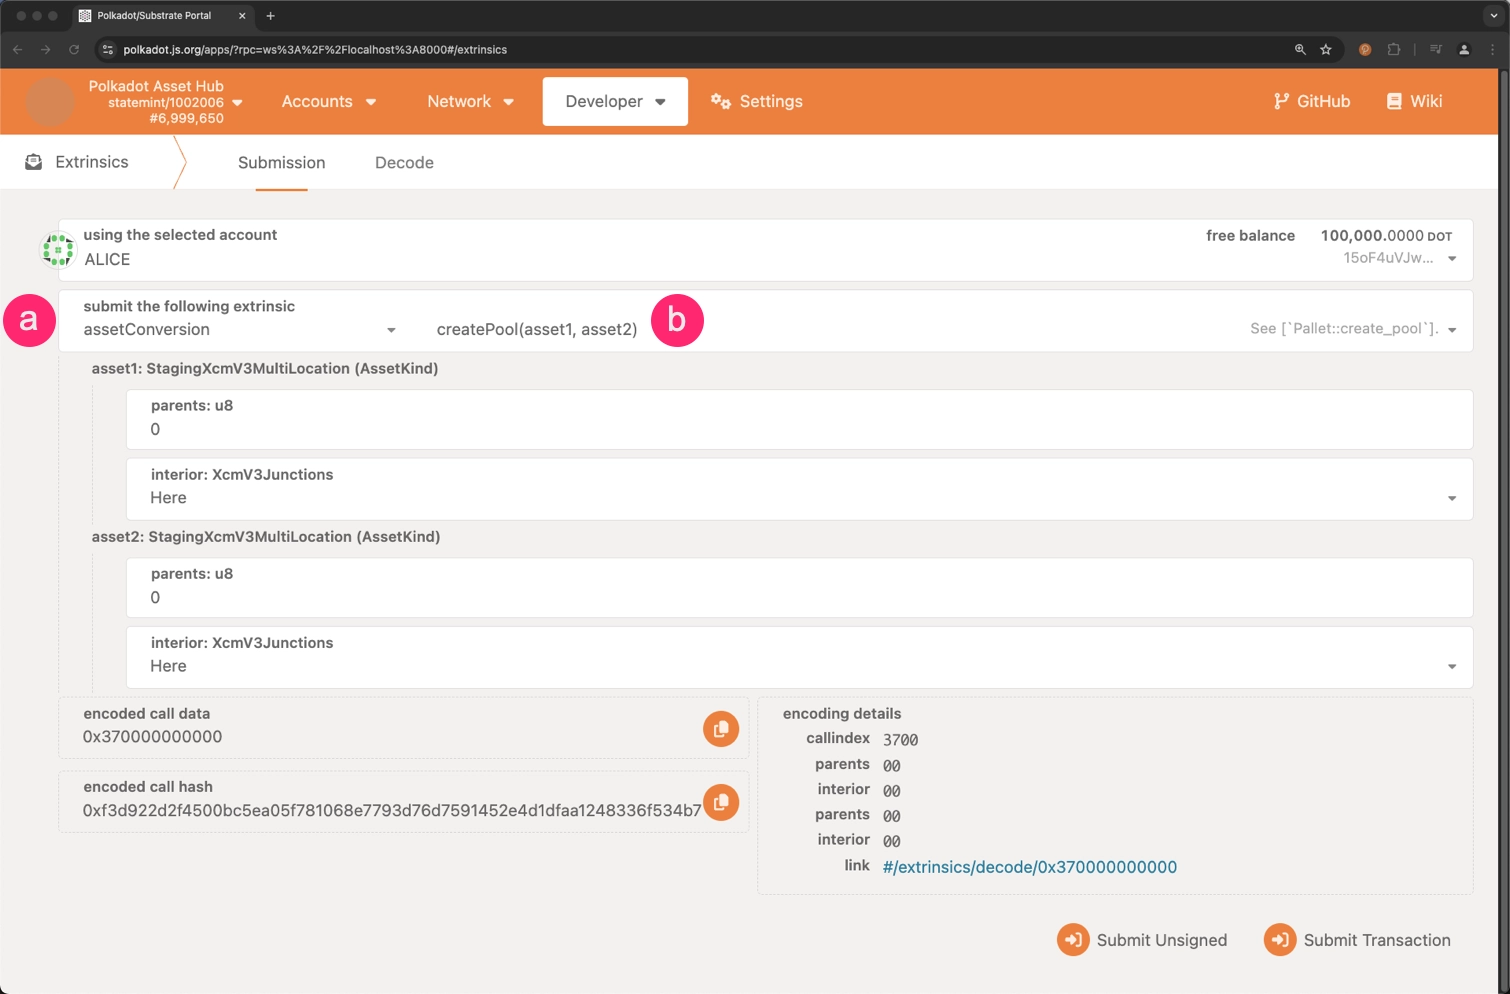
Select extrinsic to create the pool:
- Select the
AssetConversionpallet. - Choose the
createPoolextrinsic from the list of available extrinsics.
- Select the
-
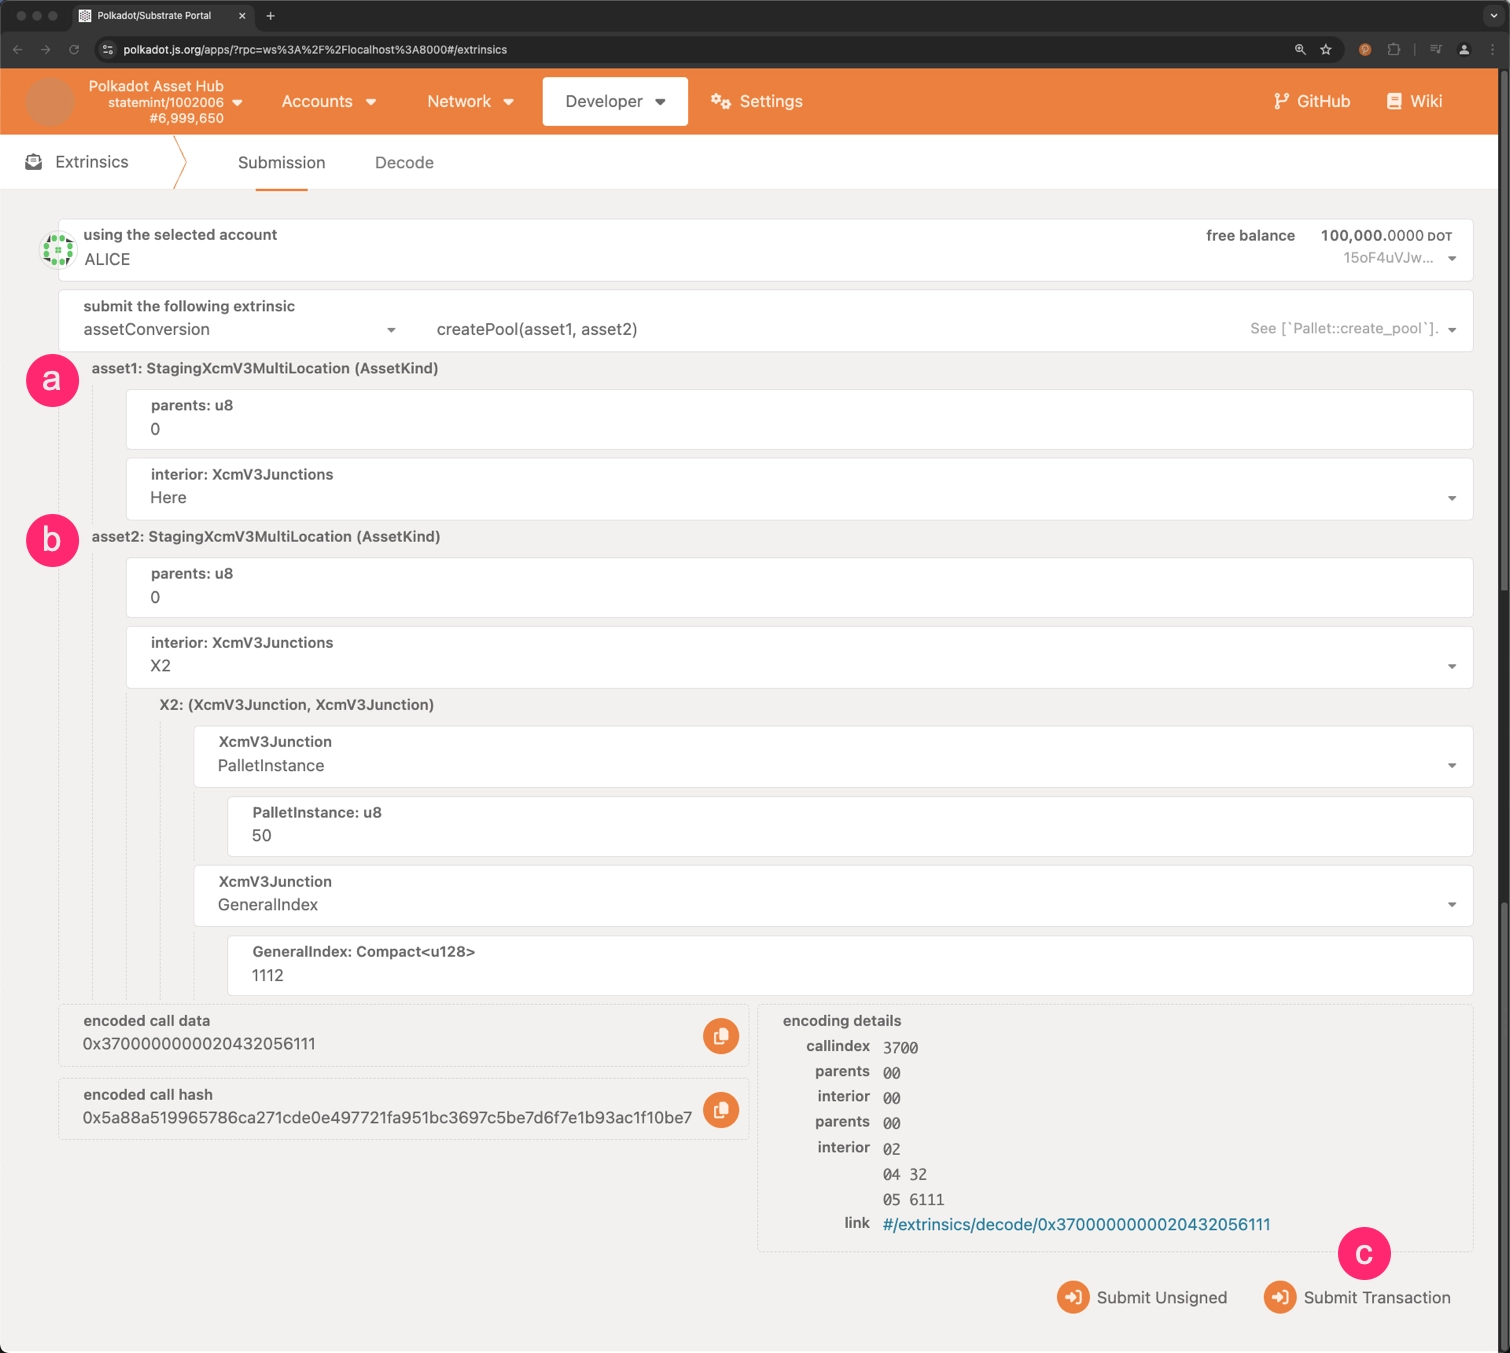
Fill in the required fields:
-
asset1: The Multilocation of the first asset in the pool. In this case, it is the DOT token, which the following Multilocation represents. -
asset2: The second asset's Multilocation within the pool. This refers to the PPM token, which the following Multilocation identifies. -
Click on Submit Transaction to create the liquidity pool.
-
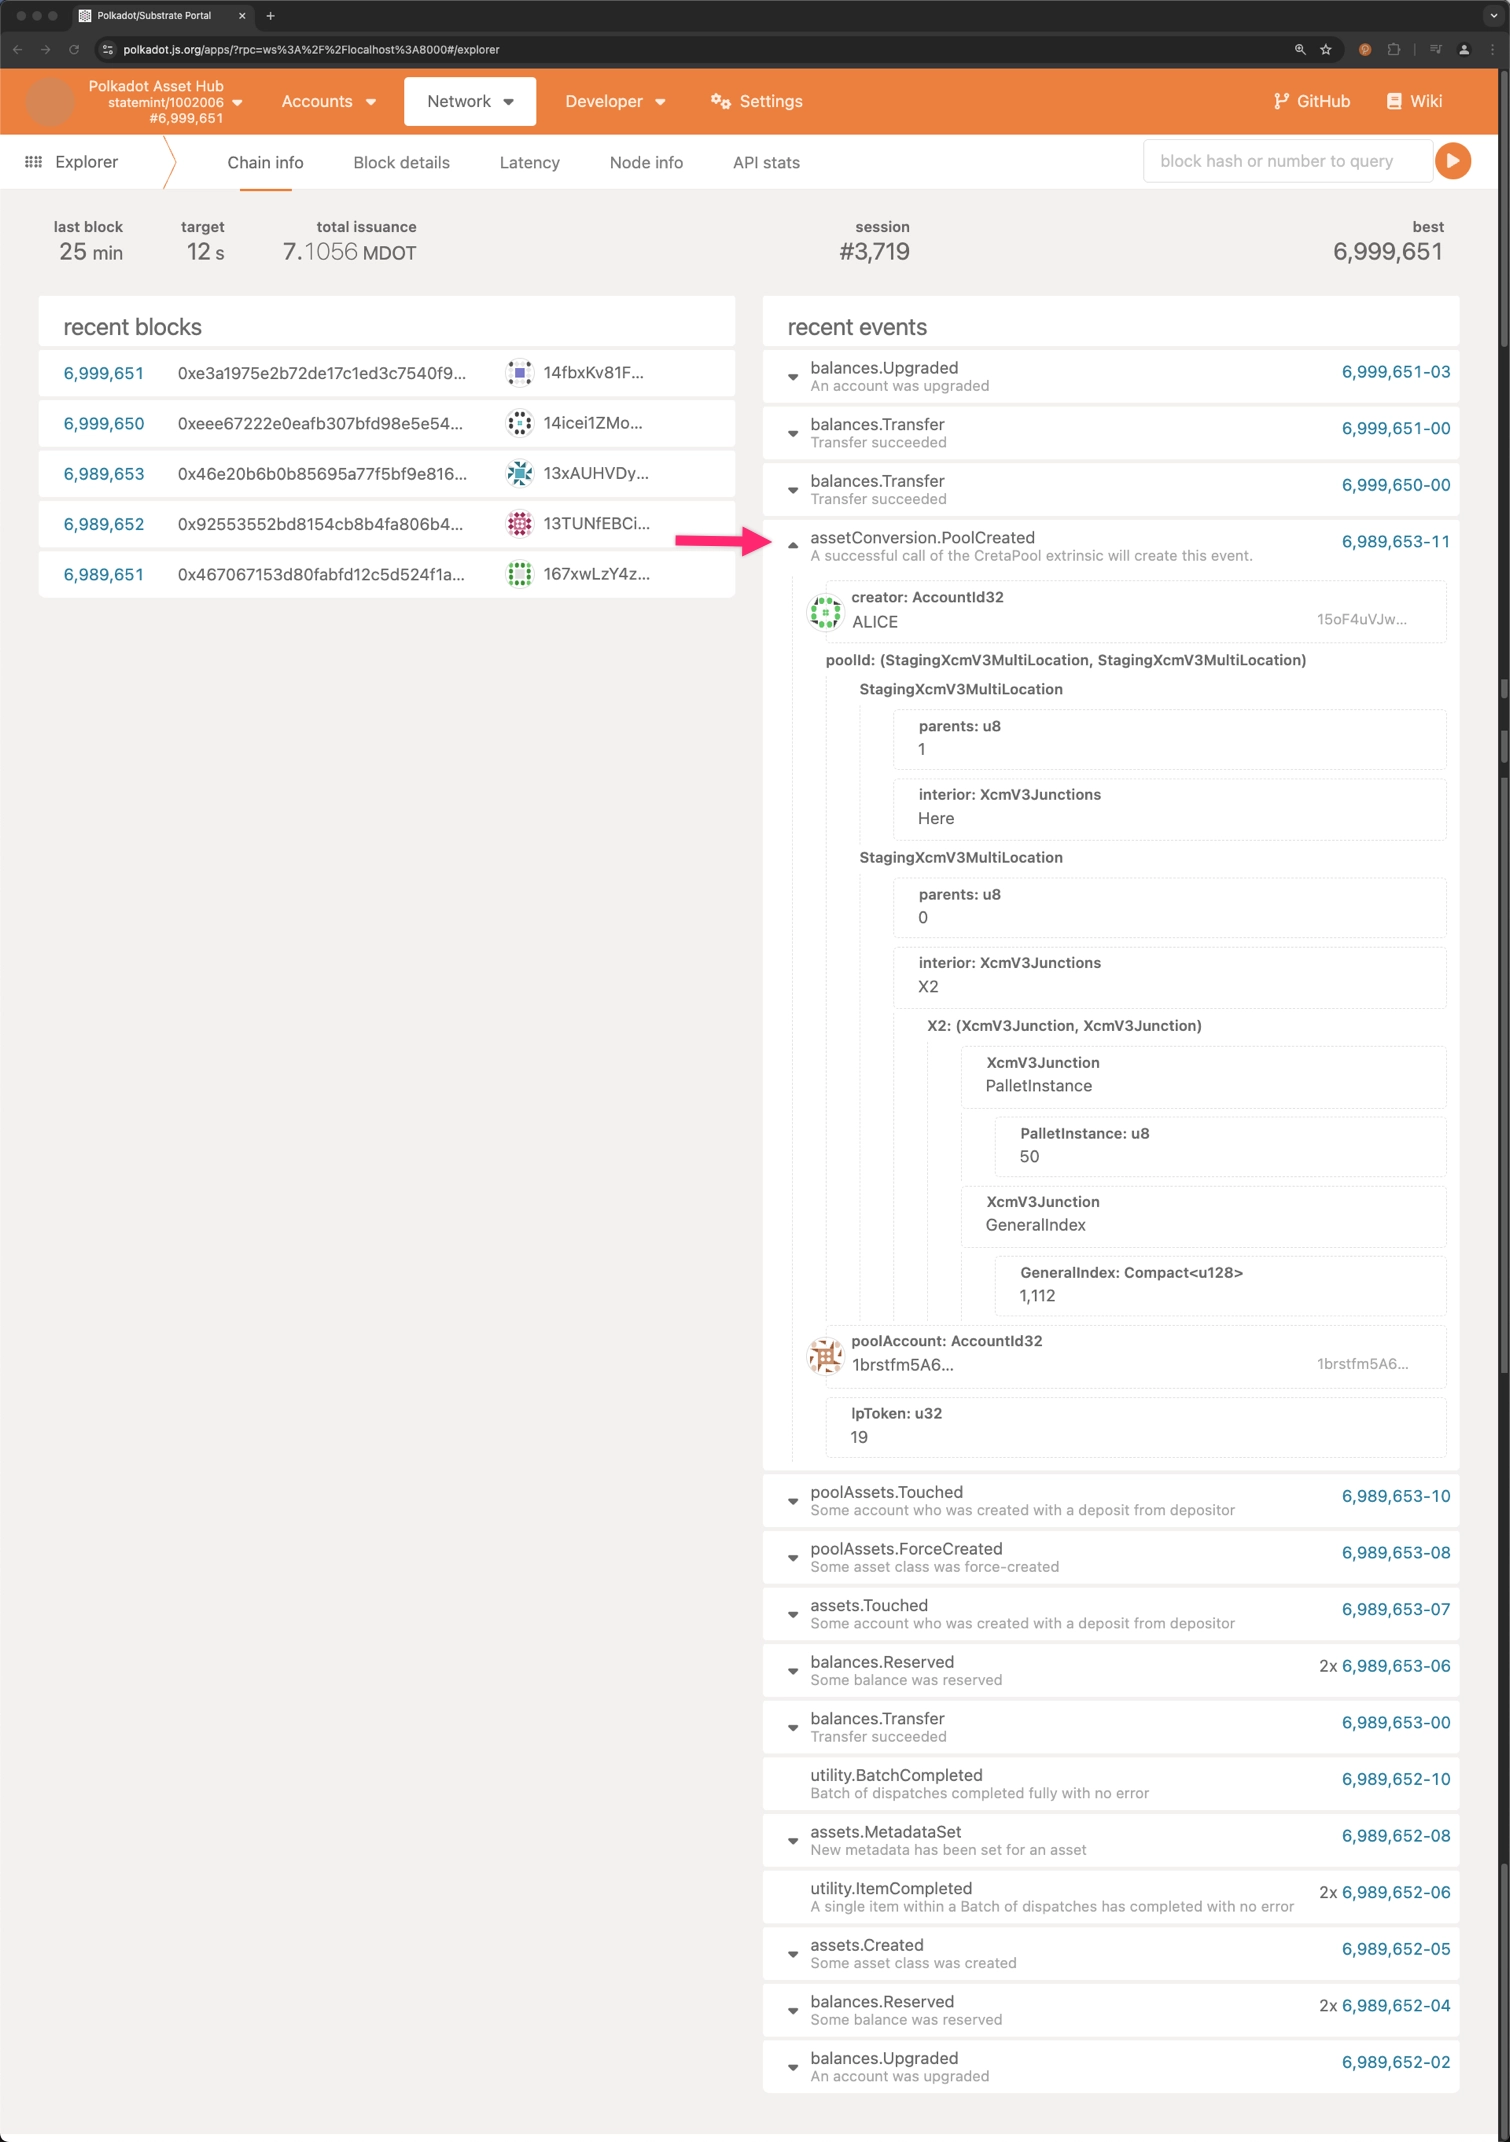
Signing and submitting the transaction triggers the creation of the liquidity pool. To verify the new pool's creation, check the Explorer section on the Polkadot.js Apps interface and ensure that the PoolCreated event was emitted.
As the preceding image shows, the lpToken ID created for this pool is 19. This ID is essential to identify the liquidity pool and associated LP tokens.
Add Liquidity to a Pool
The addLiquidity extrinsic allows users to provide liquidity to a pool of two assets. Users specify their preferred amounts for both assets and minimum acceptable quantities. The function determines the best asset contribution, which may vary from the amounts desired but won't fall below the specified minimums. Providers receive liquidity tokens representing their pool portion in return for their contribution.
To add liquidity to a pool, follow these steps:
-
Navigate to the Extrinsics section on the Polkadot.js Apps interface:
- Select Developer from the top menu.
- Click on Extrinsics from the dropdown menu.
-
Select extrinsic to add liqudity:
- Select the
assetConversionpallet. - Choose the
addLiquidityextrinsic from the list of available extrinsics.
- Select the
-
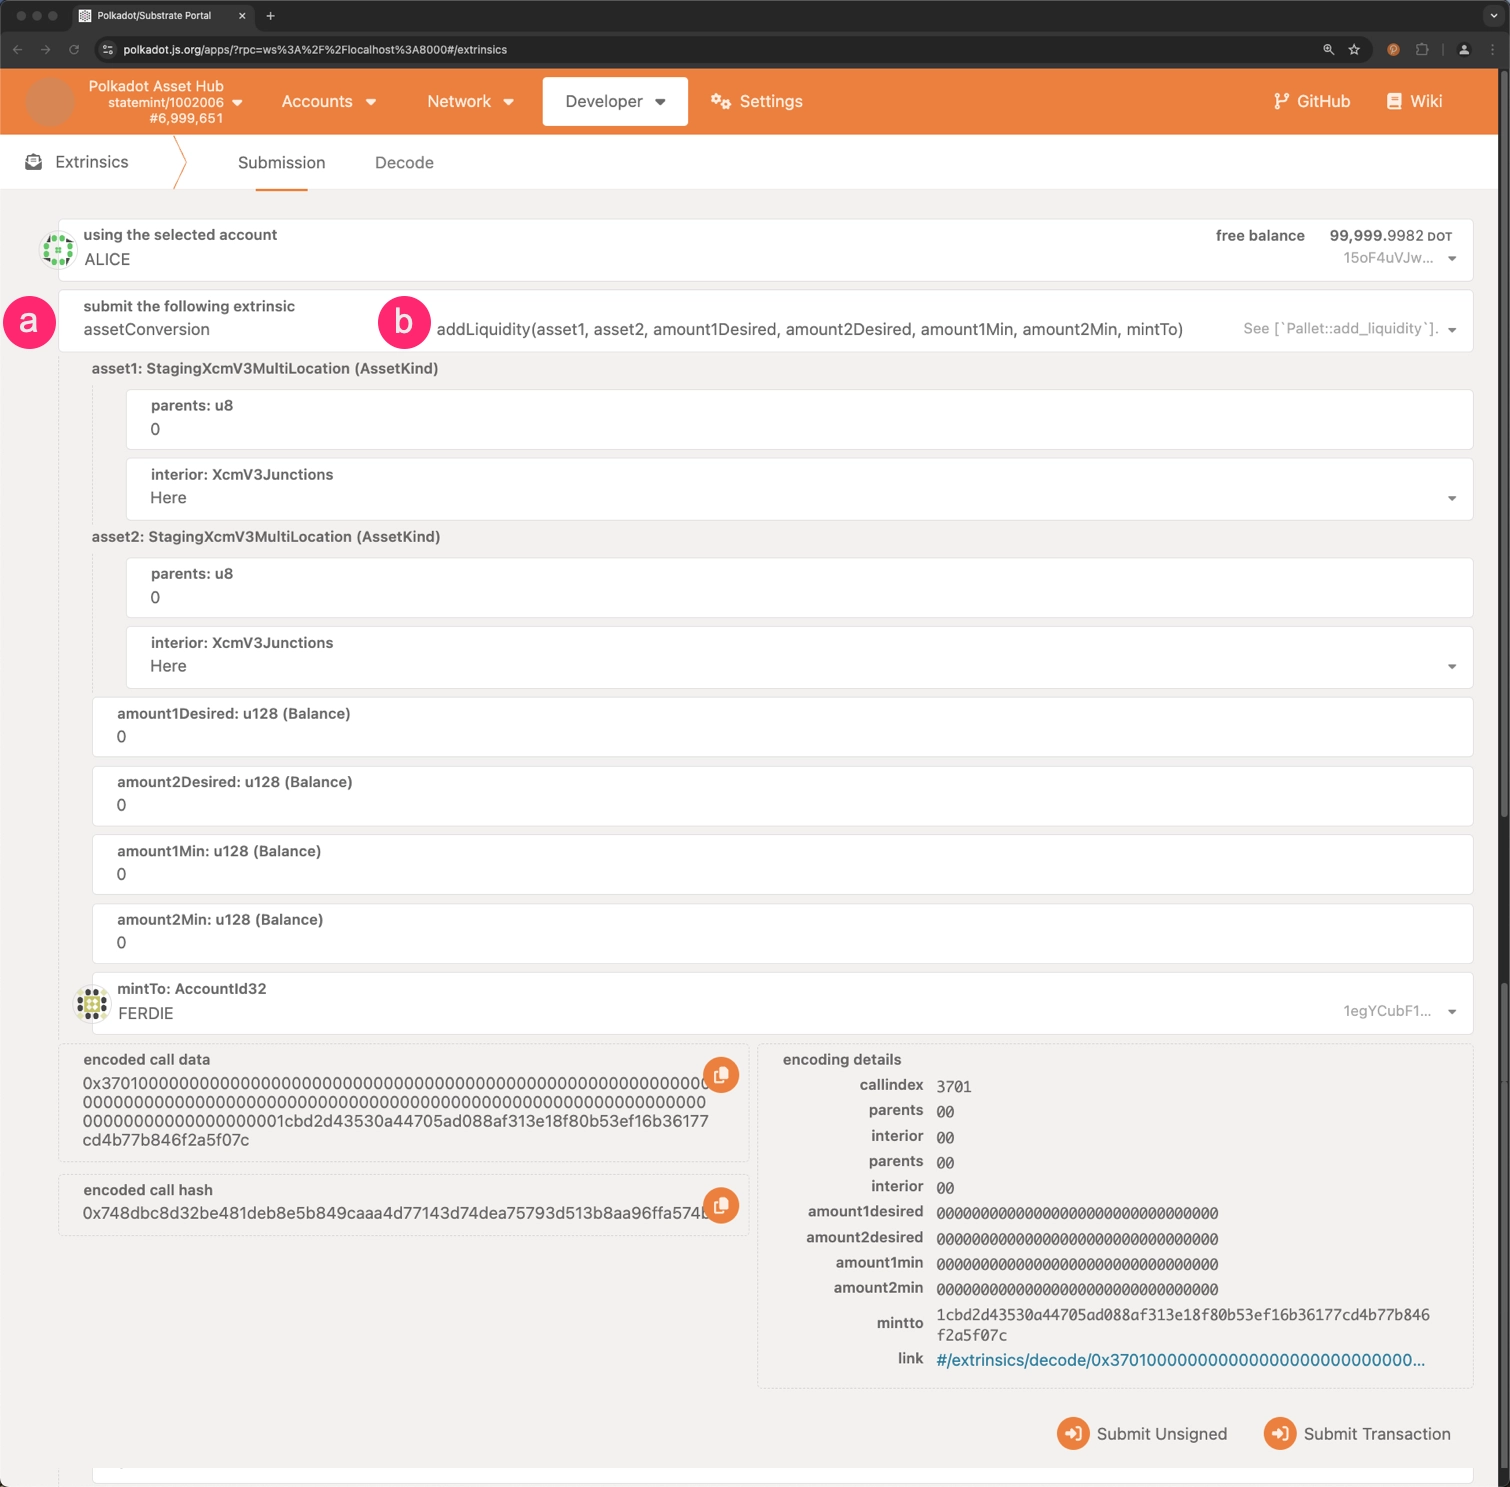
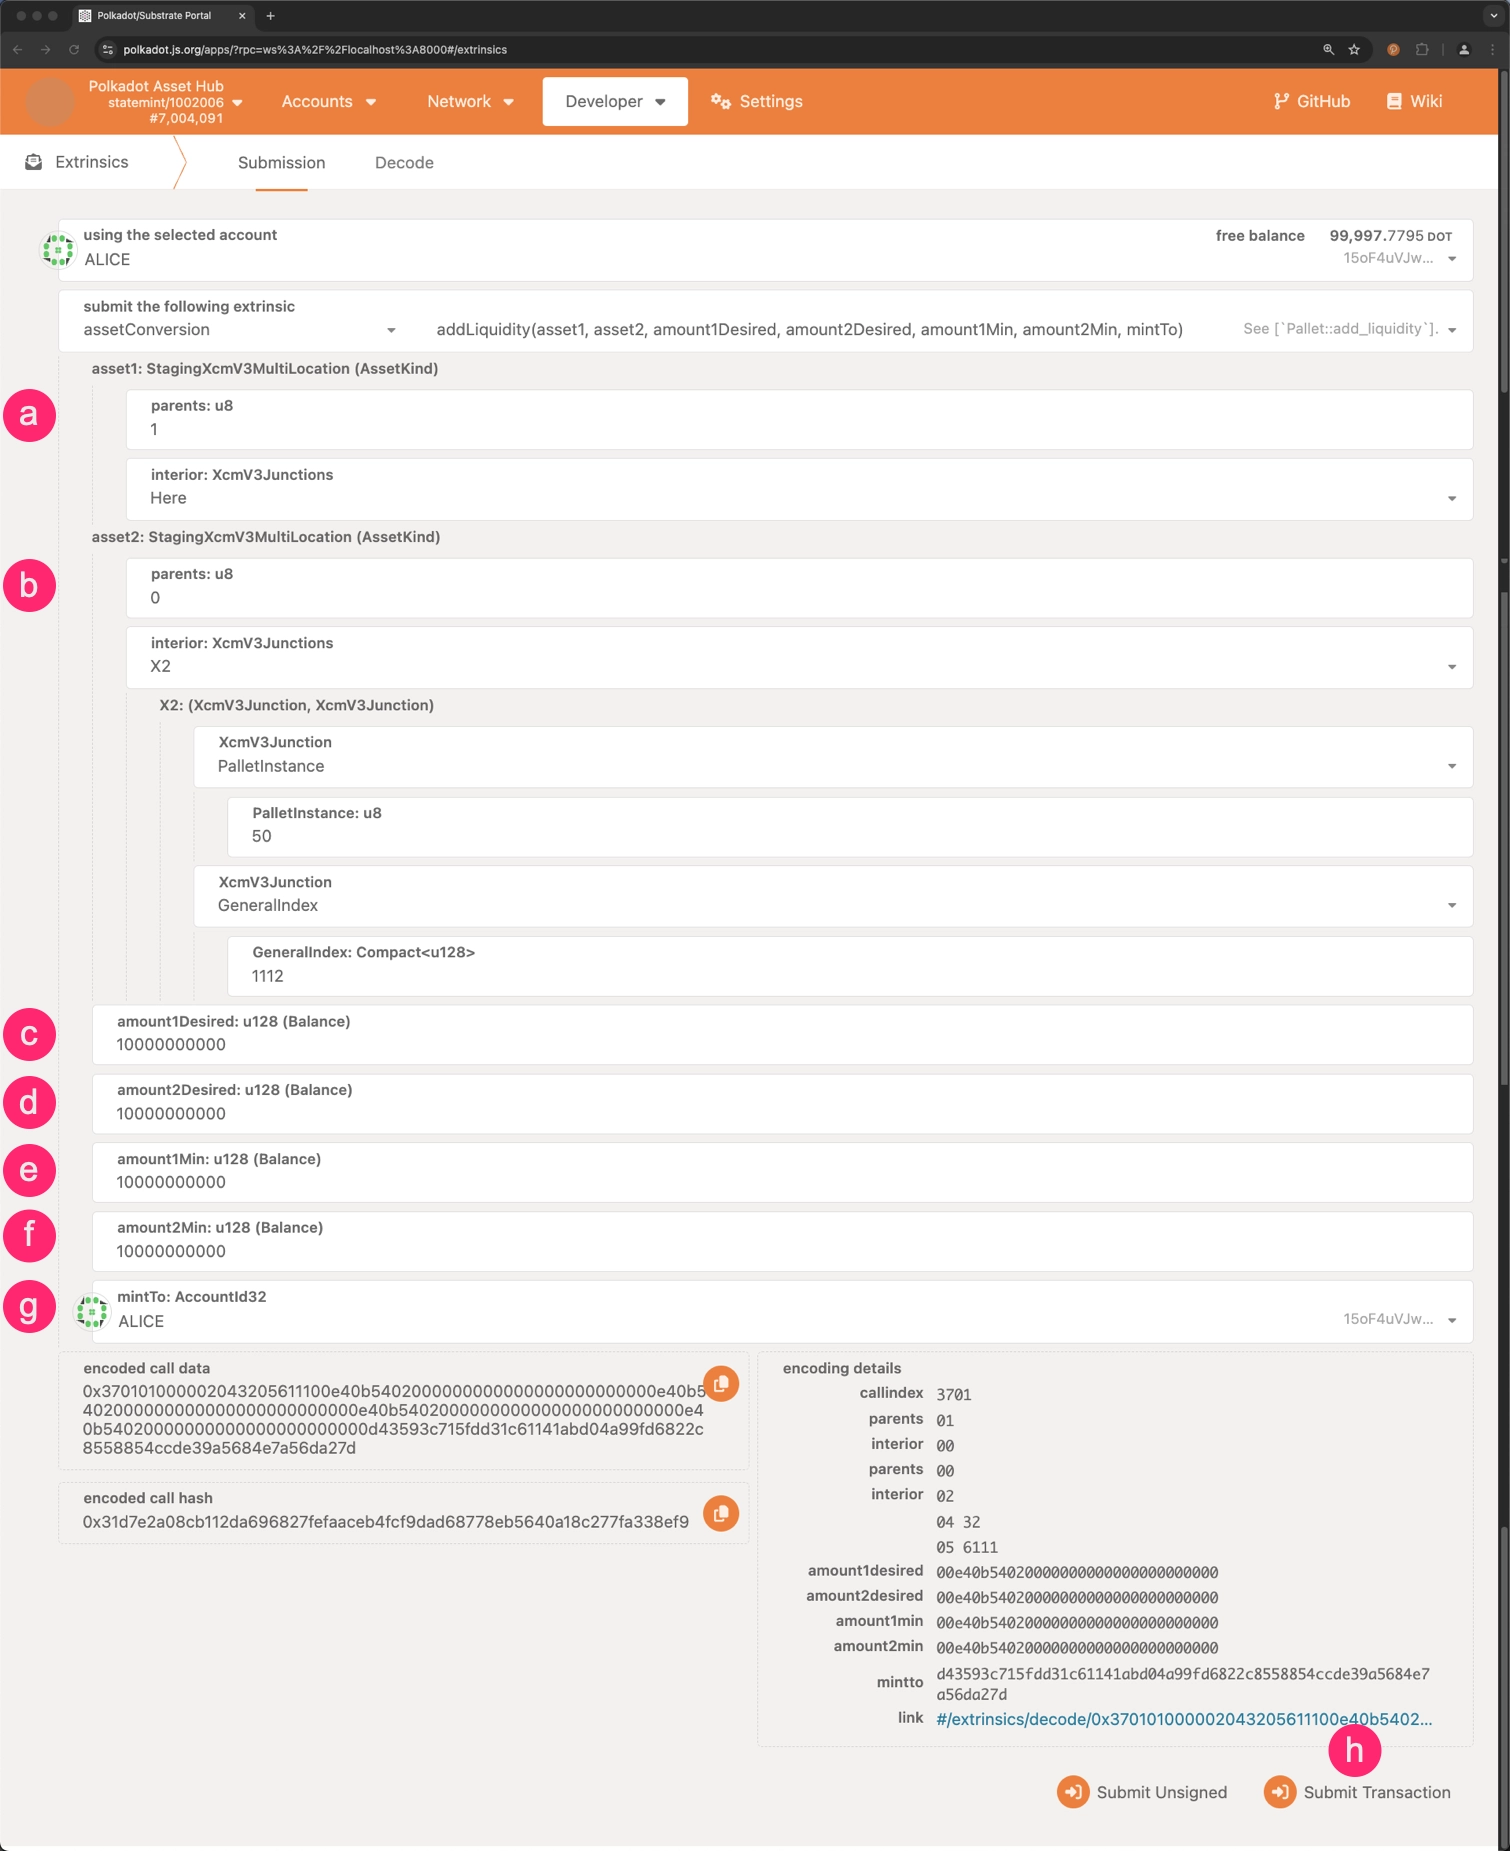
Fill in the required fields:
-
asset1: The Multilocation of the first asset in the pool. In this case, it is the DOT token, which the following Multilocation represents. -
asset2: The second asset's Multilocation within the pool. This refers to the PPM token, which the following Multilocation identifies. -
amount1Desired: The amount of the first asset that will be contributed to the pool. amount2Desired: The quantity of the second asset intended for pool contribution.amount1Min: The minimum amount of the first asset that will be contributed.amount2Min: The lowest acceptable quantity of the second asset for contribution.mintTo: The account to which the liquidity tokens will be minted.- Click on Submit Transaction to add liquidity to the pool.
Warning
Ensure that the appropriate amount of tokens provided has been minted previously and is available in your account before adding liquidity to the pool.
In this case, the liquidity provided to the pool is between DOT tokens and PPM tokens with the asset ID 1112 on Polkadot Asset Hub. The intention is to provide liquidity for 1 DOT token (
u128value of 1000000000000 as it has 10 decimals) and 1 PPM token (u128value of 1000000000000 as it also has 10 decimals). -
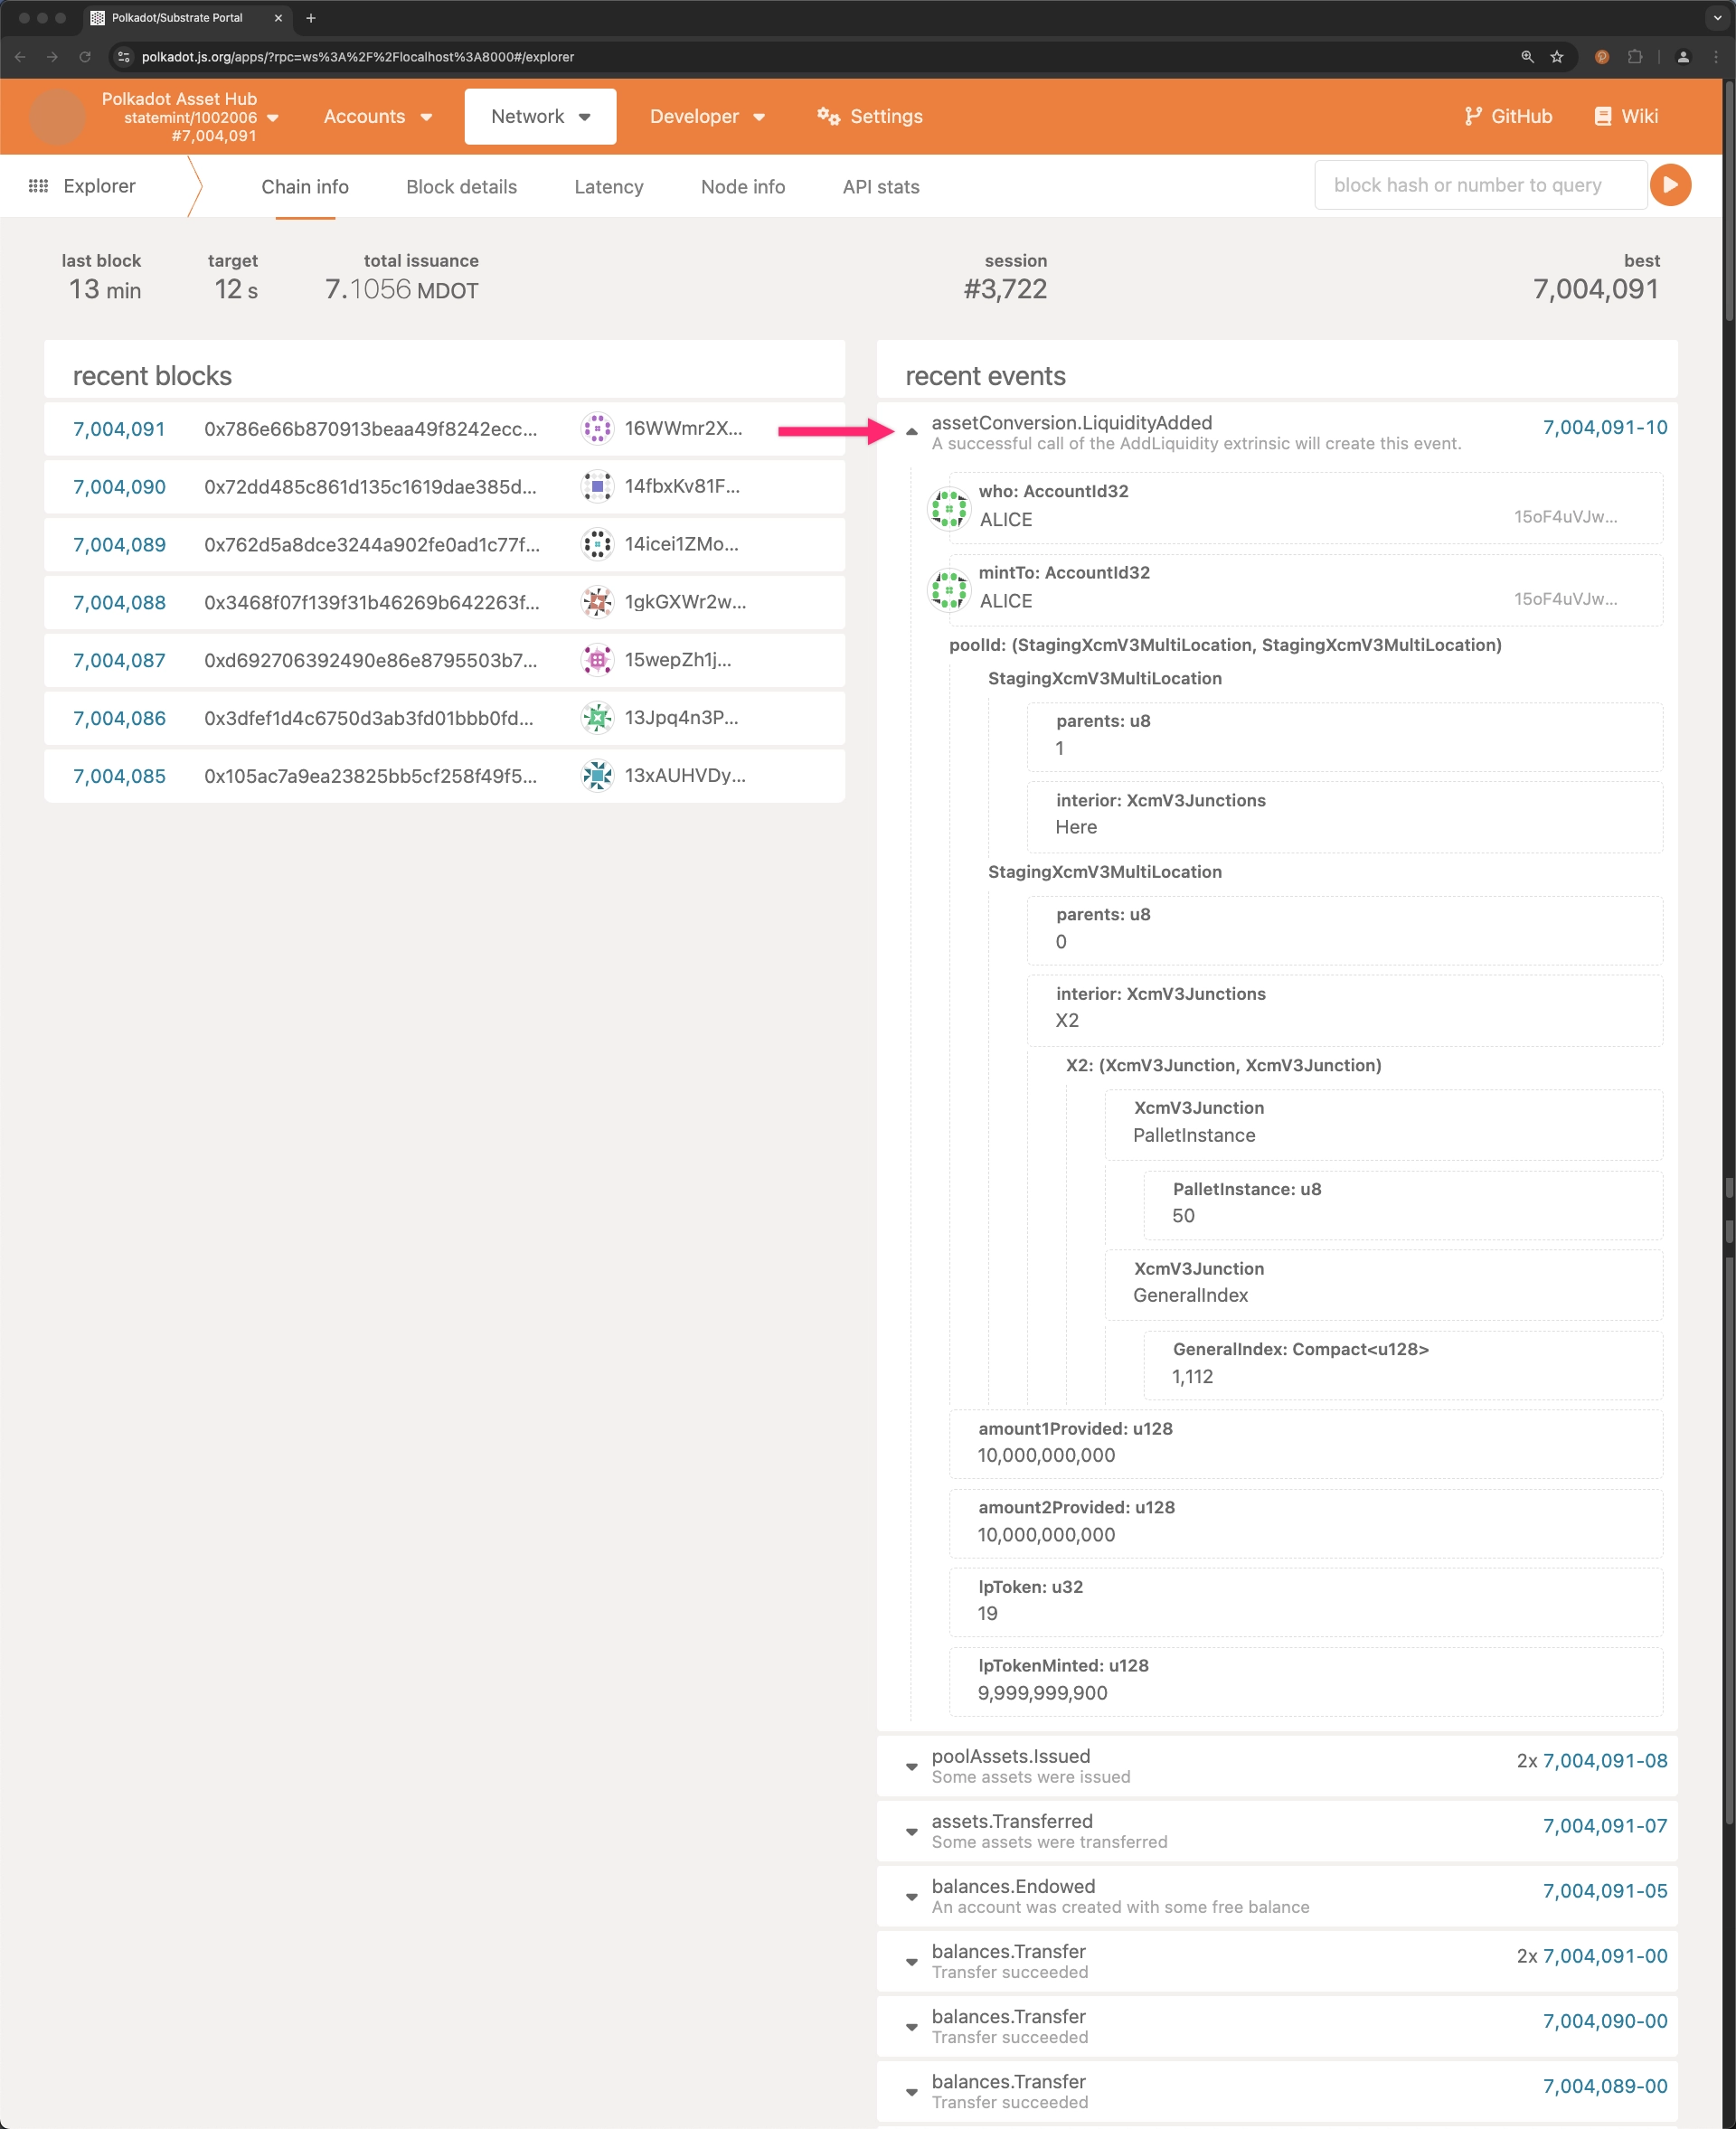
Signing and submitting the transaction adds liquidity to the pool. To verify the liquidity addition, check the Explorer section on the Polkadot.js Apps interface and ensure that the LiquidityAdded event was emitted.
Swap Assets
Swap from an Exact Amount of Tokens
The asset conversion pallet enables users to exchange a specific quantity of one asset for another in a designated liquidity pool by swapping them for an exact amount of tokens. It guarantees the user will receive at least a predetermined minimum amount of the second asset. This function increases trading predictability and allows users to conduct asset exchanges with confidence that they are assured a minimum return.
To swap assets for an exact amount of tokens, follow these steps:
-
Navigate to the Extrinsics section on the Polkadot.js Apps interface:
- Select Developer from the top menu.
- Click on Extrinsics from the dropdown menu.
-
Select extrinsic to swap assets:
- Select the
AssetConversionpallet. - Choose the
swapExactTokensForTokensextrinsic from the list of available extrinsics.
- Select the
-
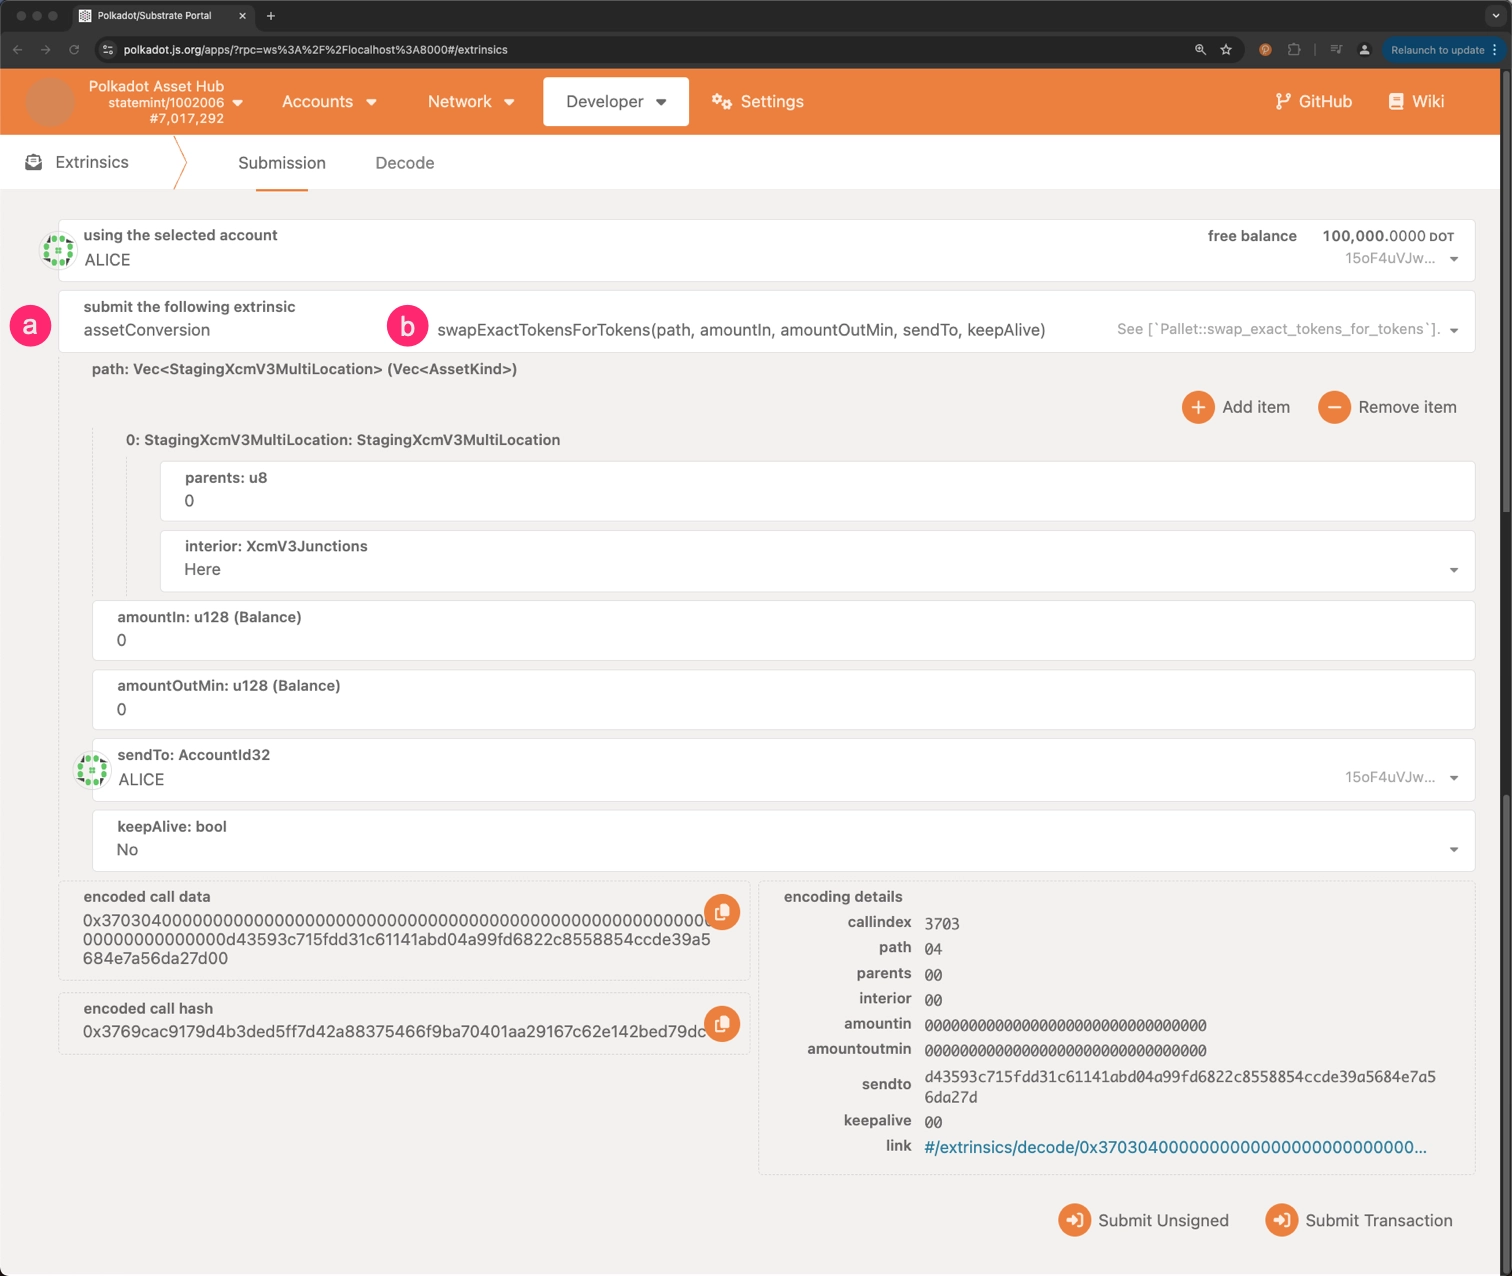
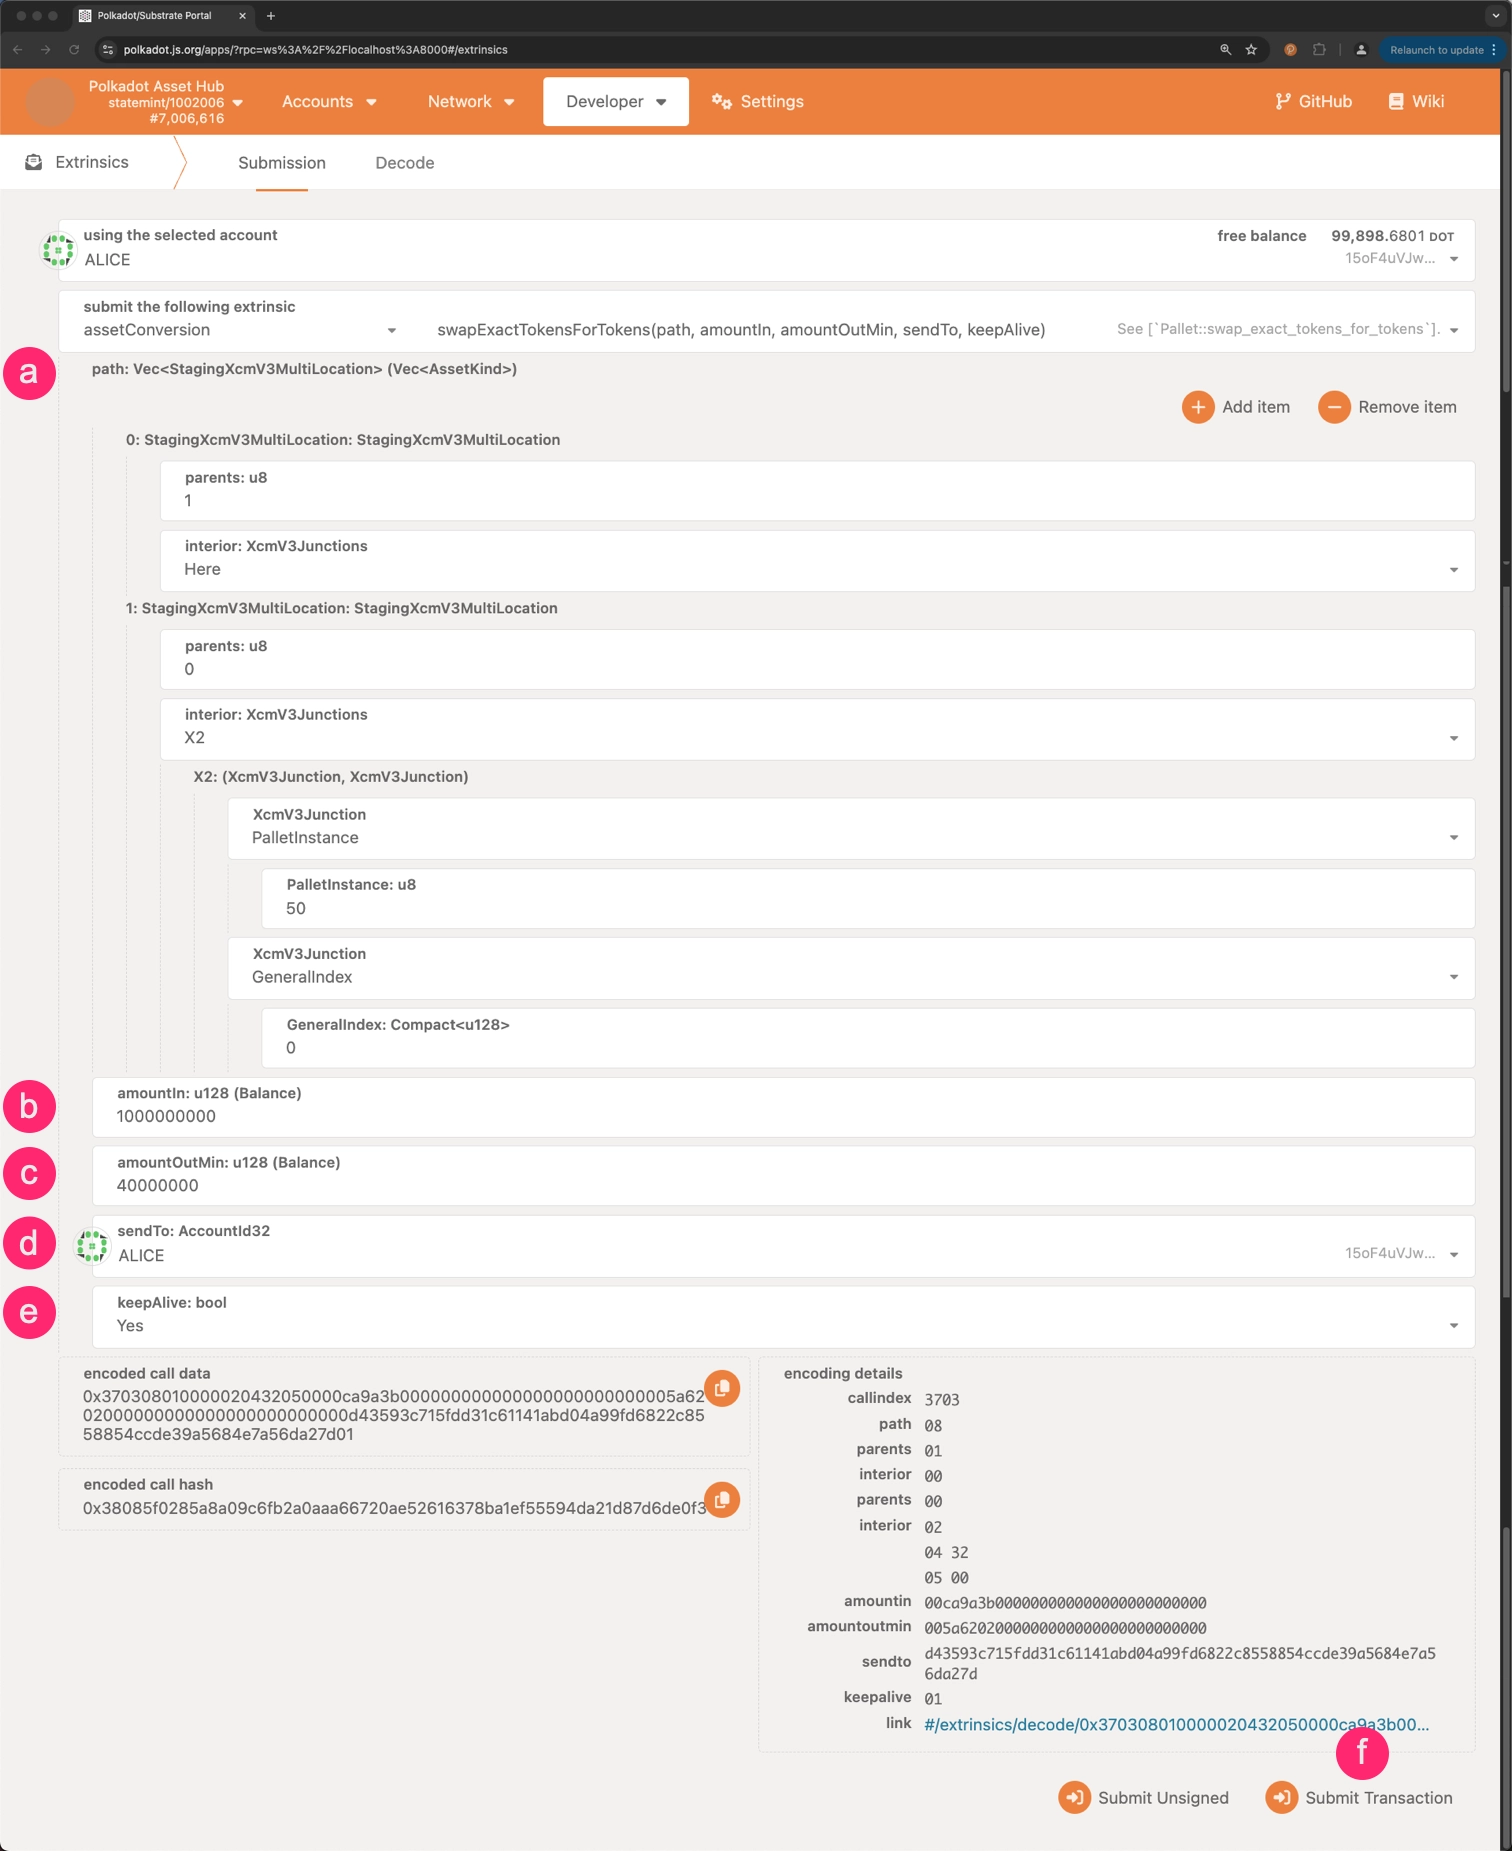
Fill in the required fields:
-
path: Vec<StagingXcmV3MultiLocation>: An array of Multilocations representing the path of the swap. The first and last elements of the array are the input and output assets, respectively. In this case, the path consists of two elements:-
0: StagingXcmV3MultiLocation: The Multilocation of the first asset in the pool. In this case, it is the DOT token, which the following Multilocation represents. -
1: StagingXcmV3MultiLocation: The second asset's Multilocation within the pool. This refers to the PPM token, which the following Multilocation identifies.
-
-
amountOut: The exact amount of the second asset that the user wants to receive. amountInMax: The maximum amount of the first asset that the user is willing to swap.sendTo: The account to which the swapped assets will be sent.keepAlive: A boolean value that determines whether the pool should be kept alive after the swap.- Click on Submit Transaction to swap assets for an exact amount of tokens.
Warning
Ensure that the appropriate amount of tokens provided has been minted previously and is available in your account before adding liquidity to the pool.
In this case, the intention is to swap 0.01 DOT token (u128 value of 100000000000 as it has 10 decimals) for 0.04 PPM token (u128 value of 400000000000 as it also has 10 decimals).
-
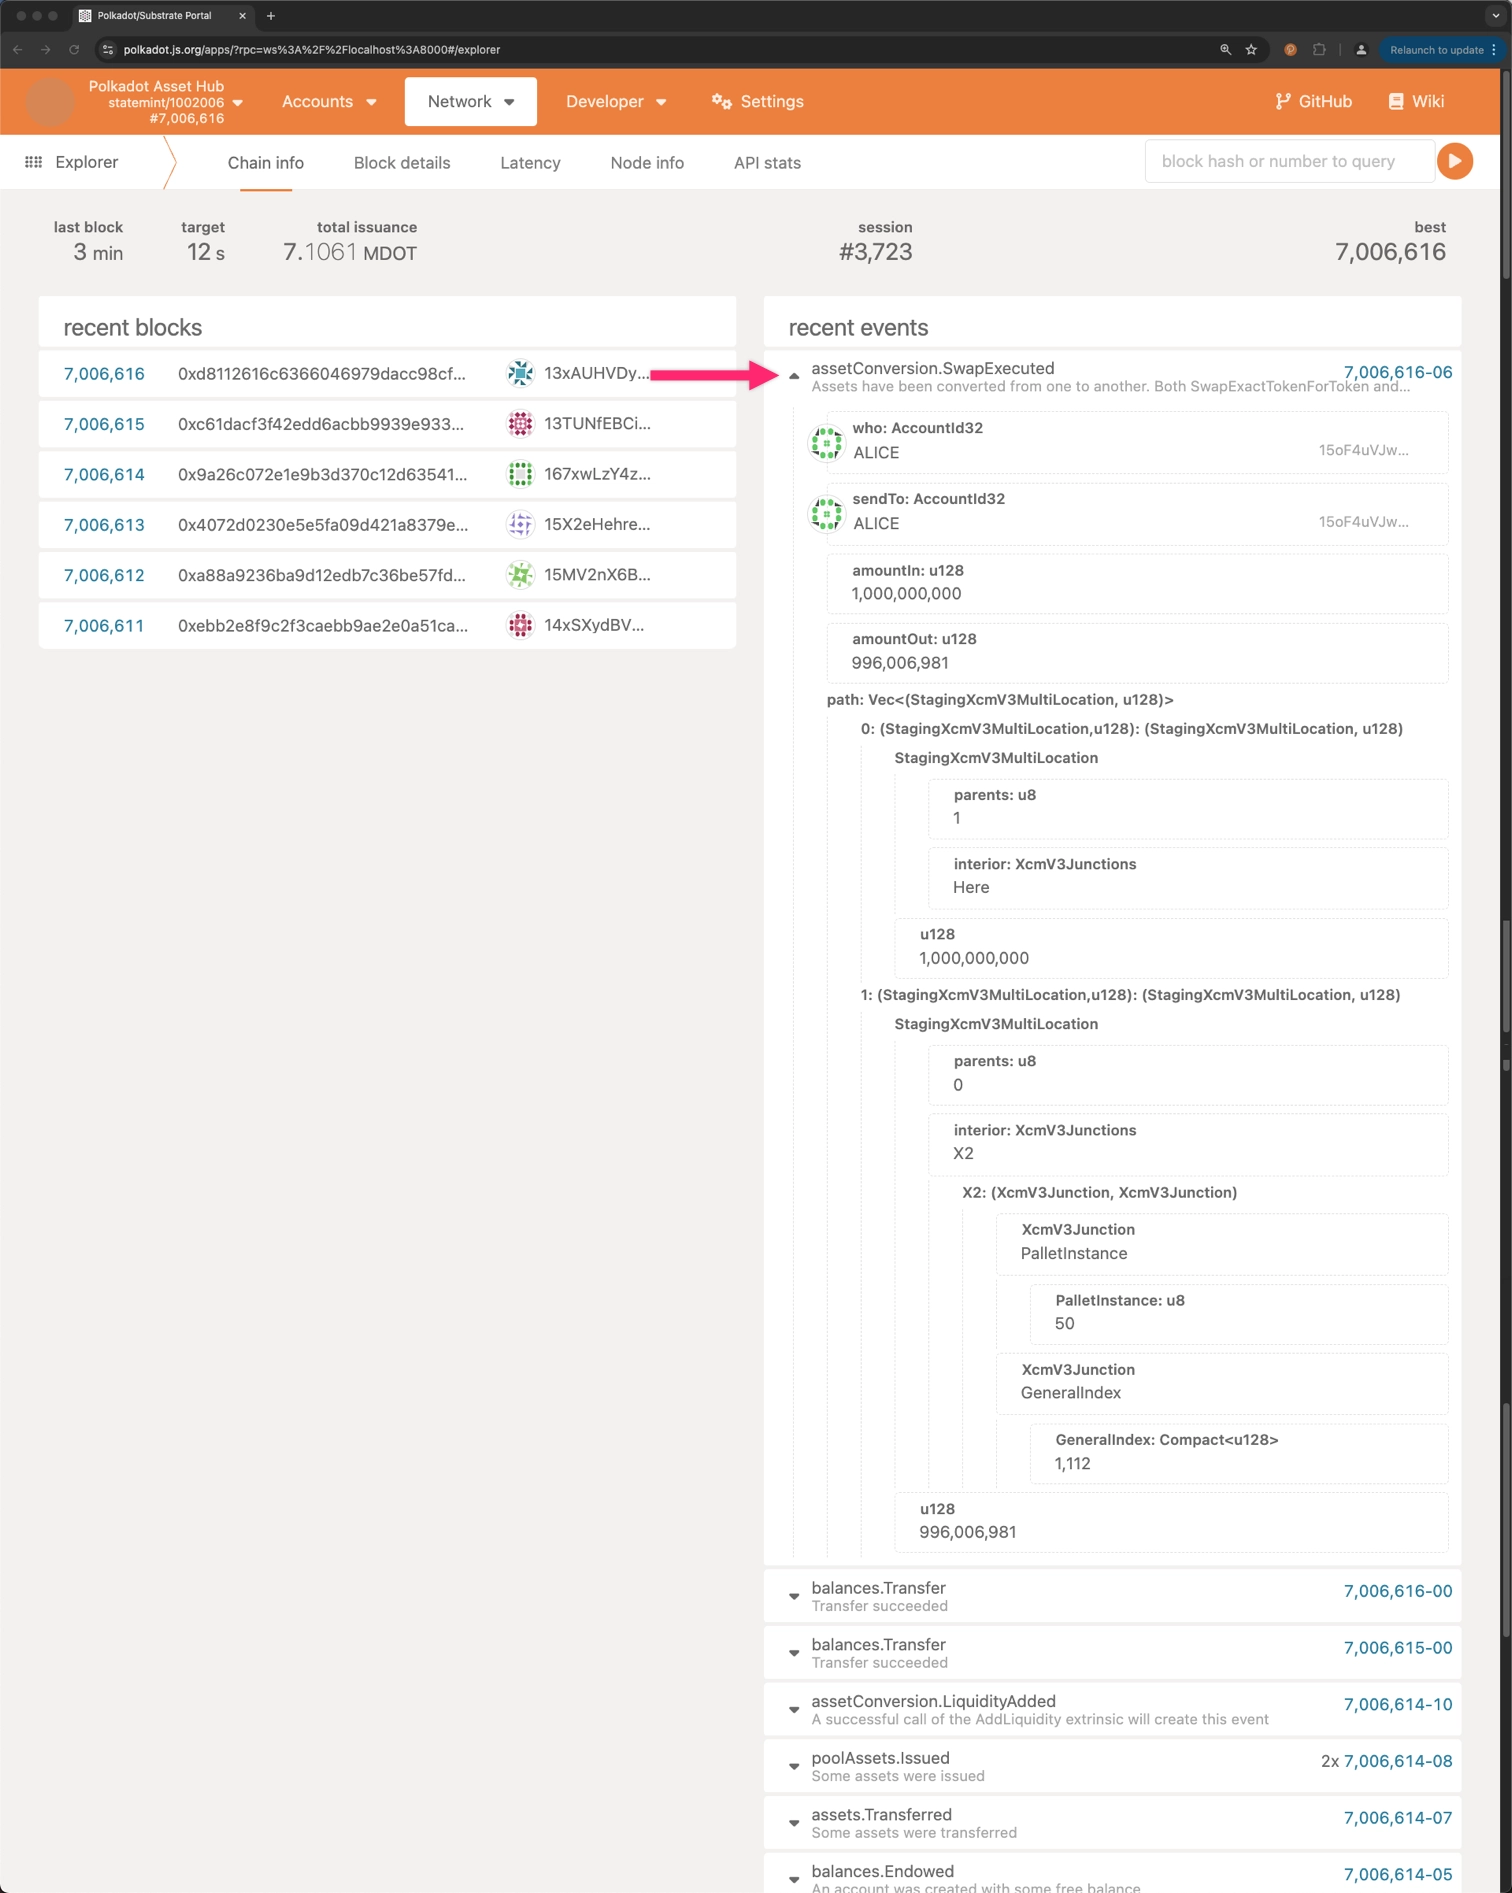
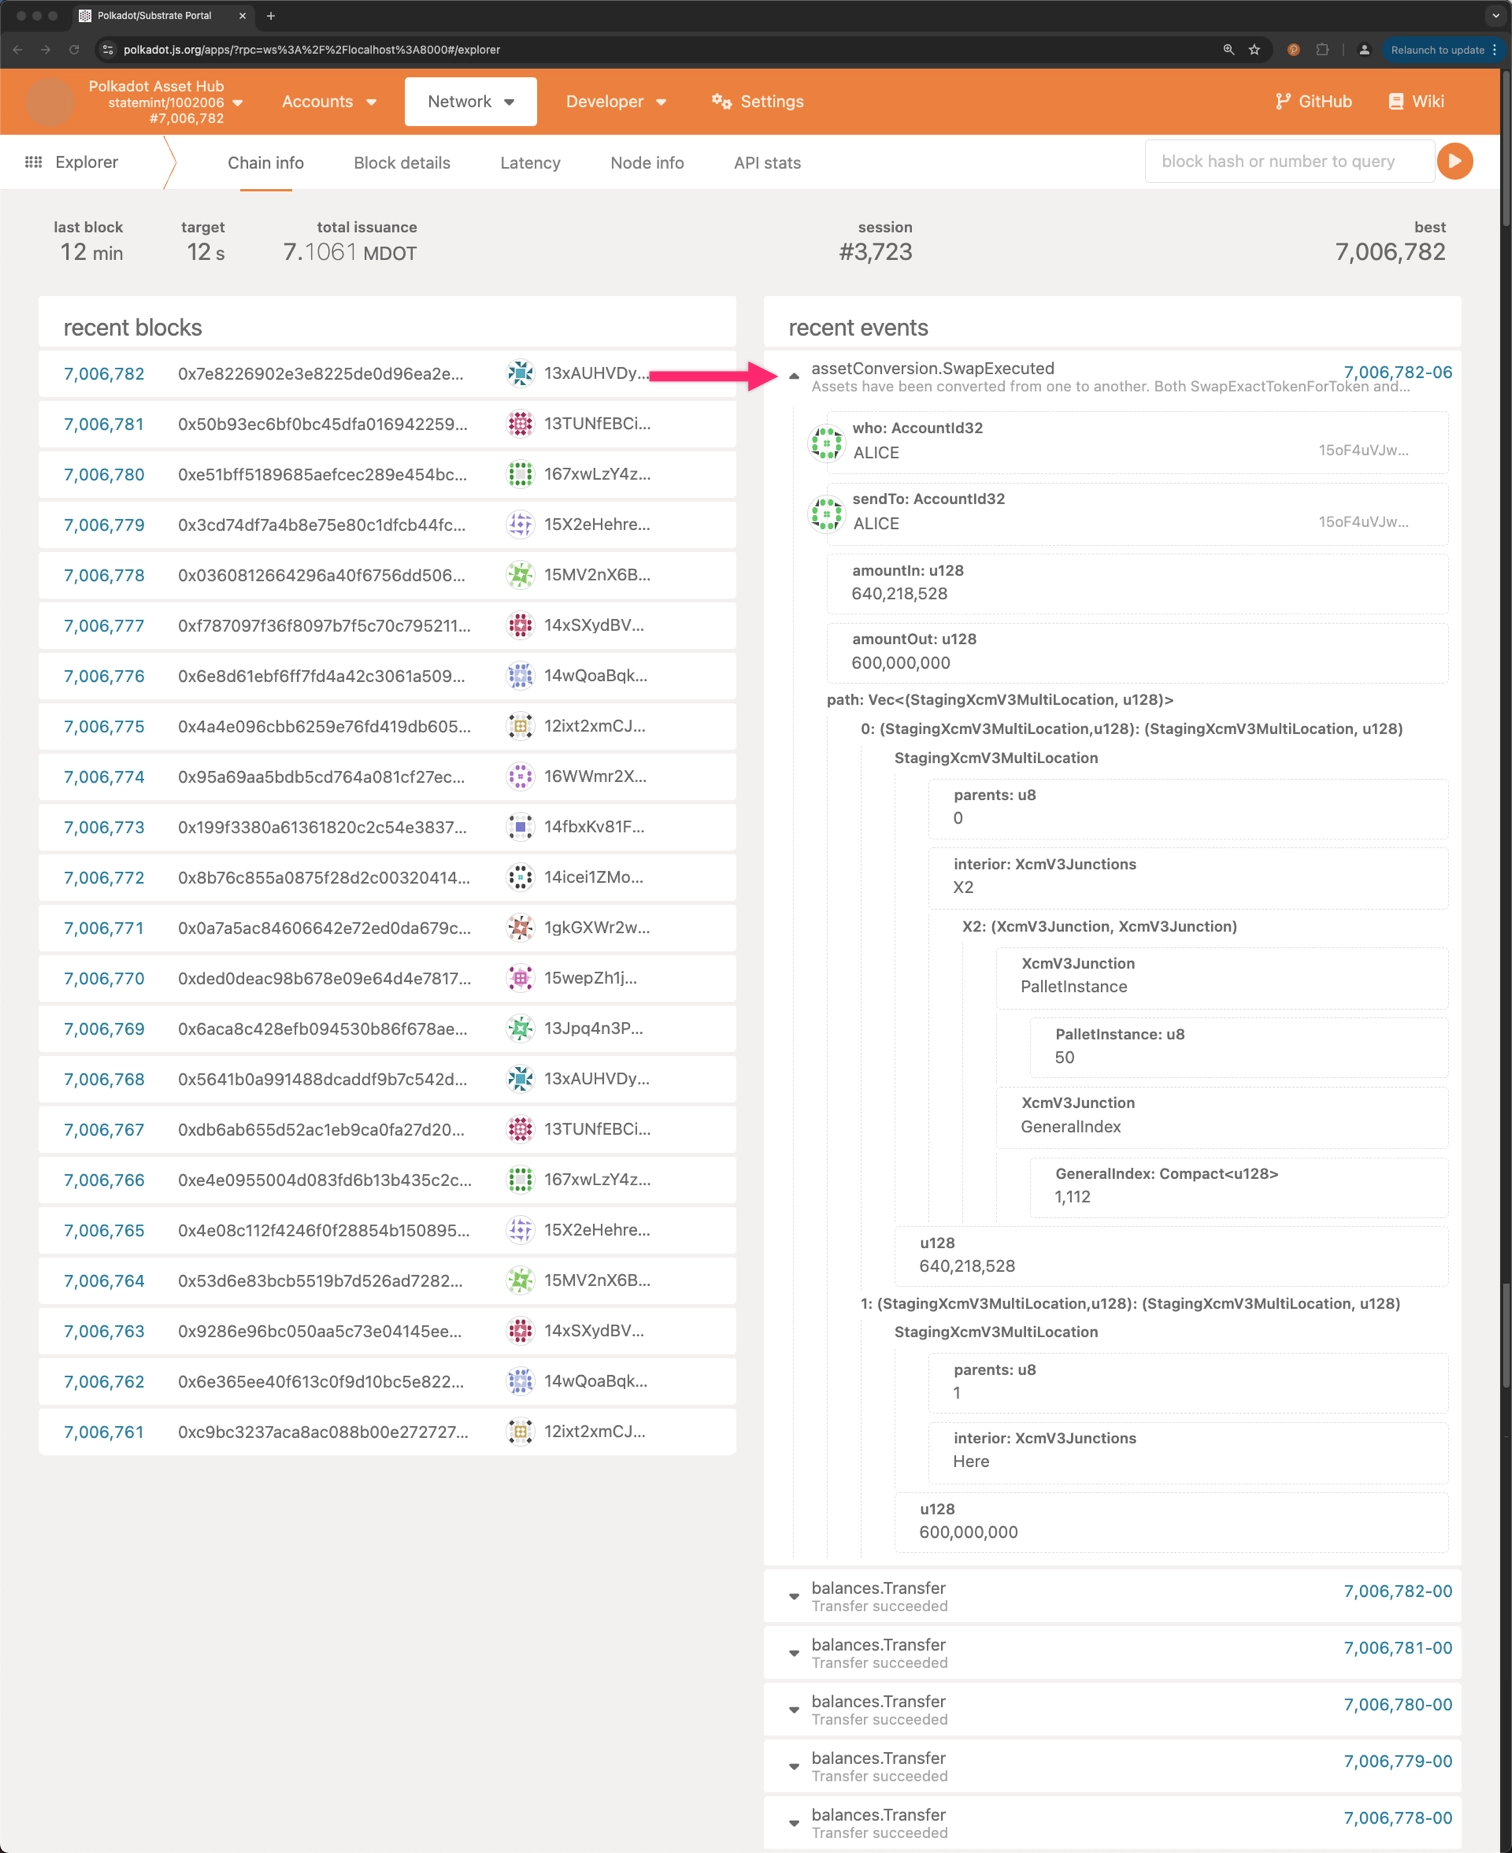
Signing and submitting the transaction will execute the swap. To verify execution, check the Explorer section on the Polkadot.js Apps interface and make sure that the SwapExecuted event was emitted.
Swap to an Exact Amount of Tokens
Conversely, the Asset Conversion pallet comes with a function that allows users to trade a variable amount of one asset to acquire a precise quantity of another. It ensures that users stay within a set maximum of the initial asset to obtain the desired amount of the second asset. This provides a method to control transaction costs while achieving the intended result.
To swap assets for an exact amount of tokens, follow these steps:
-
Navigate to the Extrinsics section on the Polkadot.js Apps interface:
- Select Developer from the top menu.
- Click on Extrinsics from the dropdown menu.
-
Select extrinsic to swap tokens:
- Select the
AssetConversionpallet. - Choose the
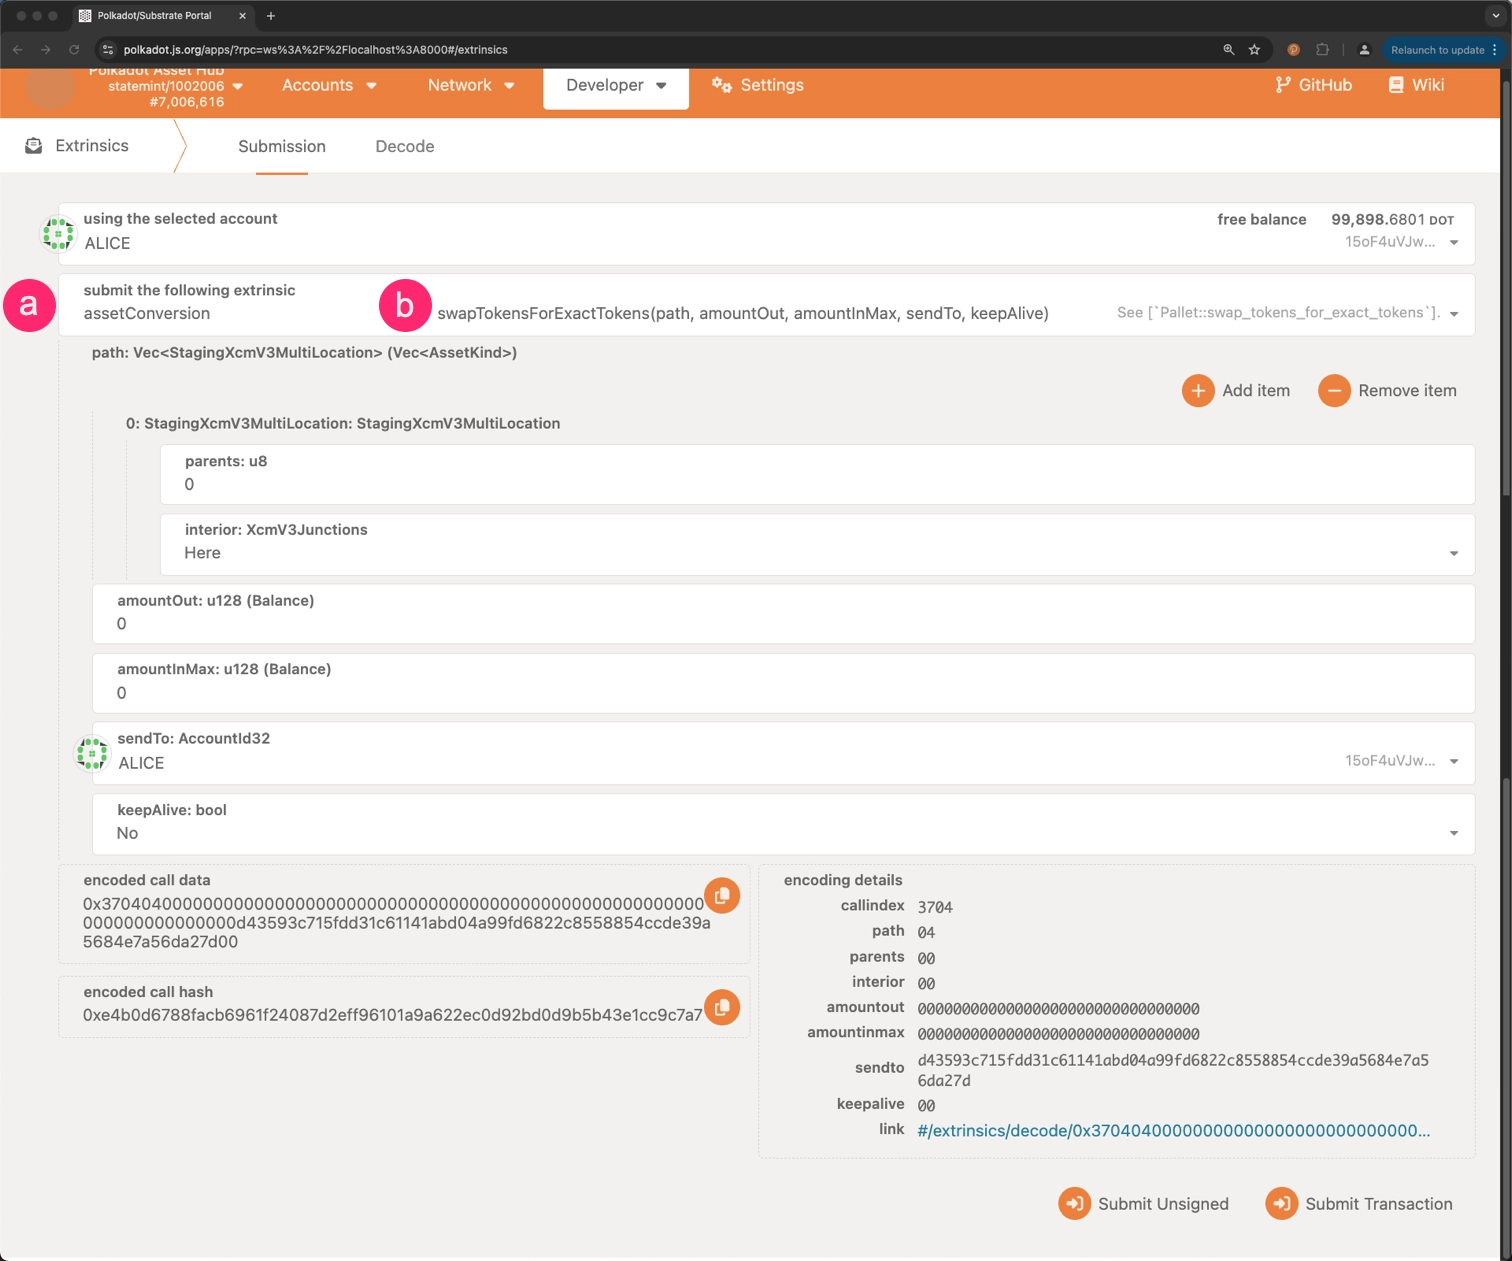
swapTokensForExactTokensextrinsic from the list of available extrinsics.
- Select the
-
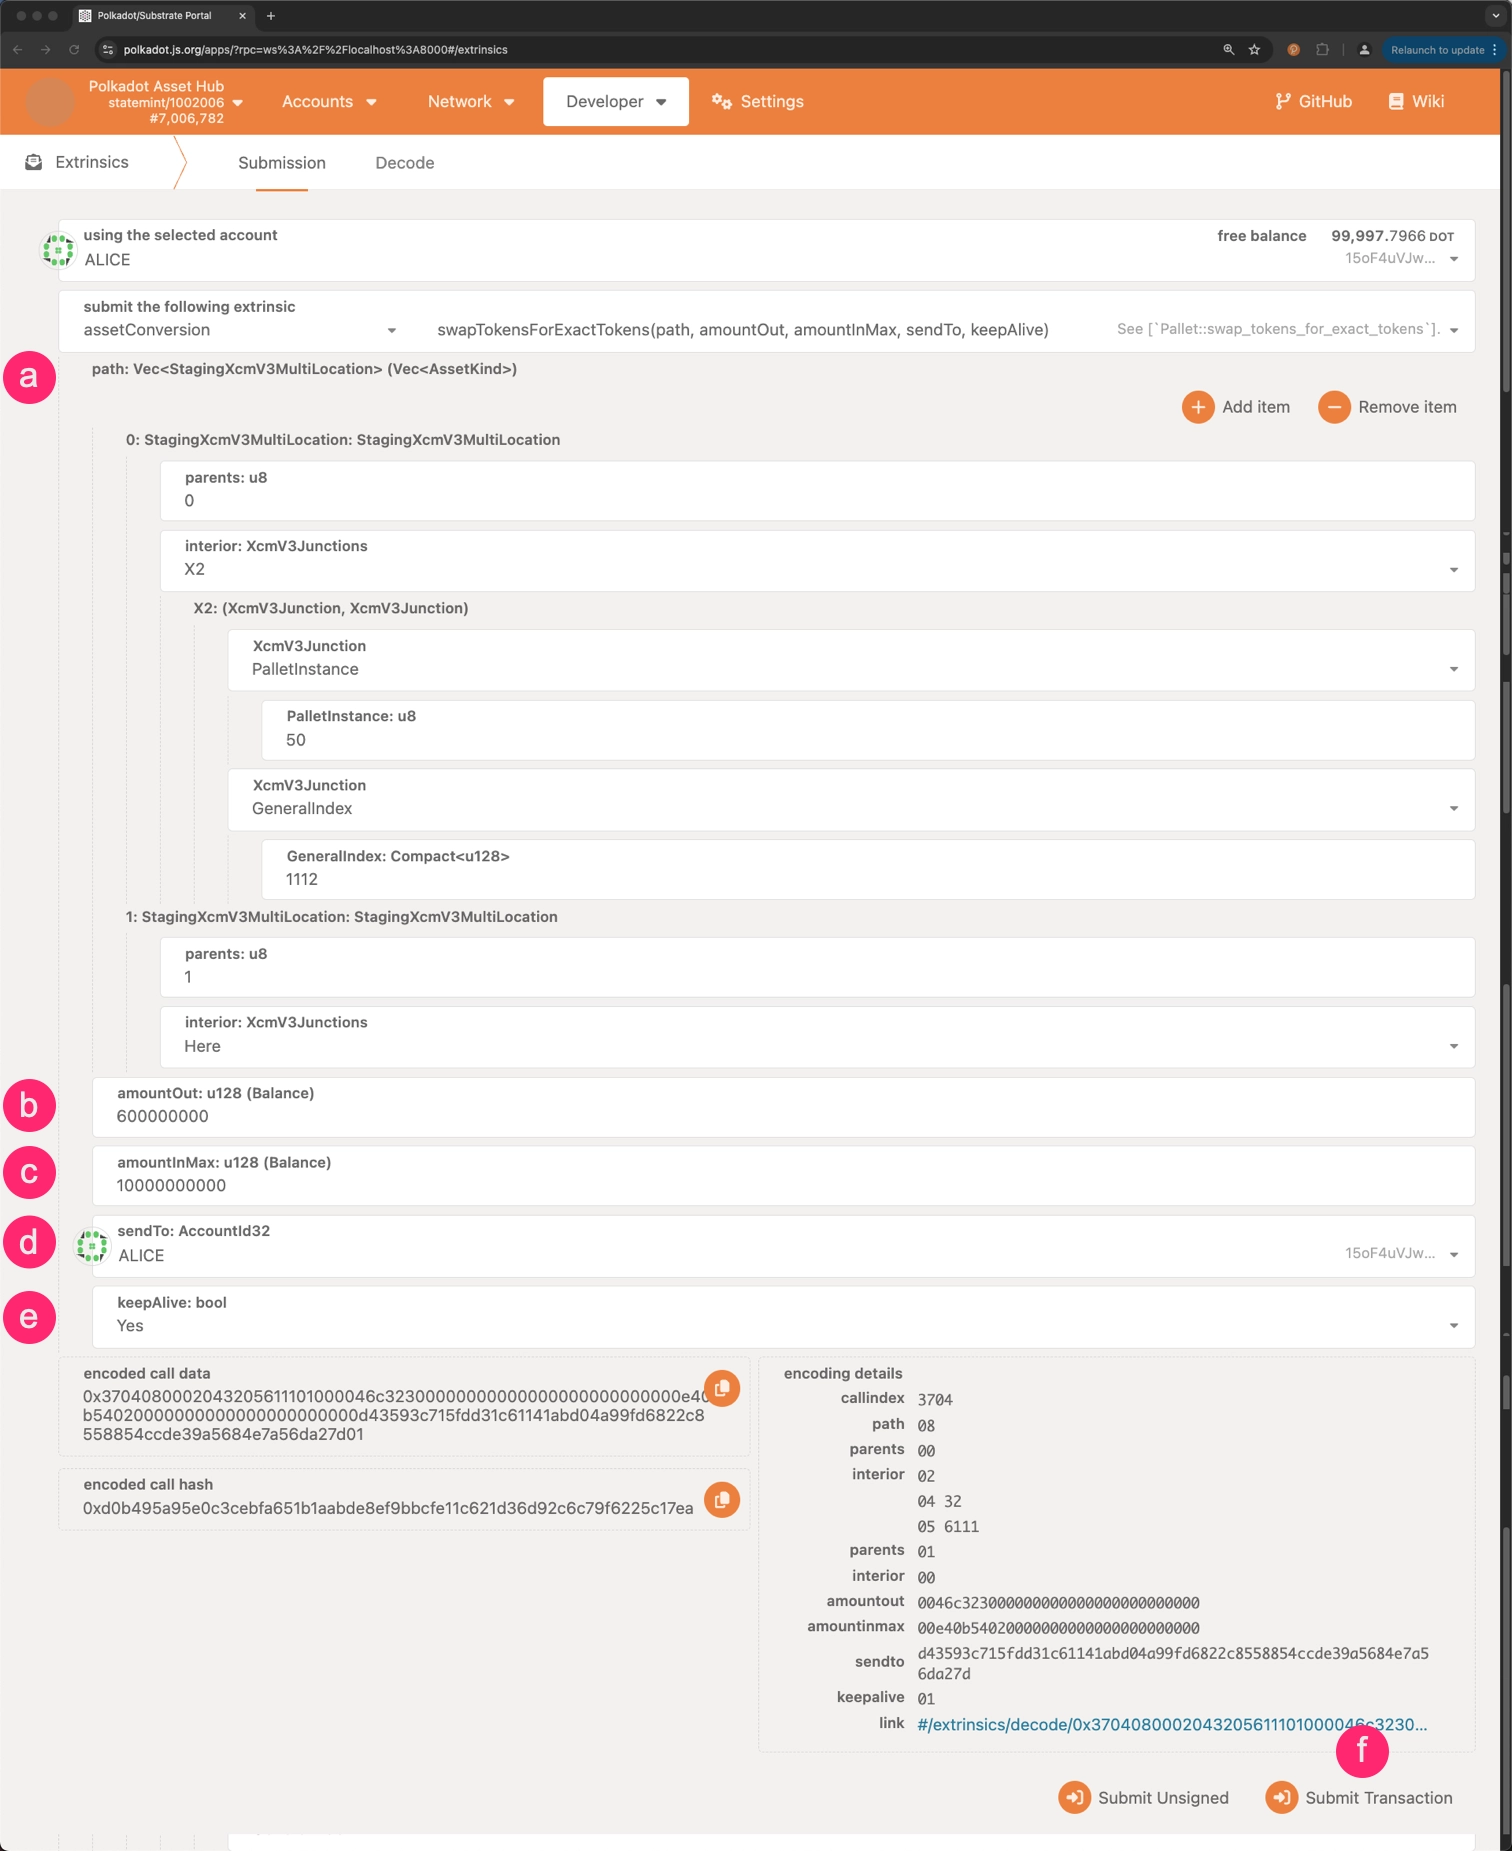
Fill in the required fields:
-
path: Vec<StagingXcmV3MultiLocation\>: An array of Multilocations representing the path of the swap. The first and last elements of the array are the input and output assets, respectively. In this case, the path consists of two elements:-
0: StagingXcmV3MultiLocation: The Multilocation of the first asset in the pool. In this case, it is the PPM token, which the following Multilocation represents. -
1: StagingXcmV3MultiLocation: The second asset's Multilocation within the pool. This refers to the DOT token, which the following Multilocation identifies.
-
-
amountOut: The exact amount of the second asset that the user wants to receive. amountInMax: The maximum amount of the first asset that the user is willing to swap.sendTo: The account to which the swapped assets will be sent.keepAlive: A boolean value that determines whether the pool should be kept alive after the swap.- Click on Submit Transaction to swap assets for an exact amount of tokens.
Warning
Before swapping assets, ensure that the tokens provided have been minted previously and are available in your account.
In this case, the intention is to swap 0.01 DOT token (
u128value of 100000000000 as it has ten decimals) for 0.04 PPM token (u128value of 400000000000 as it also has ten decimals). -
Signing and submitting the transaction will execute the swap. To verify execution, check the Explorer section on the Polkadot.js Apps interface and make sure that the SwapExecuted event was emitted.
Withdraw Liquidity from a Pool
The Asset Conversion pallet provides the removeLiquidity extrinsic to remove liquidity from a pool. This function allows users to withdraw the liquidity they offered from a pool, returning the original assets. When calling this function, users specify the number of liquidity tokens (representing their share in the pool) they wish to burn. They also set minimum acceptable amounts for the assets they expect to receive back. This mechanism ensures that users can control the minimum value they receive, protecting against unfavorable price movements during the withdrawal process.
To withdraw liquidity from a pool, follow these steps:
-
Navigate to the Extrinsics section on the Polkadot.js Apps interface:
- Select Developer from the top menu.
- Click on Extrinsics from the dropdown menu.
-
Select extrinsic to withdraw liqudity from a pool:
- Select the
AssetConversionpallet. - Choose the
removeLiquidityextrinsic from the list of available extrinsics.
- Select the
-
Fill in the required fields:
-
asset1: The Multilocation of the first asset in the pool. In this case, it is the DOT token, which the following Multilocation represents. -
asset2: The second asset's Multilocation within the pool. This refers to the PPM token, which the following Multilocation identifies. -
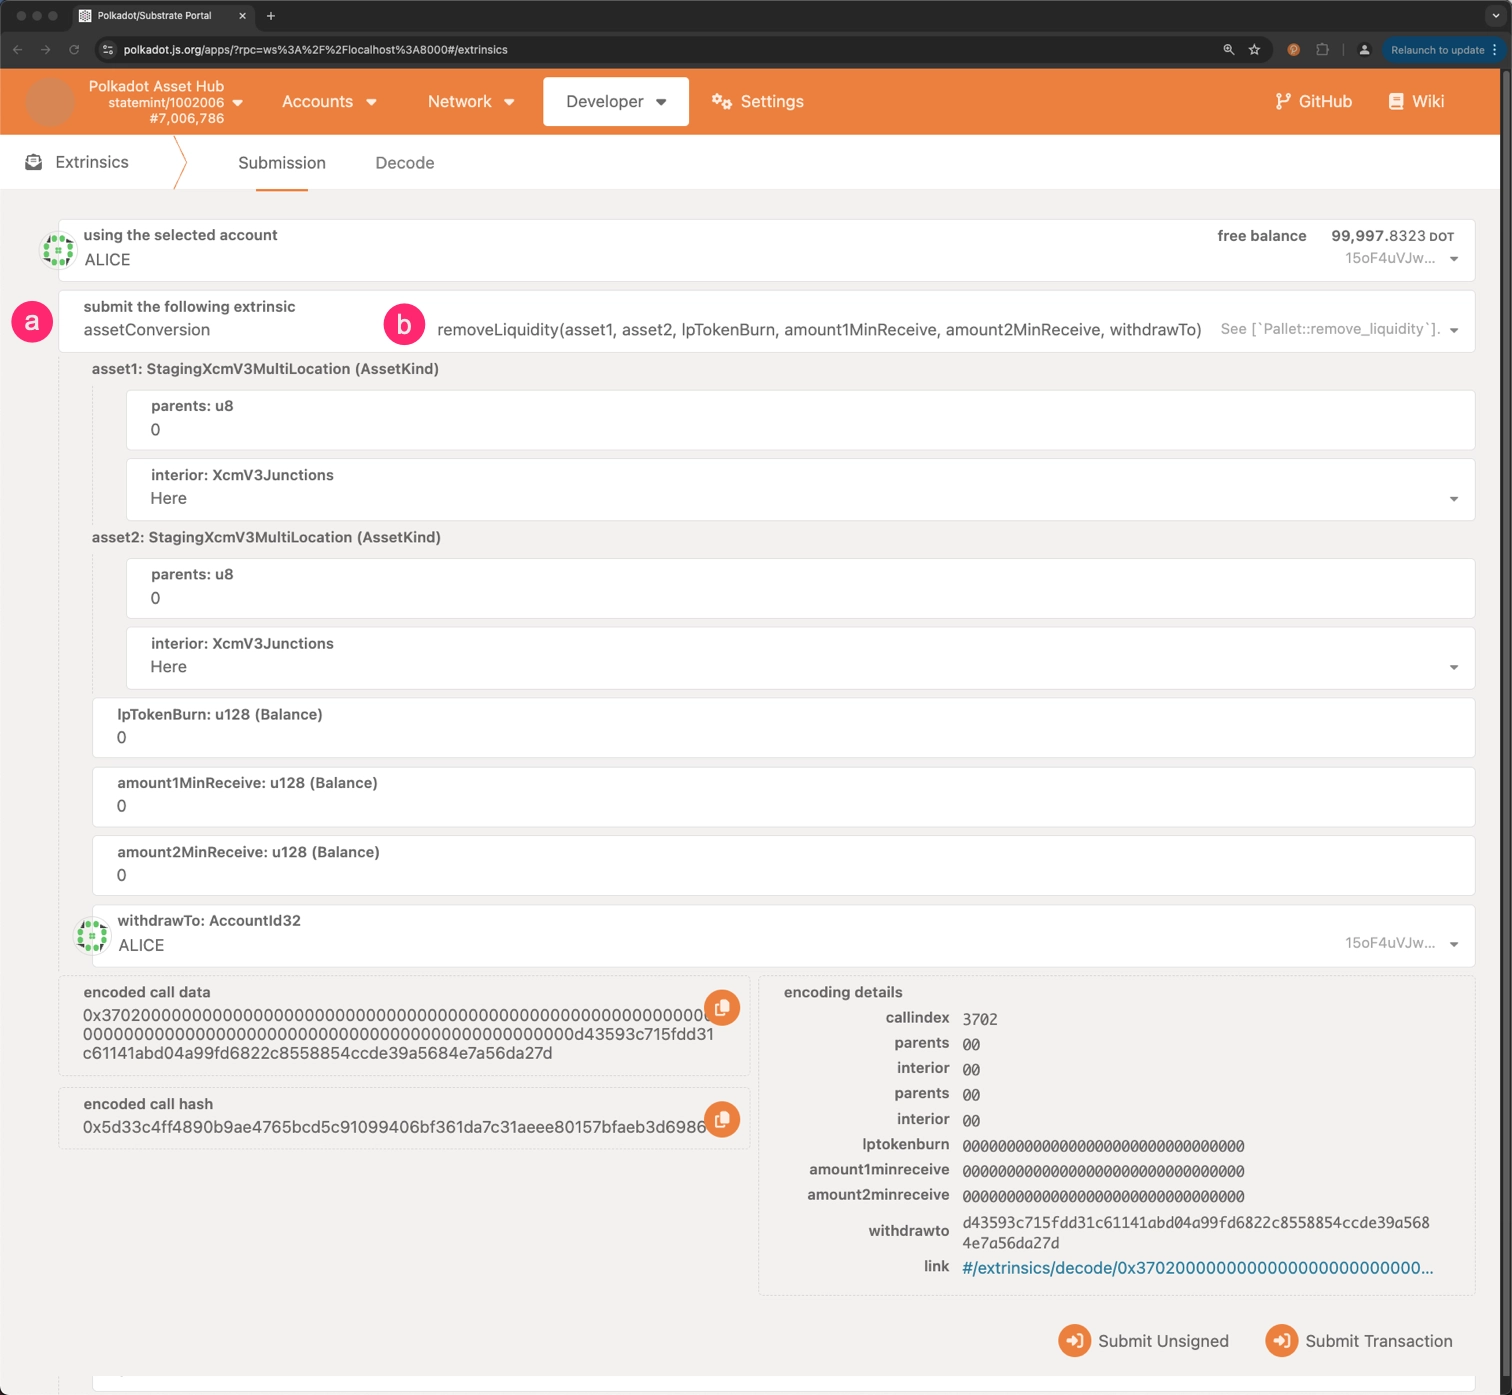
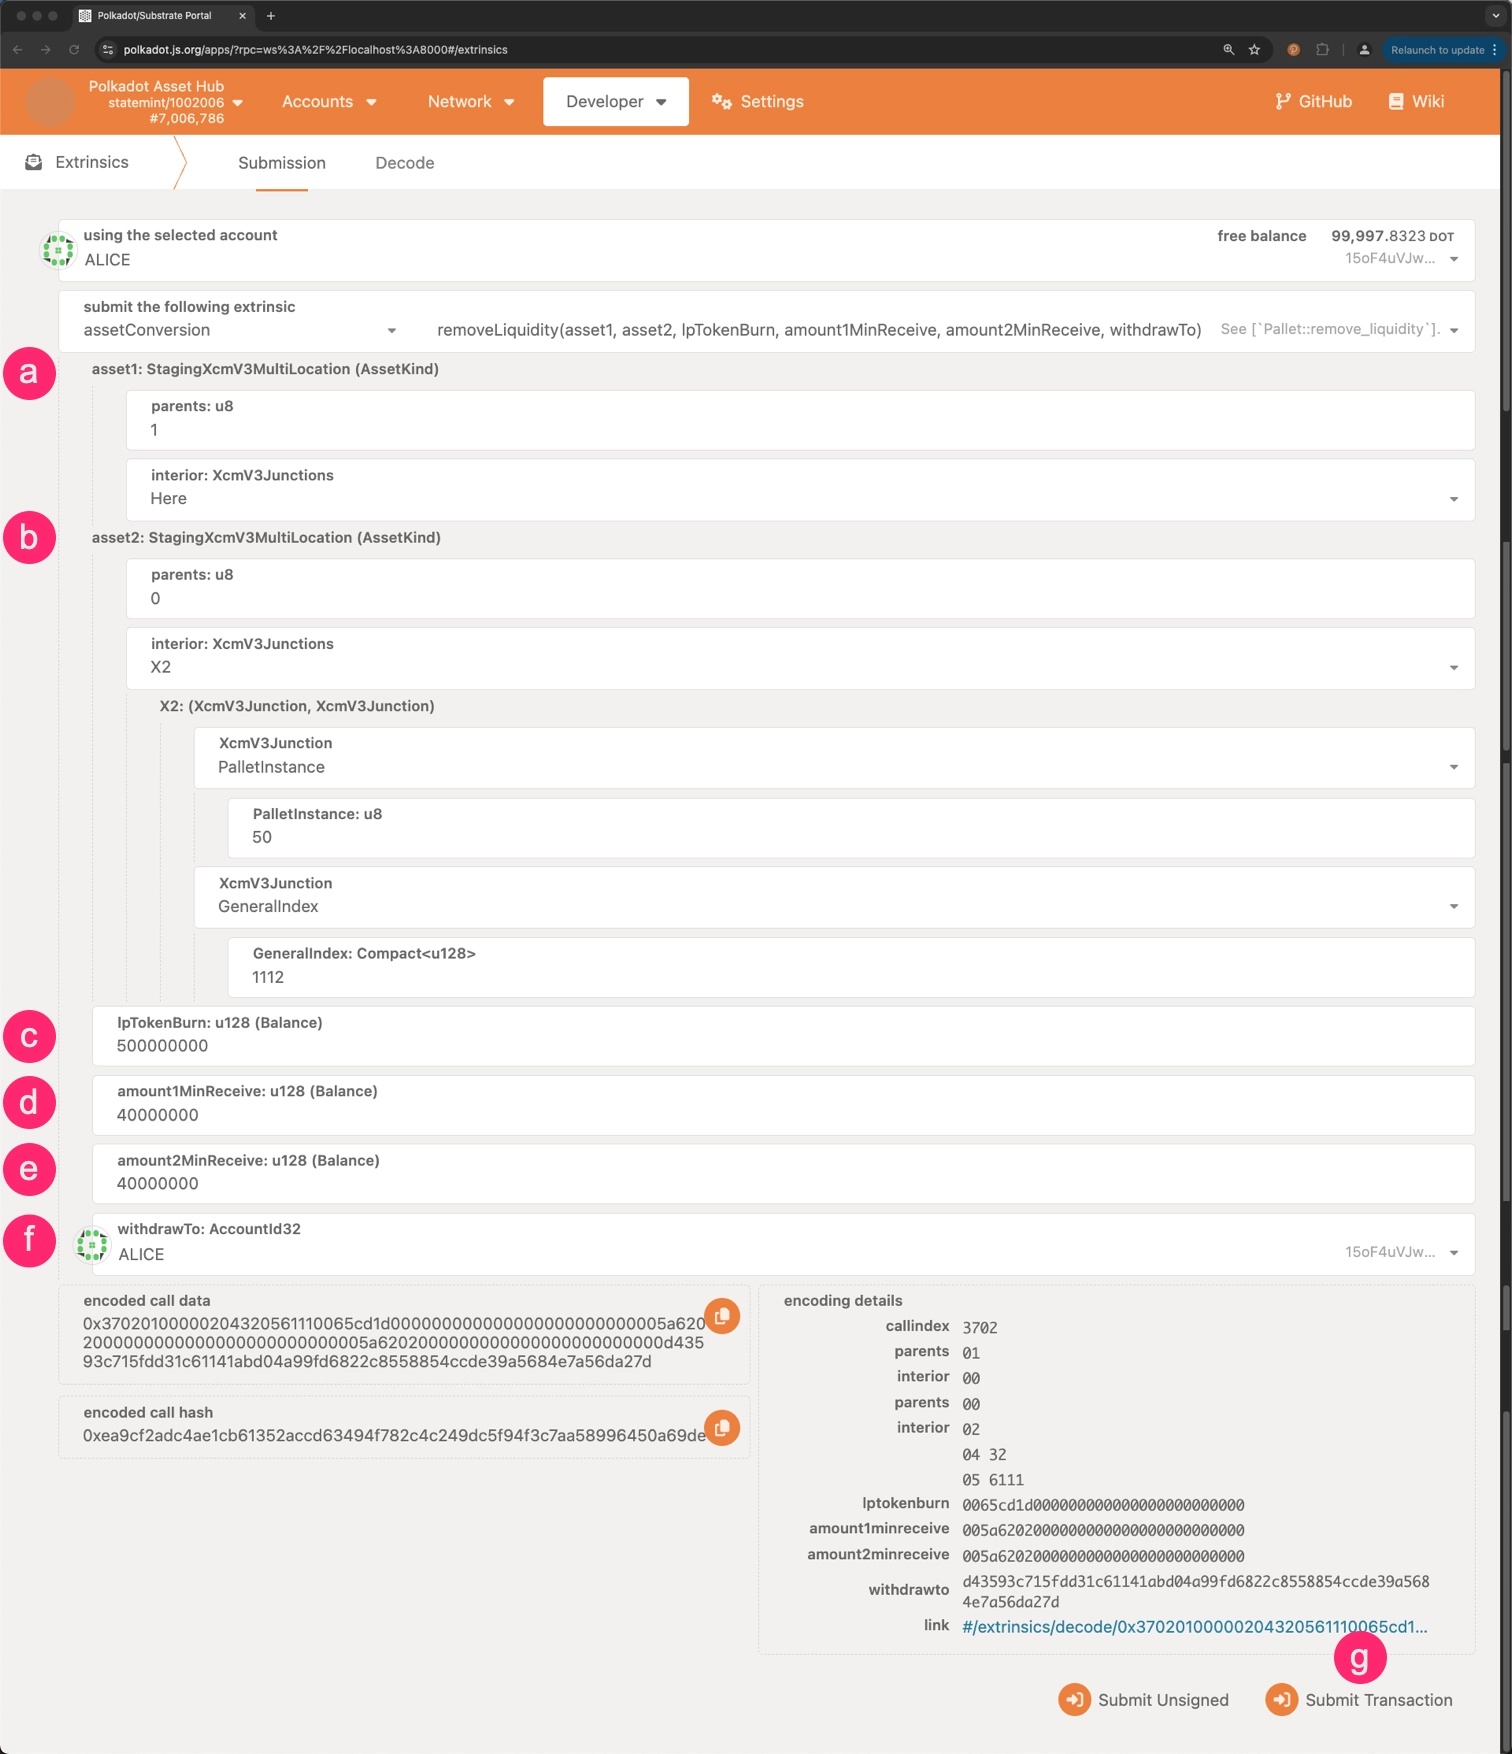
lpTokenBurn: The number of liquidity tokens to burn. amount1MinReceived: The minimum amount of the first asset that the user expects to receive.amount2MinReceived: The minimum quantity of the second asset the user expects to receive.withdrawTo: The account to which the withdrawn assets will be sent.- Click on Submit Transaction to withdraw liquidity from the pool.
Warning
Ensure that the tokens provided have been minted previously and are available in your account before withdrawing liquidity from the pool.
In this case, the intention is to withdraw 0.05 liquidity tokens from the pool, expecting to receive 0.004 DOT token (
u128value of 40000000000 as it has 10 decimals) and 0.04 PPM token (u128value of 400000000000 as it also has 10 decimals). -
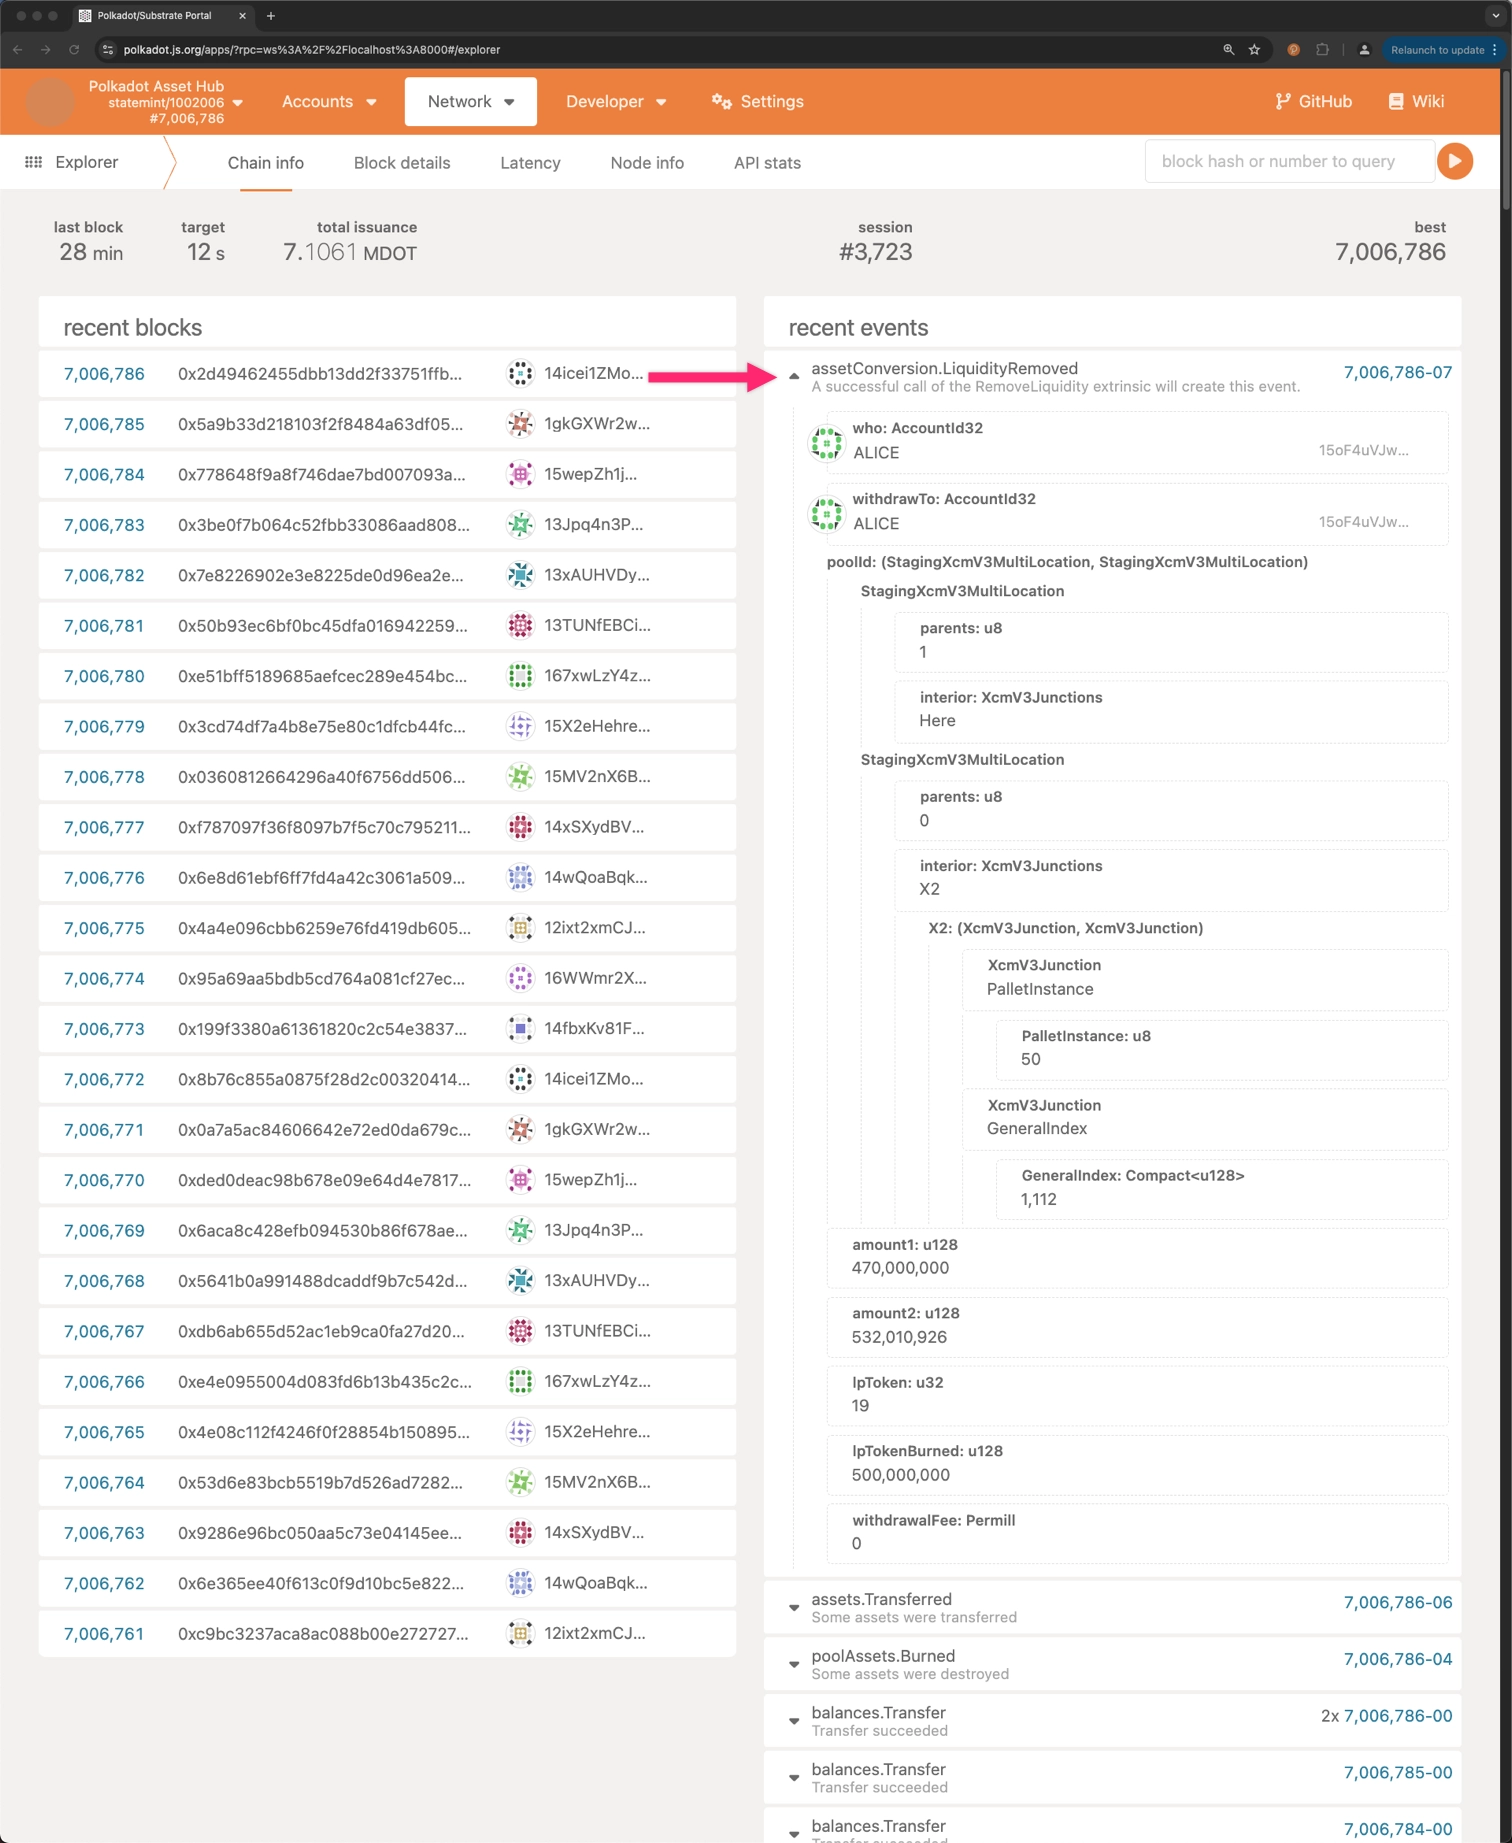
Signing and submitting the transaction will initiate the withdrawal of liquidity from the pool. To verify the withdrawal, check the Explorer section on the Polkadot.js Apps interface and ensure that the LiquidityRemoved event was emitted.
Test Environment Setup
To test the Asset Conversion pallet, you can set up a local test environment to simulate different scenarios. This guide uses Chopsticks to spin up an instance of Polkadot Asset Hub. For further details on using Chopsticks, please refer to the Chopsticks documentation.
To set up a local test environment, execute the following command:
npx @acala-network/chopsticks \
--config=https://raw.githubusercontent.com/AcalaNetwork/chopsticks/master/configs/polkadot-asset-hub.yml
This command initiates a lazy fork of Polkadot Asset Hub, including the most recent block information from the network. For Kusama Asset Hub testing, simply switch out polkadot-asset-hub.yml with kusama-asset-hub.yml in the command.
You now have a local Asset Hub instance up and running, ready for you to test various asset conversion procedures. The process here mirrors what you'd do on MainNet. After completing a transaction on TestNet, you can apply the same steps to convert assets on MainNet.
| Created: November 18, 2024
