Unlock a Parachain
Introduction
Parachain locks are a critical security mechanism in the Polkadot ecosystem designed to maintain decentralization during the parachain lifecycle. These locks prevent potential centralization risks that could emerge during the early stages of parachain operation.
The locking system follows strict, well-defined conditions that distribute control across multiple authorities:
- Relay chain governance has the authority to lock any parachain.
- A parachain can lock its own lock.
- Parachain managers have permission to lock the parachain.
- Parachains are locked automatically when they successfully produce their first block.
Similarly, unlocking a parachain follows controlled procedures:
- Relay chain governance retains the authority to unlock any parachain.
- A parachain can unlock its own lock.
This document guides you through checking a parachain's lock status and safely executing the unlock procedure from a parachain using XCM (Cross-Consensus Messaging).
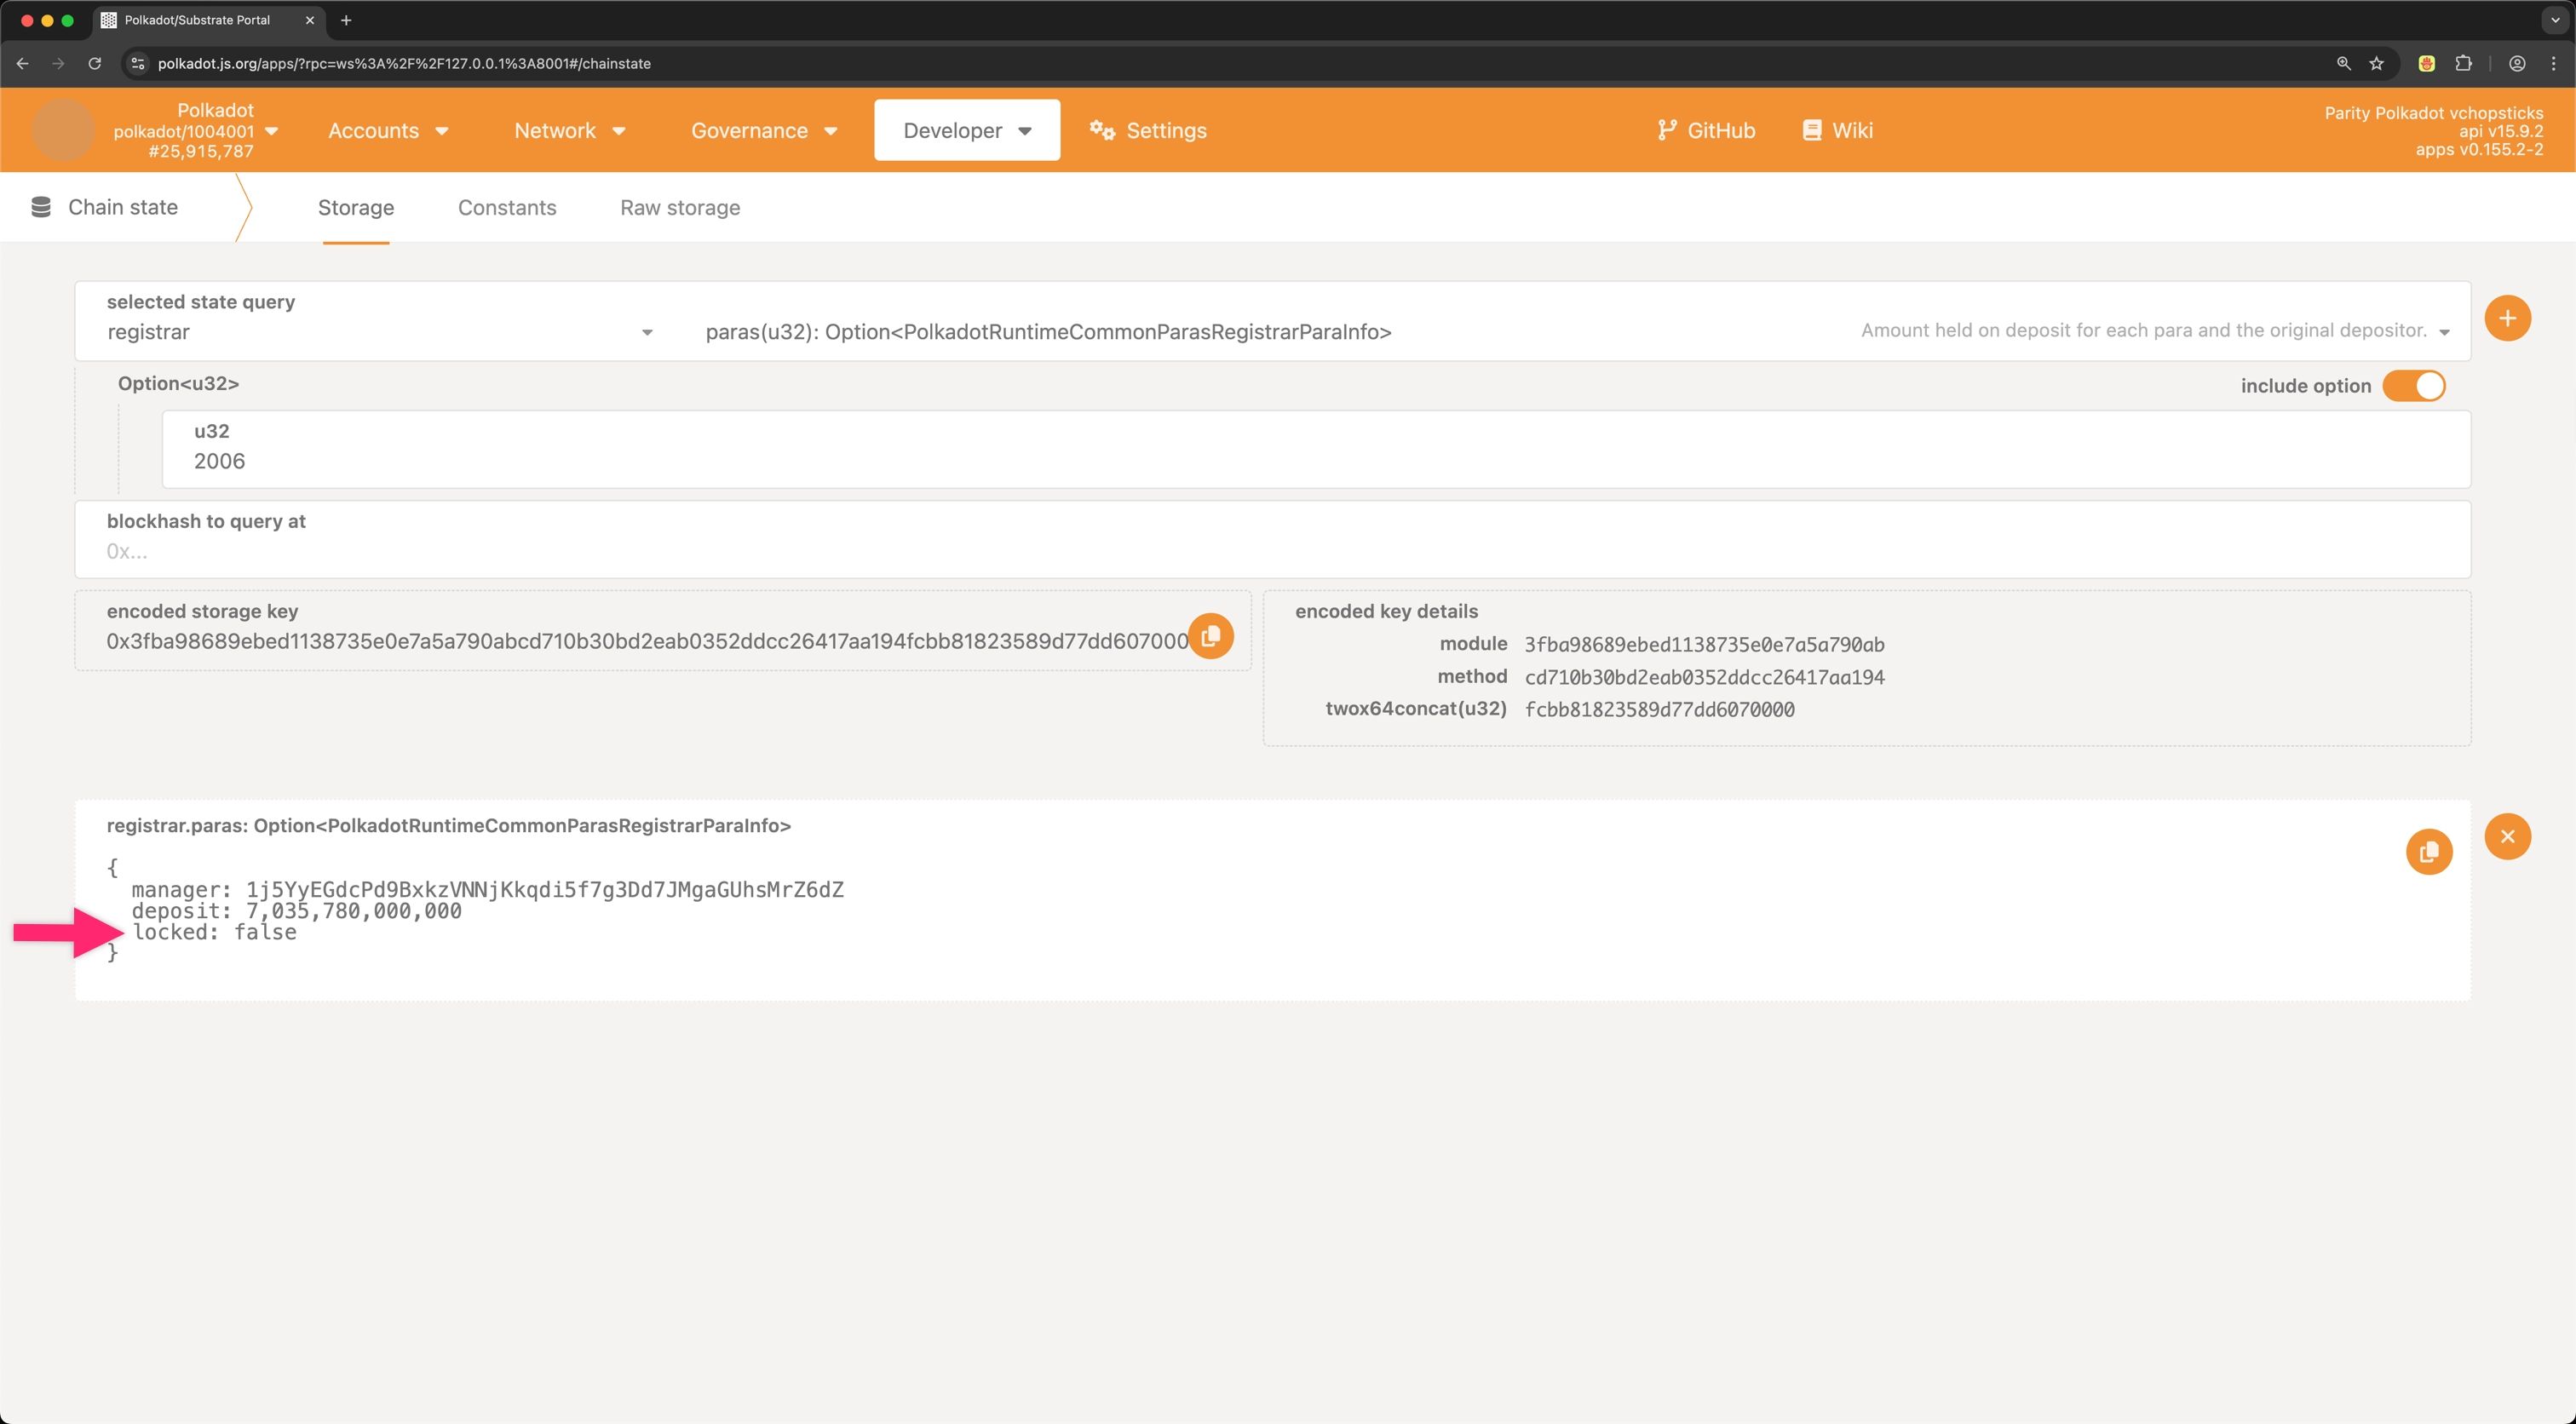
Check If the Parachain Is Locked
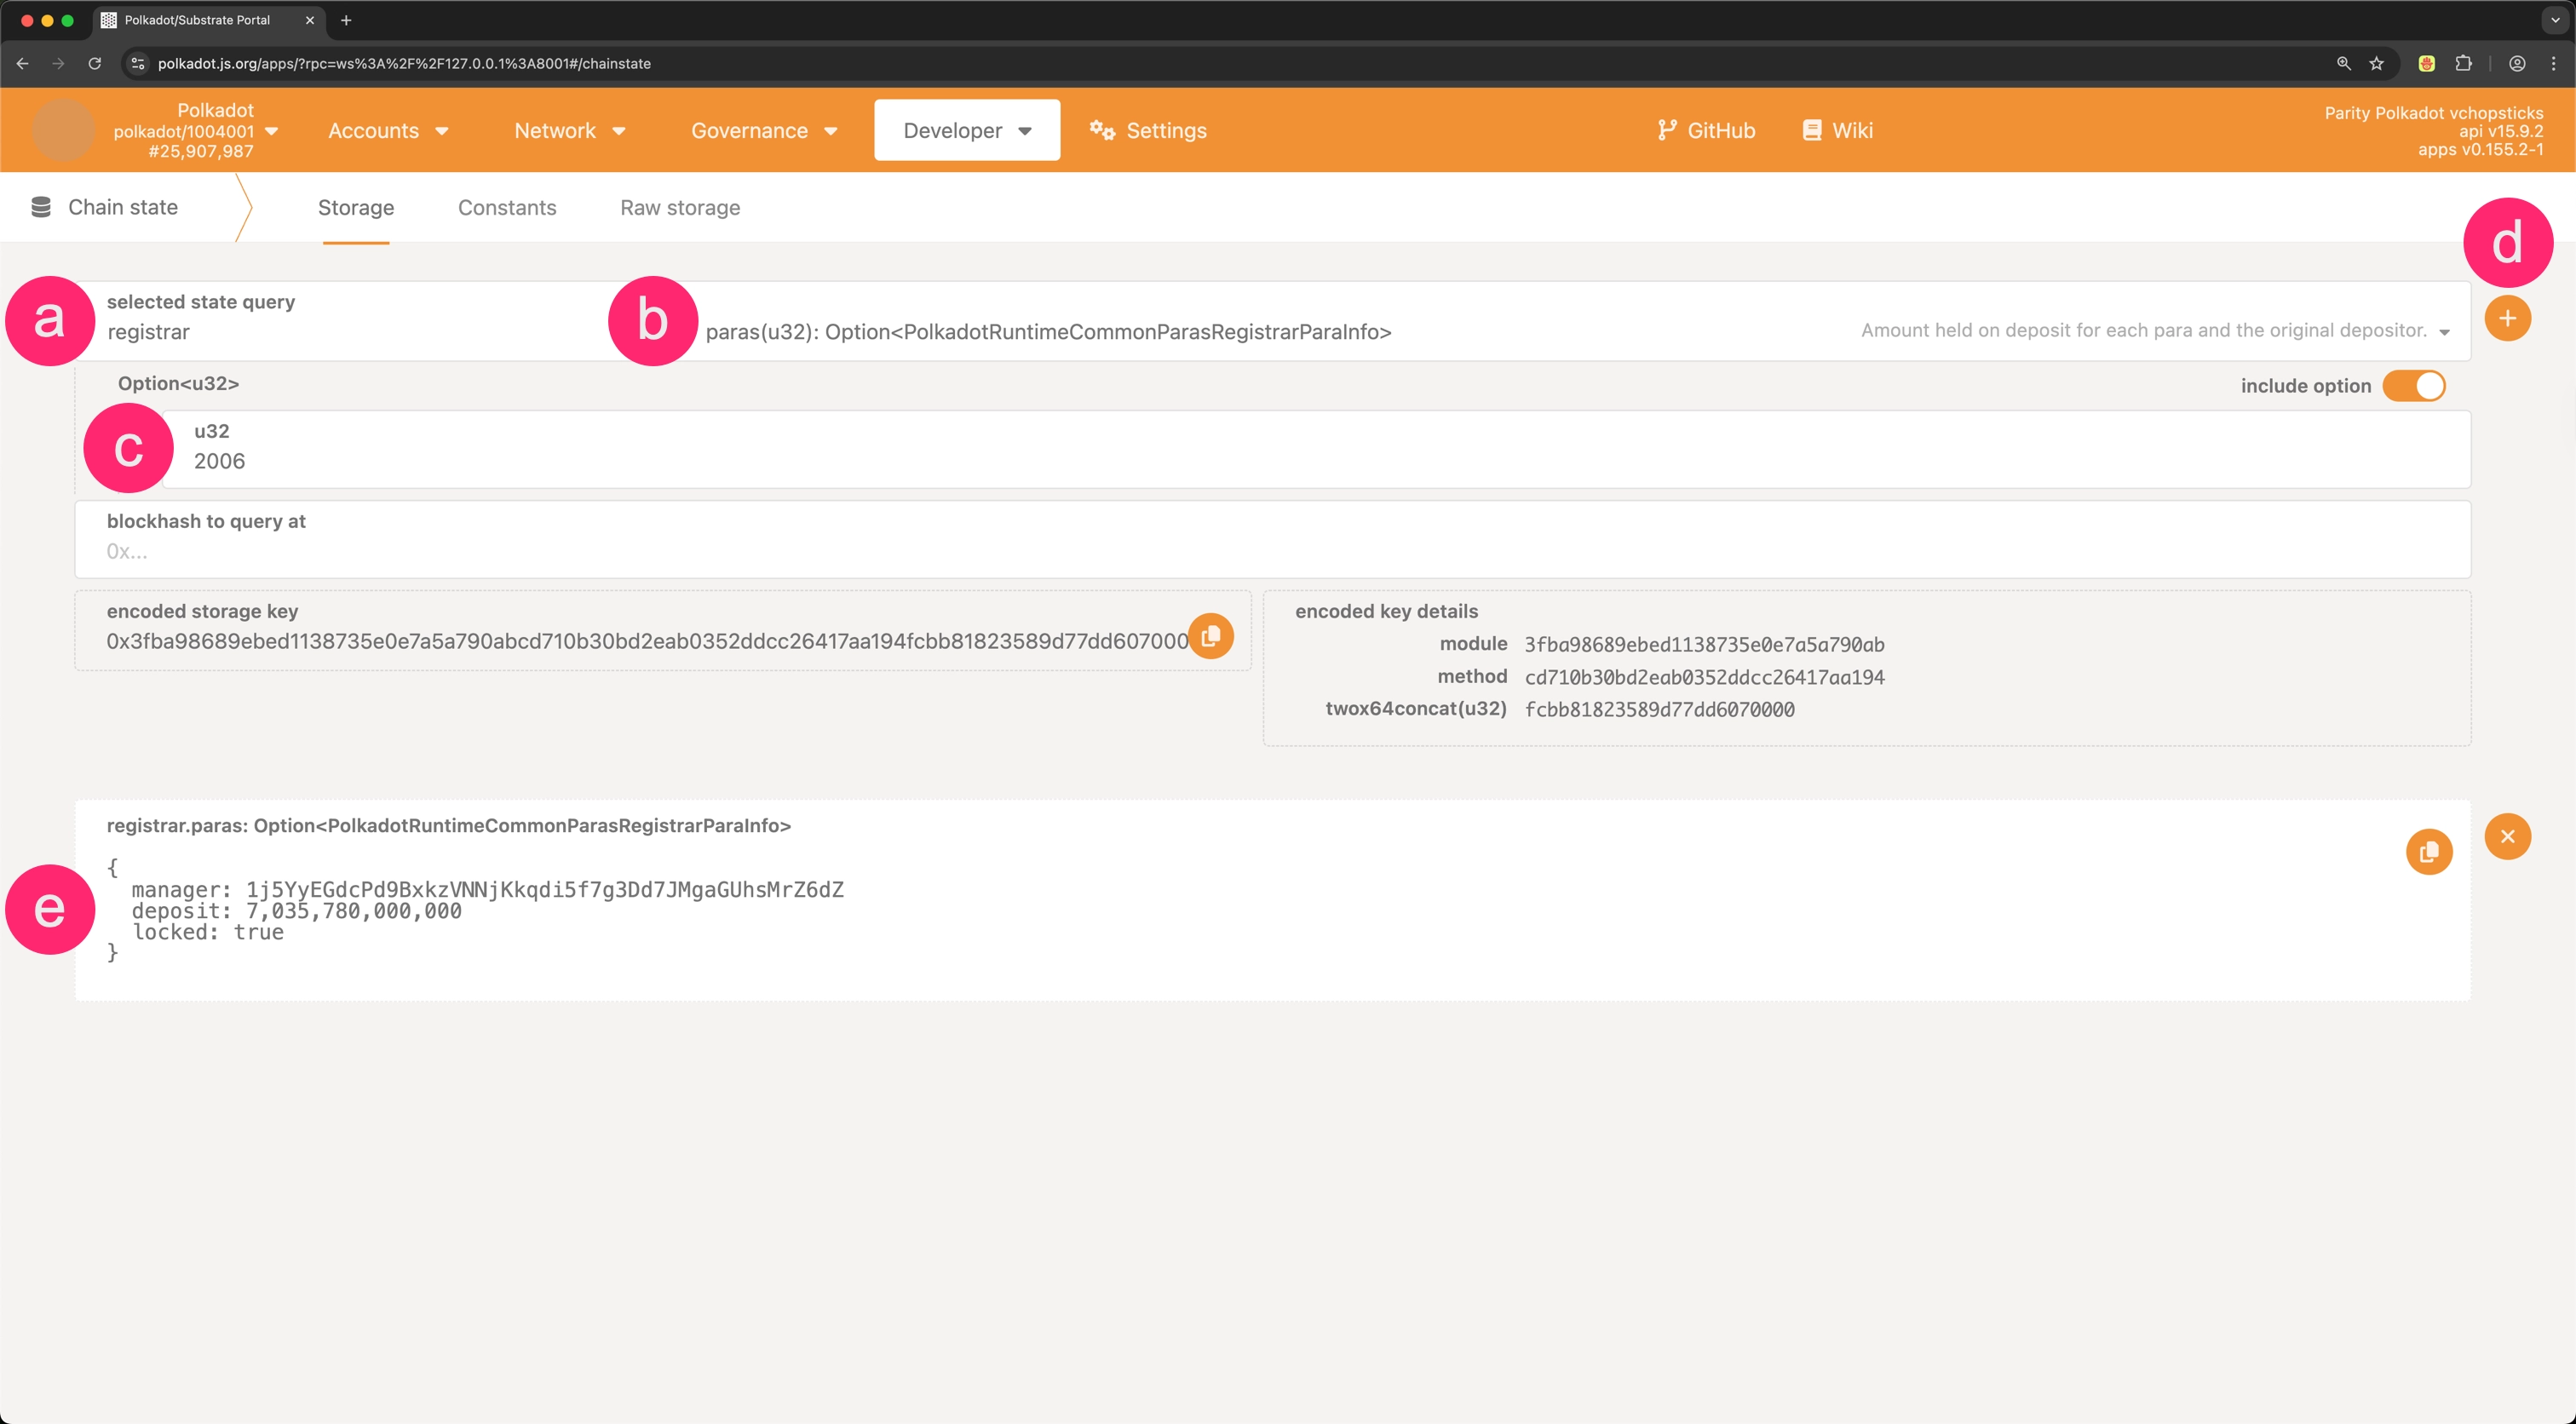
Before unlocking a parachain, you should verify its current lock status. This can be done through the Polkadot.js interface:
-
In Polkadot.js Apps, connect to the relay chain, navigate to the Developer dropdown and select the Chain State option.
-
Query the parachain locked status:
- Select
registrar. - Choose the
parasoption. - Input the parachain ID you want to check as a parameter (e.g.
2006). - Click the + button to execute the query.
- Check the status of the parachain lock.
manager: The account that has placed a deposit for registering this parachain.deposit: The amount reserved by themanageraccount for the registration.locked: Whether the parachain registration should be locked from being controlled by the manager.
- Select
How to Unlock a Parachain
Unlocking a parachain requires sending an XCM (Cross-Consensus Message) to the relay chain from the parachain itself, sending a message with Root origin, or this can be accomplished through the relay chain's governance mechanism, executing a root call.
If sending an XCM, the parachain origin must have proper authorization, typically from either the parachain's sudo pallet (if enabled) or its governance system.
This guide demonstrates the unlocking process using a parachain with the sudo pallet. For parachains using governance-based authorization instead, the process will require adjustments to how the XCM is sent.
Prepare the Unlock Call
Before sending the XCM, you need to construct the relay chain call that will be executed. Follow these steps to prepare the registrar.removeLock extrinsic:
-
In Polkadot.js Apps, connect to the relay chain, navigate to the Developer dropdown and select the Extrinsics option.
-
Build the
registrar.removeLockextrinsic:- Select the registrar pallet.
- Choose the removeLock extrinsic.
- Fill in the parachain ID parameter (e.g.,
2006). - Copy the encoded call data.

To ensure your encoded call data is correct, check this example of a decoded
removeLockcall for parachain 2006. Your encoded data should follow the same pattern. -
Determine the transaction weight required for executing the call. You can estimate this by executing the
transactionPaymentCallApi.queryCallInforuntime call with the encoded call data previously obtained: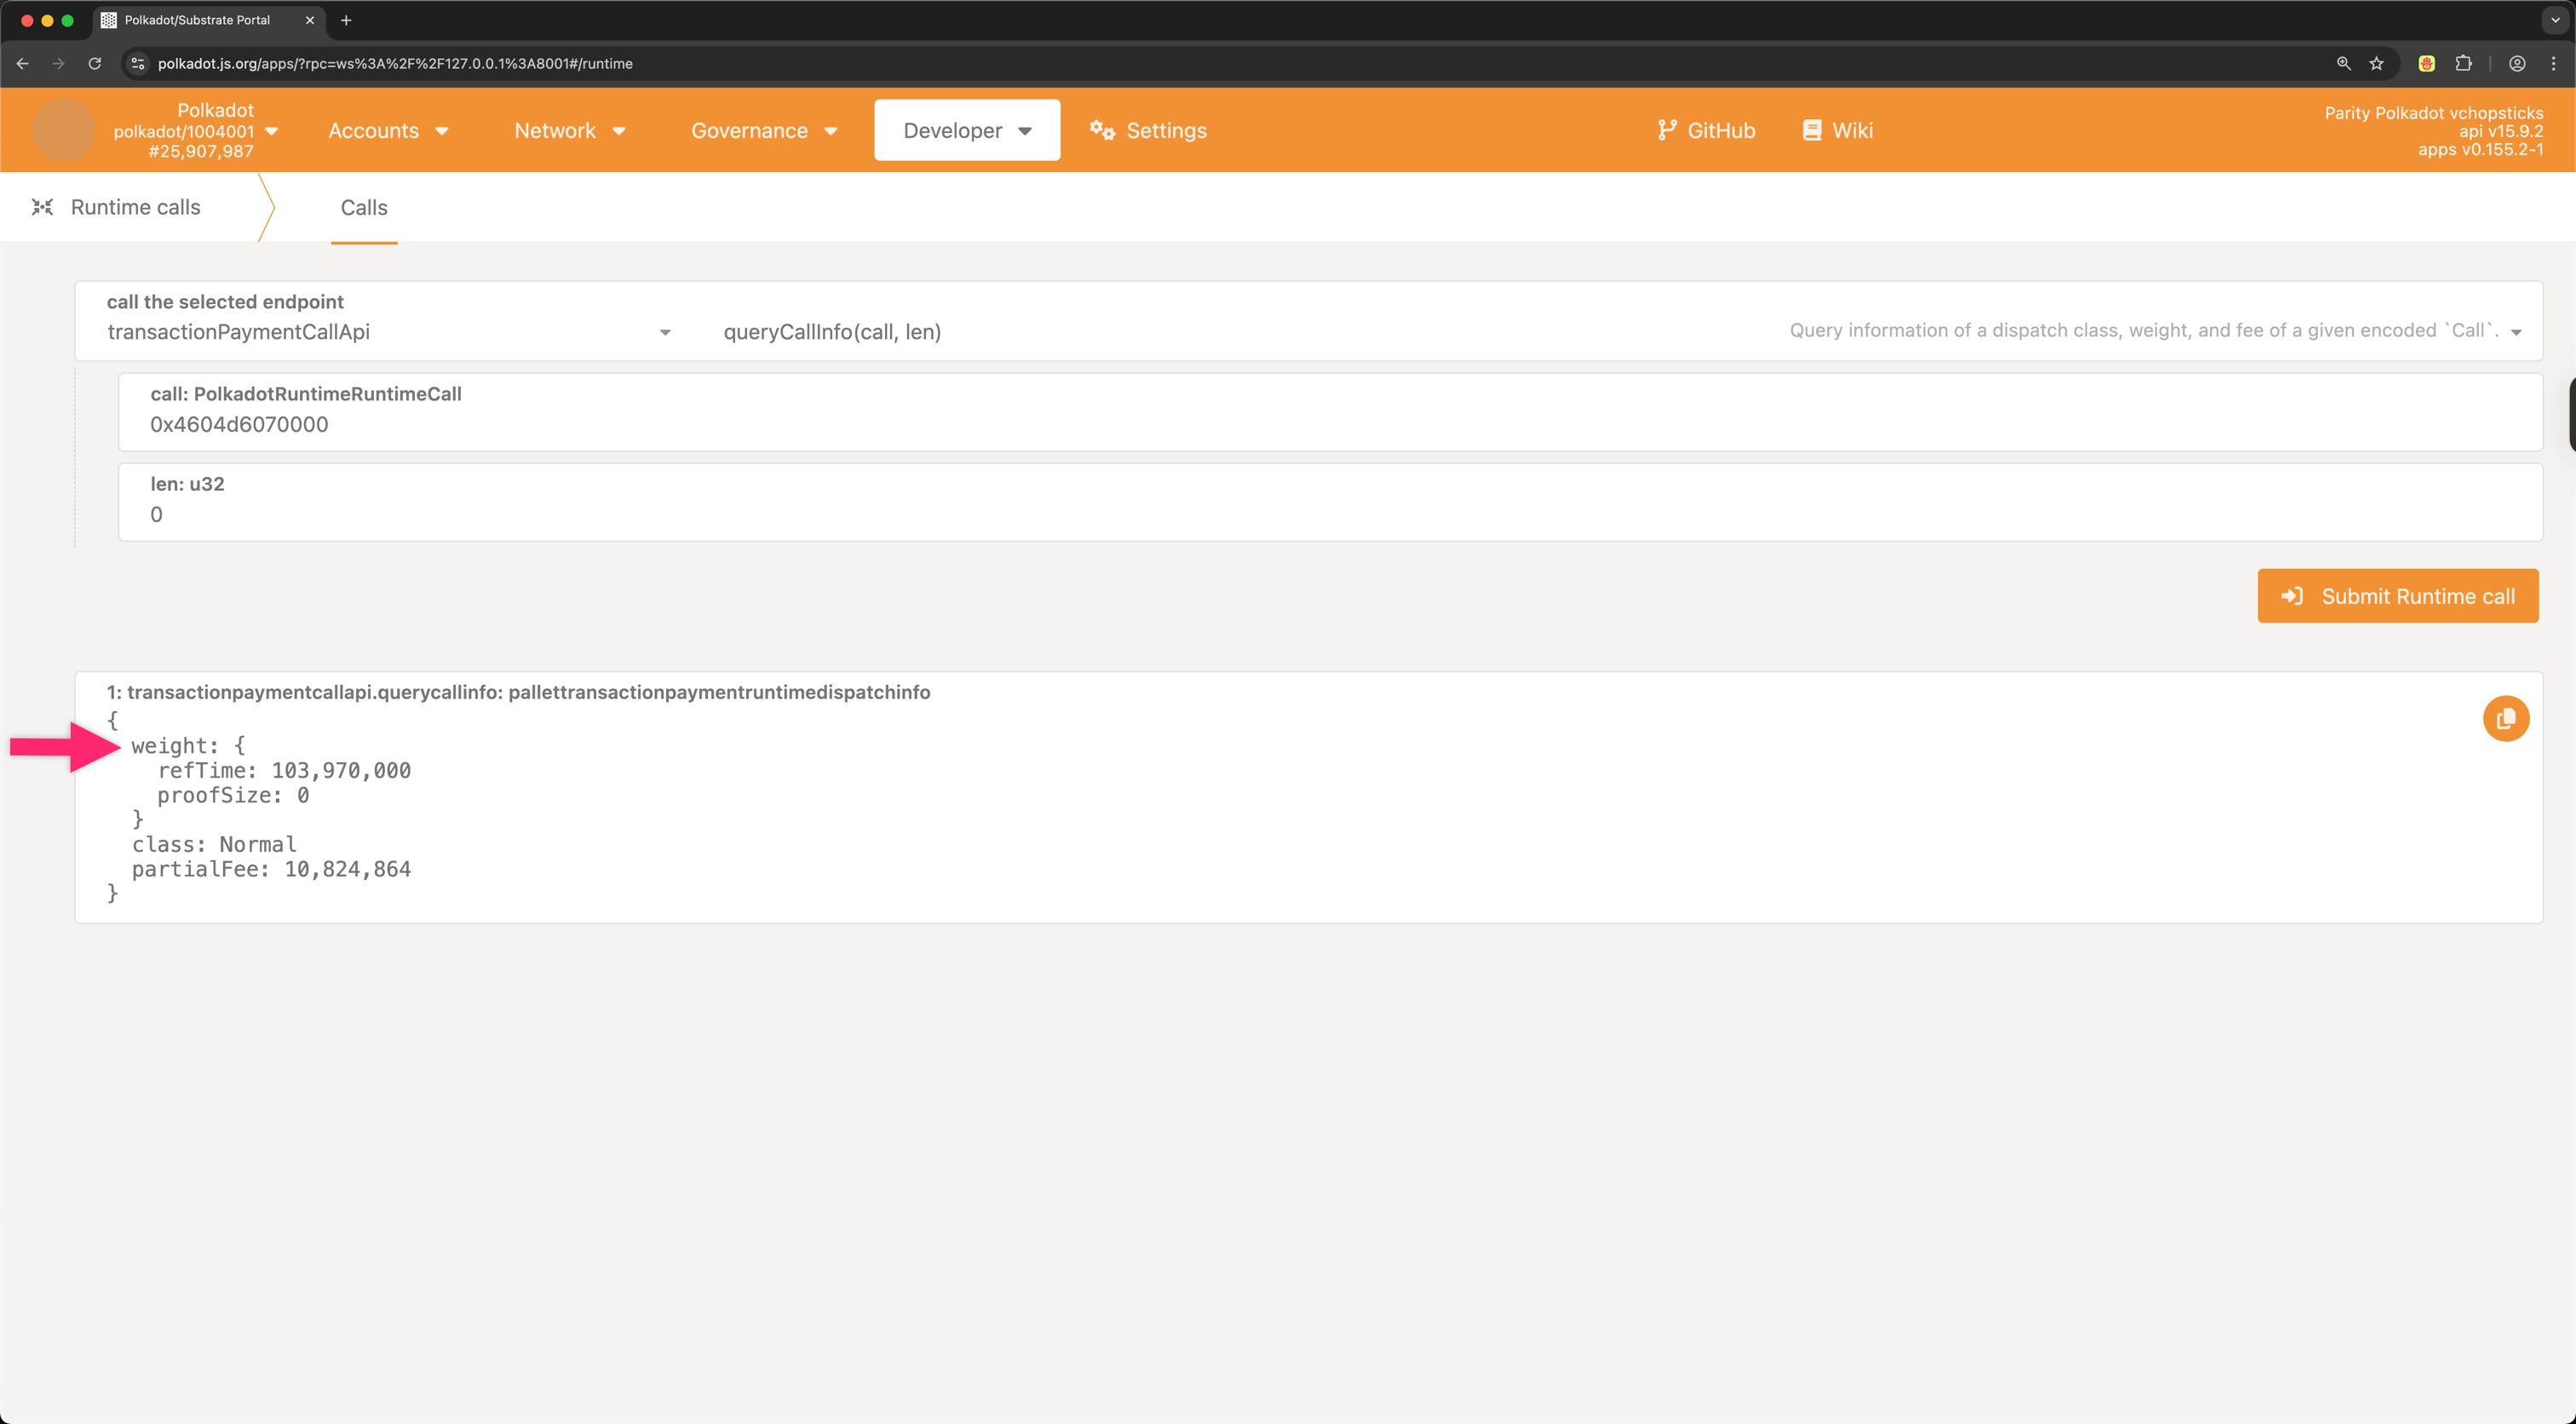
This weight information is crucial for properly configuring your XCM message's execution parameters in the next steps.
Fund the Sovereign Account
For a successful XCM execution, the sovereign account of your parachain on the relay chain must have sufficient funds to cover transaction fees. The sovereign account is a deterministic address derived from your parachain ID.
You can identify your parachain's sovereign account using either of these methods:
Execute the locationToAccountApi.convertLocation runtime API call to convert your parachain's location into its sovereign account address on the relay chain.
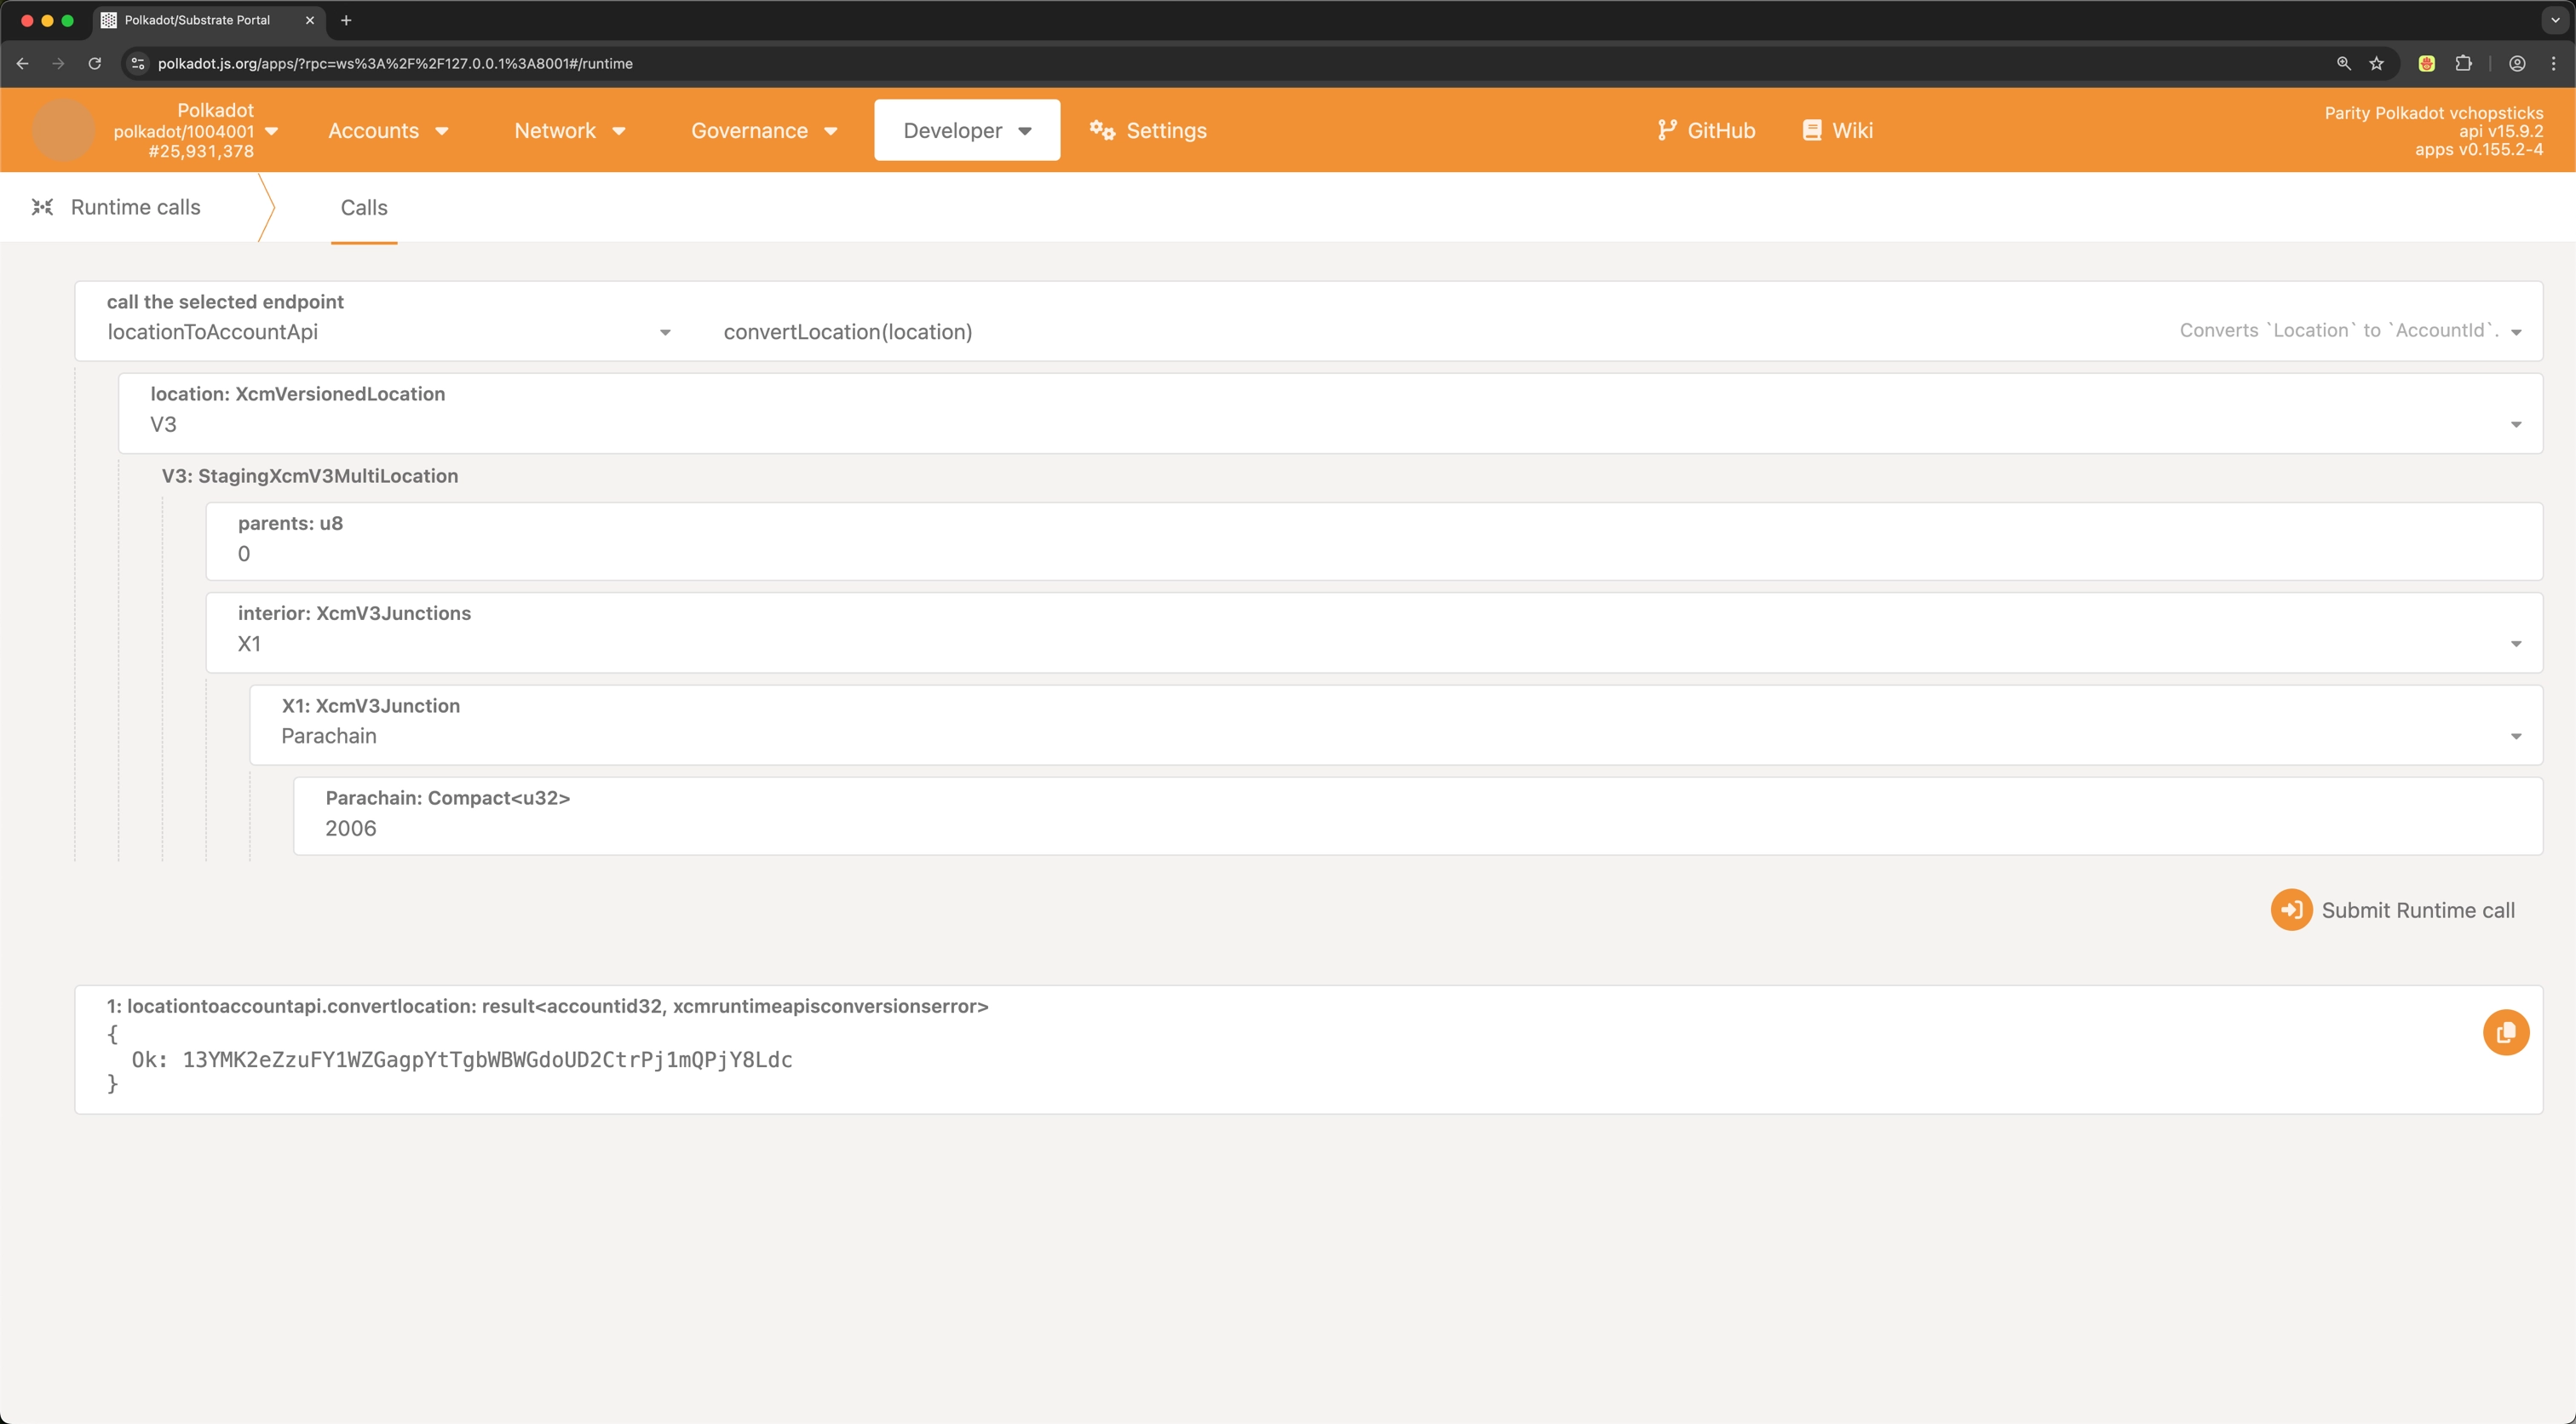
Use the "Para ID" to Address section in Substrate Utilities with the Child option selected.
-
Identify the appropriate prefix:
- For parent/child chains use the prefix
0x70617261(which decodes tob"para").
- For parent/child chains use the prefix
-
Encode your parachain ID as a u32 SCALE value:
- For parachain 2006, this would be
d6070000.
- For parachain 2006, this would be
-
Combine the prefix with the encoded ID to form the sovereign account address:
- Hex:
0x70617261d6070000000000000000000000000000000000000000000000000000 - SS58 format:
5Ec4AhPW97z4ZyYkd3mYkJrSeZWcwVv4wiANES2QrJi1x17F
- Hex:
You can transfer funds to this account from any account on the relay chain using a standard transfer. To calculate the amount needed, refer to the XCM Payment API. The calculation will depend on the XCM built in the next step.
Craft and Submit the XCM
With the call data prepared and the sovereign account funded, you can now construct and send the XCM from your parachain to the relay chain. The XCM will need to perform several operations in sequence:
- Withdraw DOT from your parachain's sovereign account.
- Buy execution to pay for transaction fees.
- Execute the
registrar.removeLockextrinsic. - Return any unused funds to your sovereign account.
Here's how to submit this XCM using Astar (Parachain 2006) as an example:
-
In Polkadot.js Apps, connect to the parachain, navigate to the Developer dropdown and select the Extrinsics option.
-
Create a
sudo.sudoextrinsic that executespolkadotXcm.send:- Use the
sudo.sudoextrinsic to execute the following call as Root. - Select the polkadotXcm pallet.
- Choose the send extrinsic.
- Set the dest parameter as the relay chain.
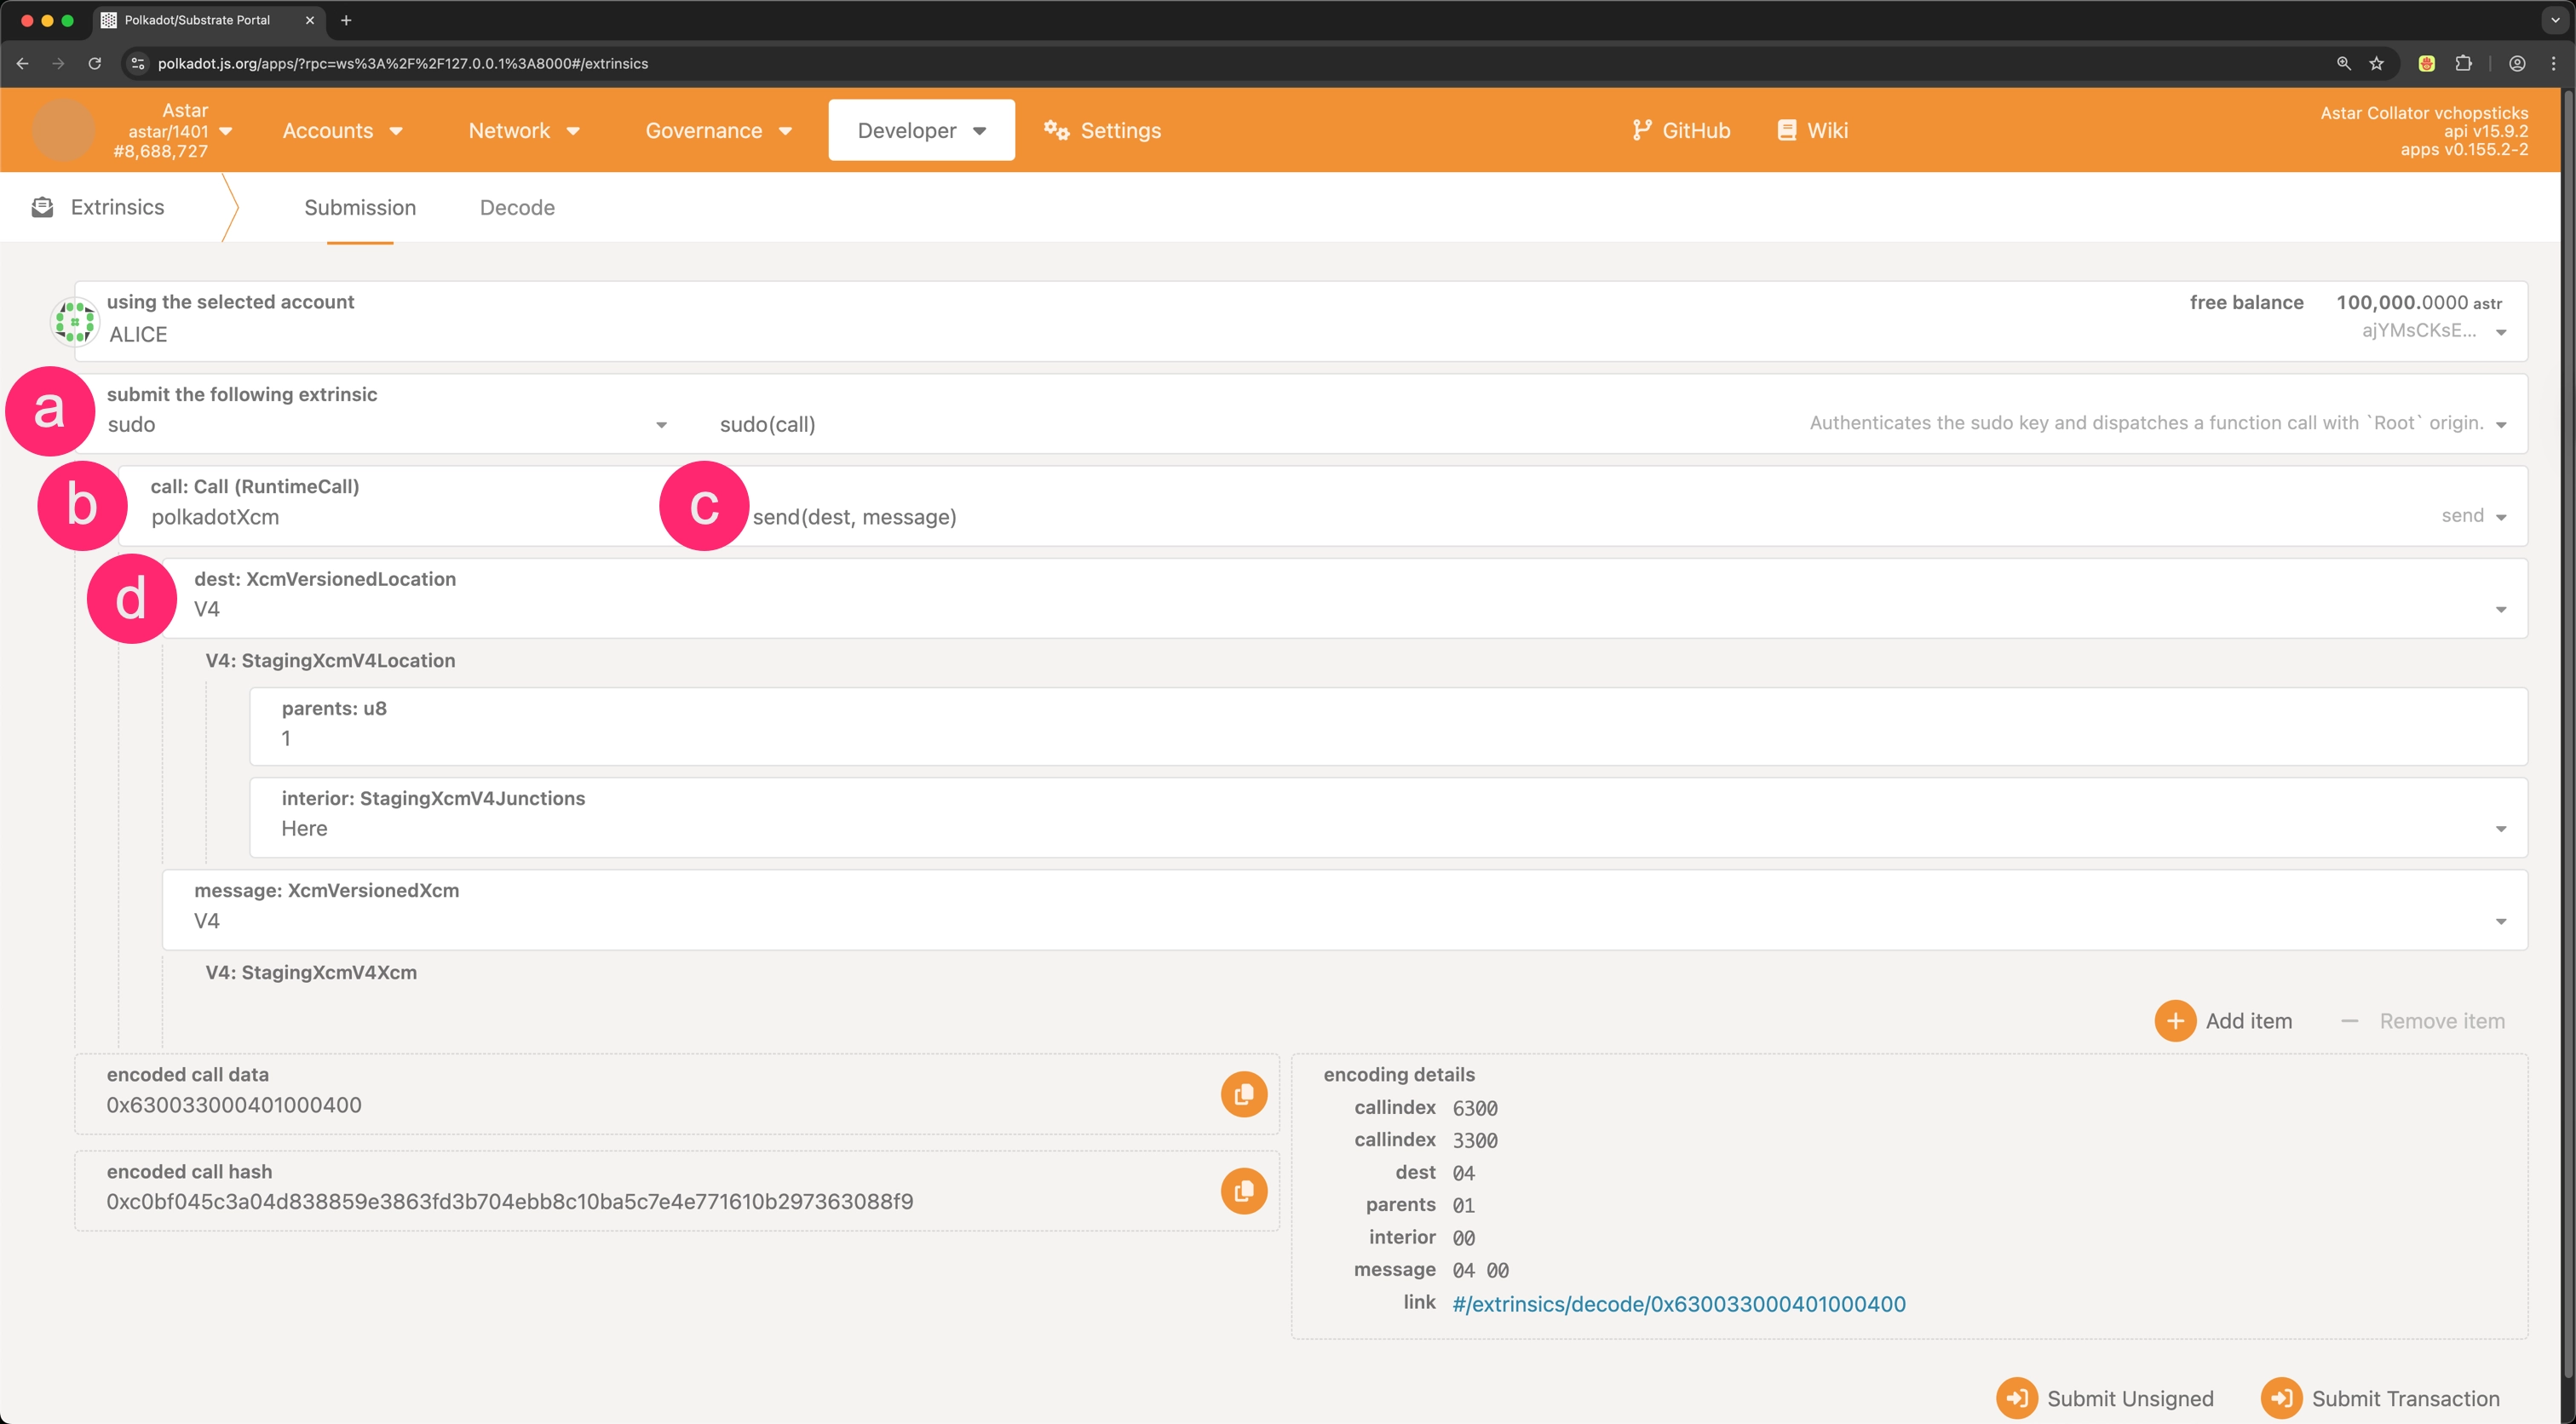
- Use the
-
Construct the XCM and submit it:
- Add a WithdrawAsset instruction.
- Add a BuyExecution instruction.
- fees:
- id: The asset location to use for the fee payment. In this example, the relay chain native asset is used.
- fun: Select
Fungibleand use the same amount you withdrew from the sovereign account in the previous step.
- weightLimit: Use
Unlimited.
- fees:
- Add a Transact instruction with the following parameters:
- originKind: Use
Native. - requireWeightAtMost: Use the weight calculated previously.
- call: Use the encoded call data generated before.
- originKind: Use
- Add a RefundSurplus instruction.
- Add a DepositAsset instruction to send the remaining funds to the parachain sovereign account.
- Click the Submit Transaction button.
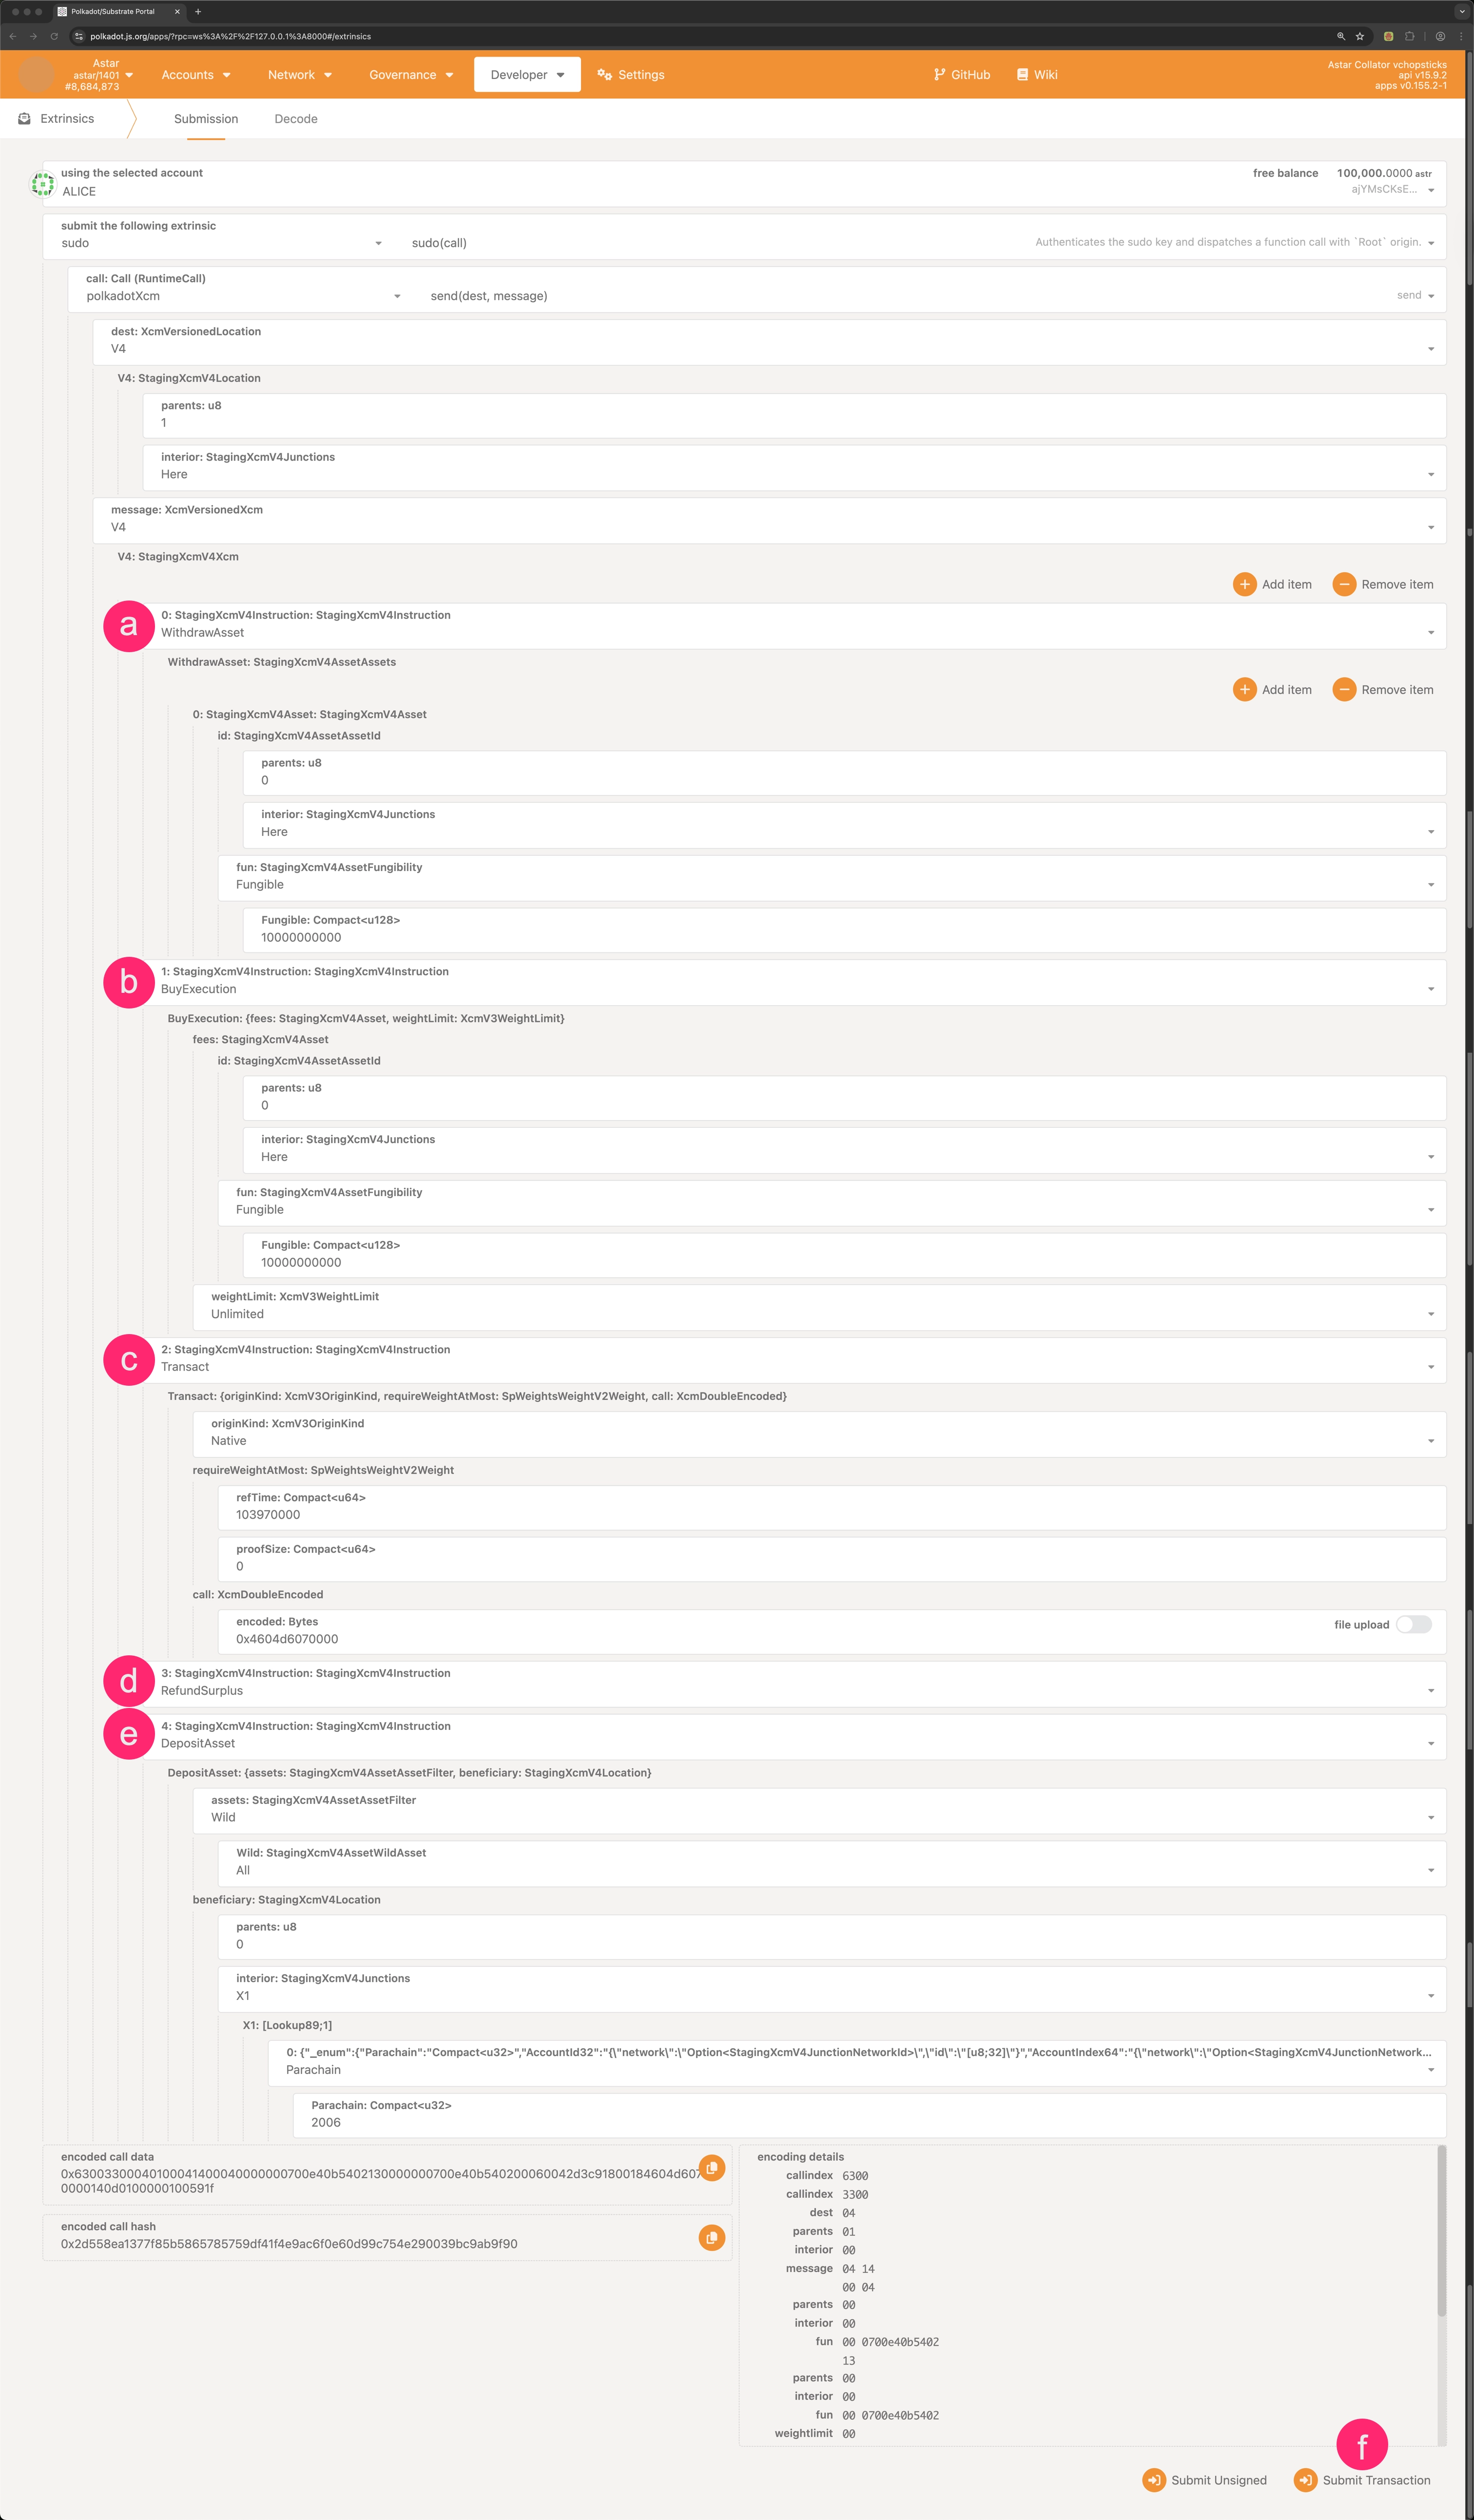
If the amount withdrawn in the first instruction is exactly the amount needed to pay the transaction fees, instructions 4 and 5 can be omitted.
To validate your XCM, examine the following reference extrinsic showing the proper instruction sequence and parameter formatting. Following this structure will help ensure successful execution of your message.
After submitting the transaction, wait for it to be finalized and then verify that your parachain has been successfully unlocked by following the steps described in the Check if the Parachain is Locked section. If the parachain shows as unlocked, your operation has been successful. If it still appears locked, verify that your XCM transaction was processed correctly and consider troubleshooting the XCM built.
| Created: May 13, 2025