Run a Block-Producing Collator
Introduction
Block-producing collators are the backbone of system parachain operations. Unlike RPC or archive nodes, which maintain state, collators actively produce blocks and submit them to relay chain validators for inclusion. They ensure network liveness, censorship resistance, and cross-chain message processing.
Collators maintain fully synced relay chain and parachain nodes, aggregate transactions into blocks, create parachain block candidates, generate state transition proofs (Proof-of-Validity), and send block candidates to relay chain validators. They also enable cross-chain message handling via XCM. While critical for liveness, collators do not secure the network—security is provided by relay chain validators through the ELVES protocol.
This guide explains how to set up a collator for Polkadot system parachains, covering all key requirements, setting up and registering session keys, and meeting governance approval or invulnerables-list criteria (required for system parachains; non-system parachains may be more permissionless).
Prerequisites
Hardware Requirements
Block-producing collators require robust hardware for reliable operation, including the following:
- CPU: 4+ cores (8+ cores recommended for optimal performance)
- Memory: 32 GB RAM minimum (64 GB recommended)
- Storage:
- 200+ GB NVMe SSD (with pruning enabled for both parachain and relay chain)
- Fast disk I/O is critical for block production performance
- Network:
- Public IP address
- 100+ Mbps connection; a stable connection is critical
- Open ports:
- 30333: Parachain P2P
- 30334: Relay chain P2P
Uptime is critical
Consider redundancy and monitoring to maintain block production reliability.
Software Requirements
Required software:
- Operating system: Ubuntu 22.04 LTS (recommended) or similar Linux distribution
- Docker: Required for obtaining binaries and running containers
Account Requirements
Need to create an account?
You can generate an account by taking the following steps:
-
Generate an account key with the
sr25519scheme using the following command:The output will be similar to the following:
docker run -it parity/subkey:latest generate --scheme sr25519Secret phrase: embody rail hour peanut .... badge syrup luggage canvas Network ID: substrate Secret seed: 0x6498dd3416c491406e2c8283c76760ce4ca018478888b42315e7718778f2c2e1 Public key (hex): 0x2202210357e49390d4f8d868da983940fe220a0a0e00bc6feaeda462aa031810 Account ID: 0x2202210357e49390d4f8d868da983940fe220a0a0e00bc6feaeda462aa031810 Public key (SS58): 5CqJ7n72GvvF5ZzUT2HMj83KyDje4n8sXR8kuiK8HWtfDktF SS58 Address: 5CqJ7n72GvvF5ZzUT2HMj83KyDje4n8sXR8kuiK8HWtfDktF -
Save the following items displayed in the output:
- Secret phrase (seed) - Keep this secure!
- Public key (hex)
- Account ID
- SS58 Address
Warning
Store the secret phrase securely. Never share it. Consider using a hardware wallet for production collators.
Your account must meet the following requirements:
- Funded account: For on-chain transactions and potential bonding
You will also need the following, which are generated or configured later in this guide:
- Session keys: For collator identification (generated after node setup)
- Node key: For stable P2P peer ID (recommended)
Install Dependencies
This guide provides two deployment options. Select the option that best fits your needs:
- Docker: Best for simpler setup and maintenance
- systemd: Best for production environments requiring more control
-
Pull the Polkadot Parachain Docker image using the latest stable tag on Docker Hub:
-
Verify the installation:
-
Download the
polkadot-parachainbinary using the latest stable Polkadot SDK release: -
Make it executable and move it to your system path:
-
Verify installation:
Generate Node Key
Validators and collators on Polkadot need a static network key (also known as the node key) to maintain a stable node identity. This key ensures that your node can maintain a consistent peer ID, even across restarts, which is crucial for maintaining reliable network connections.
Follow these steps to generate a node key:
-
Generate your node key using one of the following options:
-
Locate your peer ID in the displayed output. The peer ID is similar to this example:
Be sure to save the peer ID for future reference.
Obtain Chain Specification
System Parachains
Obtain the chain specification for your target system parachain using one of the following options:
Download the chain specification directly using curl. For example, to download the Asset Hub Polkadot chain spec:
curl -sL -o chain-spec.json \
  https://paritytech.github.io/chainspecs/polkadot/parachain/asset-hub/chainspec.json
For other system parachains, find the correct URL in the Chainspec Collection under the List of Chainspecs.
Other Parachains
For non-system parachains, check the parachain's documentation for official chain specification files.
Run the Collator
Using your preferred deployment method, take the following steps to set up and run your collator:
-
Create a directory for collator data and copy the chain spec and node key:
-
Launch the collator using Docker:
docker run -d --name polkadot-collator --restart unless-stopped \ -p 30333:30333 \ -p 30334:30334 \ -p 9944:9944 \ -p 9615:9615 \ -v $(pwd)/collator-data:/data \ parity/polkadot-parachain:stable2603-1 \ --collator \ --chain=/data/chain-spec.json \ --base-path=/data \ --port=30333 \ --rpc-port=9944 \ --prometheus-port=9615 \ --prometheus-external \ --node-key-file=/data/node.key \ --name="INSERT_YOUR_COLLATOR_NAME" \ --blocks-pruning=256 \ --state-pruning=256 \ --database=paritydb \ -- \ --chain=polkadot \ --port=30334 \ --sync=fast \ --blocks-pruning=256 \ --state-pruning=256 \ --database=paritydb \ --pool-limit=0 \ --rpc-port=0 -
View logs to monitor sync progress:
-
Create a dedicated user:
-
Create the data directory, then copy your chain spec and node key into it:
-
Set permissions:
-
Create a systemd service file:
-
Add the following configuration:
systemd/system/polkadot-collator.service[Unit] Description=Polkadot System Parachain Collator After=network.target [Service] Type=simple User=polkadot Group=polkadot WorkingDirectory=/var/lib/polkadot-collator ExecStart=/usr/local/bin/polkadot-parachain \ --collator \ --chain=/var/lib/polkadot-collator/chain-spec.json \ --base-path=/var/lib/polkadot-collator \ --port=30333 \ --rpc-port=9944 \ --prometheus-port=9615 \ --node-key-file=/var/lib/polkadot-collator/node.key \ --name="INSERT_YOUR_COLLATOR_NAME" \ --blocks-pruning=256 \ --state-pruning=256 \ --database=paritydb \ -- \ --chain=polkadot \ --port=30334 \ --sync=fast \ --blocks-pruning=256 \ --state-pruning=256 \ --database=paritydb \ --pool-limit=0 \ --rpc-port=0 Restart=always RestartSec=10 LimitNOFILE=65536 [Install] WantedBy=multi-user.target -
Start the service:
-
Check the status:
-
View logs:
Configuration Arguments
--collator: Enables block production mode.--node-key-file: Uses the generated node key for stable peer ID.--name: Your collator name (visible in telemetry).--blocks-pruning=256: Keeps the last 256 blocks.--state-pruning=256: Keeps the state history of the last 256 blocks.--database=paritydb: Uses ParityDB for better performance.--sync=fast: Fast sync mode for the relay chain.--pool-limit=0: Disables transaction pool on relay chain (not needed for collators).--rpc-port=0(relay chain): Disables RPC on the embedded relay chain node (not needed for collators).
Your collator must sync both the relay chain and parachain before producing blocks. The relay chain uses fast sync to speed up synchronization. Overall sync time depends on:
- Network bandwidth
- Disk I/O speed
- Current chain size
Note
If you also operate relay chain nodes, such as validator or RPC nodes, you can point the collator to their RPC endpoints using the --relay-chain-rpc-urls argument. This allows the collator to retrieve relay chain data from these nodes, reducing the resources required to sync and maintain the embedded relay chain node.
Warning
Do not proceed with registration until both chains are fully synced. Monitor sync progress using the log viewing commands in the Log Management section.
Generate Session Keys
Session keys are cryptographic keys used by your collator node to sign authorship information when producing blocks. They uniquely identify your collator on the network and must be registered on-chain before your collator can participate in block production.
Breaking change introduced in runtime 2.2.0
Runtime 2.2.0 introduced a new session key generation flow using the author_rotateKeysWithOwner RPC, which requires your stash account as a parameter and returns both the session keys and a cryptographic proof of ownership. This proof must be included later when submitting setKeys. The previous author_rotateKeys RPC and the Subkey approach are no longer supported for new key generation. If your node already has session keys set on-chain and you are not rotating them, no action is required.
Polkadot and Kusama are beyond runtime 2.2.0, so the new flow is the only supported path on both networks. The Pre-2.2.0 (Legacy) tab below is kept for reference and applies only to chains still running a pre-2.2.0 runtime.
Generate session keys by running the following command on your node, replacing INSERT_STASH_ACCOUNT_ID with your stash account ID:
curl -H "Content-Type: application/json" \
-d '{"id":1, "jsonrpc":"2.0", "method": "author_rotateKeysWithOwner", "params":["INSERT_STASH_ACCOUNT_ID"]}' \
http://localhost:9944
This command returns a JSON object with two fields in the result: keys (the hex-encoded session keys) and proof (the ownership proof). Save both values for later use.
{
  "jsonrpc": "2.0",
  "result": {
    "keys": "0xda3861a45e0197f3ca145c2c209f9126e5053fas503e459af4255cf8011d51010",
    "proof": "0x1a2b3c4d5e6f..."
  },
  "id": 1
}
Subkey is no longer supported for session key generation
Previously, nodes could generate session keys externally using subkey and manually insert them into the node's keystore. This approach is no longer viable because set_keys now requires a cryptographic proof of ownership — each private session key must sign the stash account ID. The only way to obtain this proof is through author_rotateKeysWithOwner, which handles key generation, keystore insertion, and proof generation in a single step. Operators who previously relied on subkey for session key generation should migrate to using author_rotateKeysWithOwner as described above.
Polkadot and Kusama are beyond runtime 2.2.0, so this legacy flow is no longer applicable on those networks. Use it only if you are operating on a chain still running a pre-2.2.0 runtime. On such a chain, there are multiple ways to create the session keys:
-
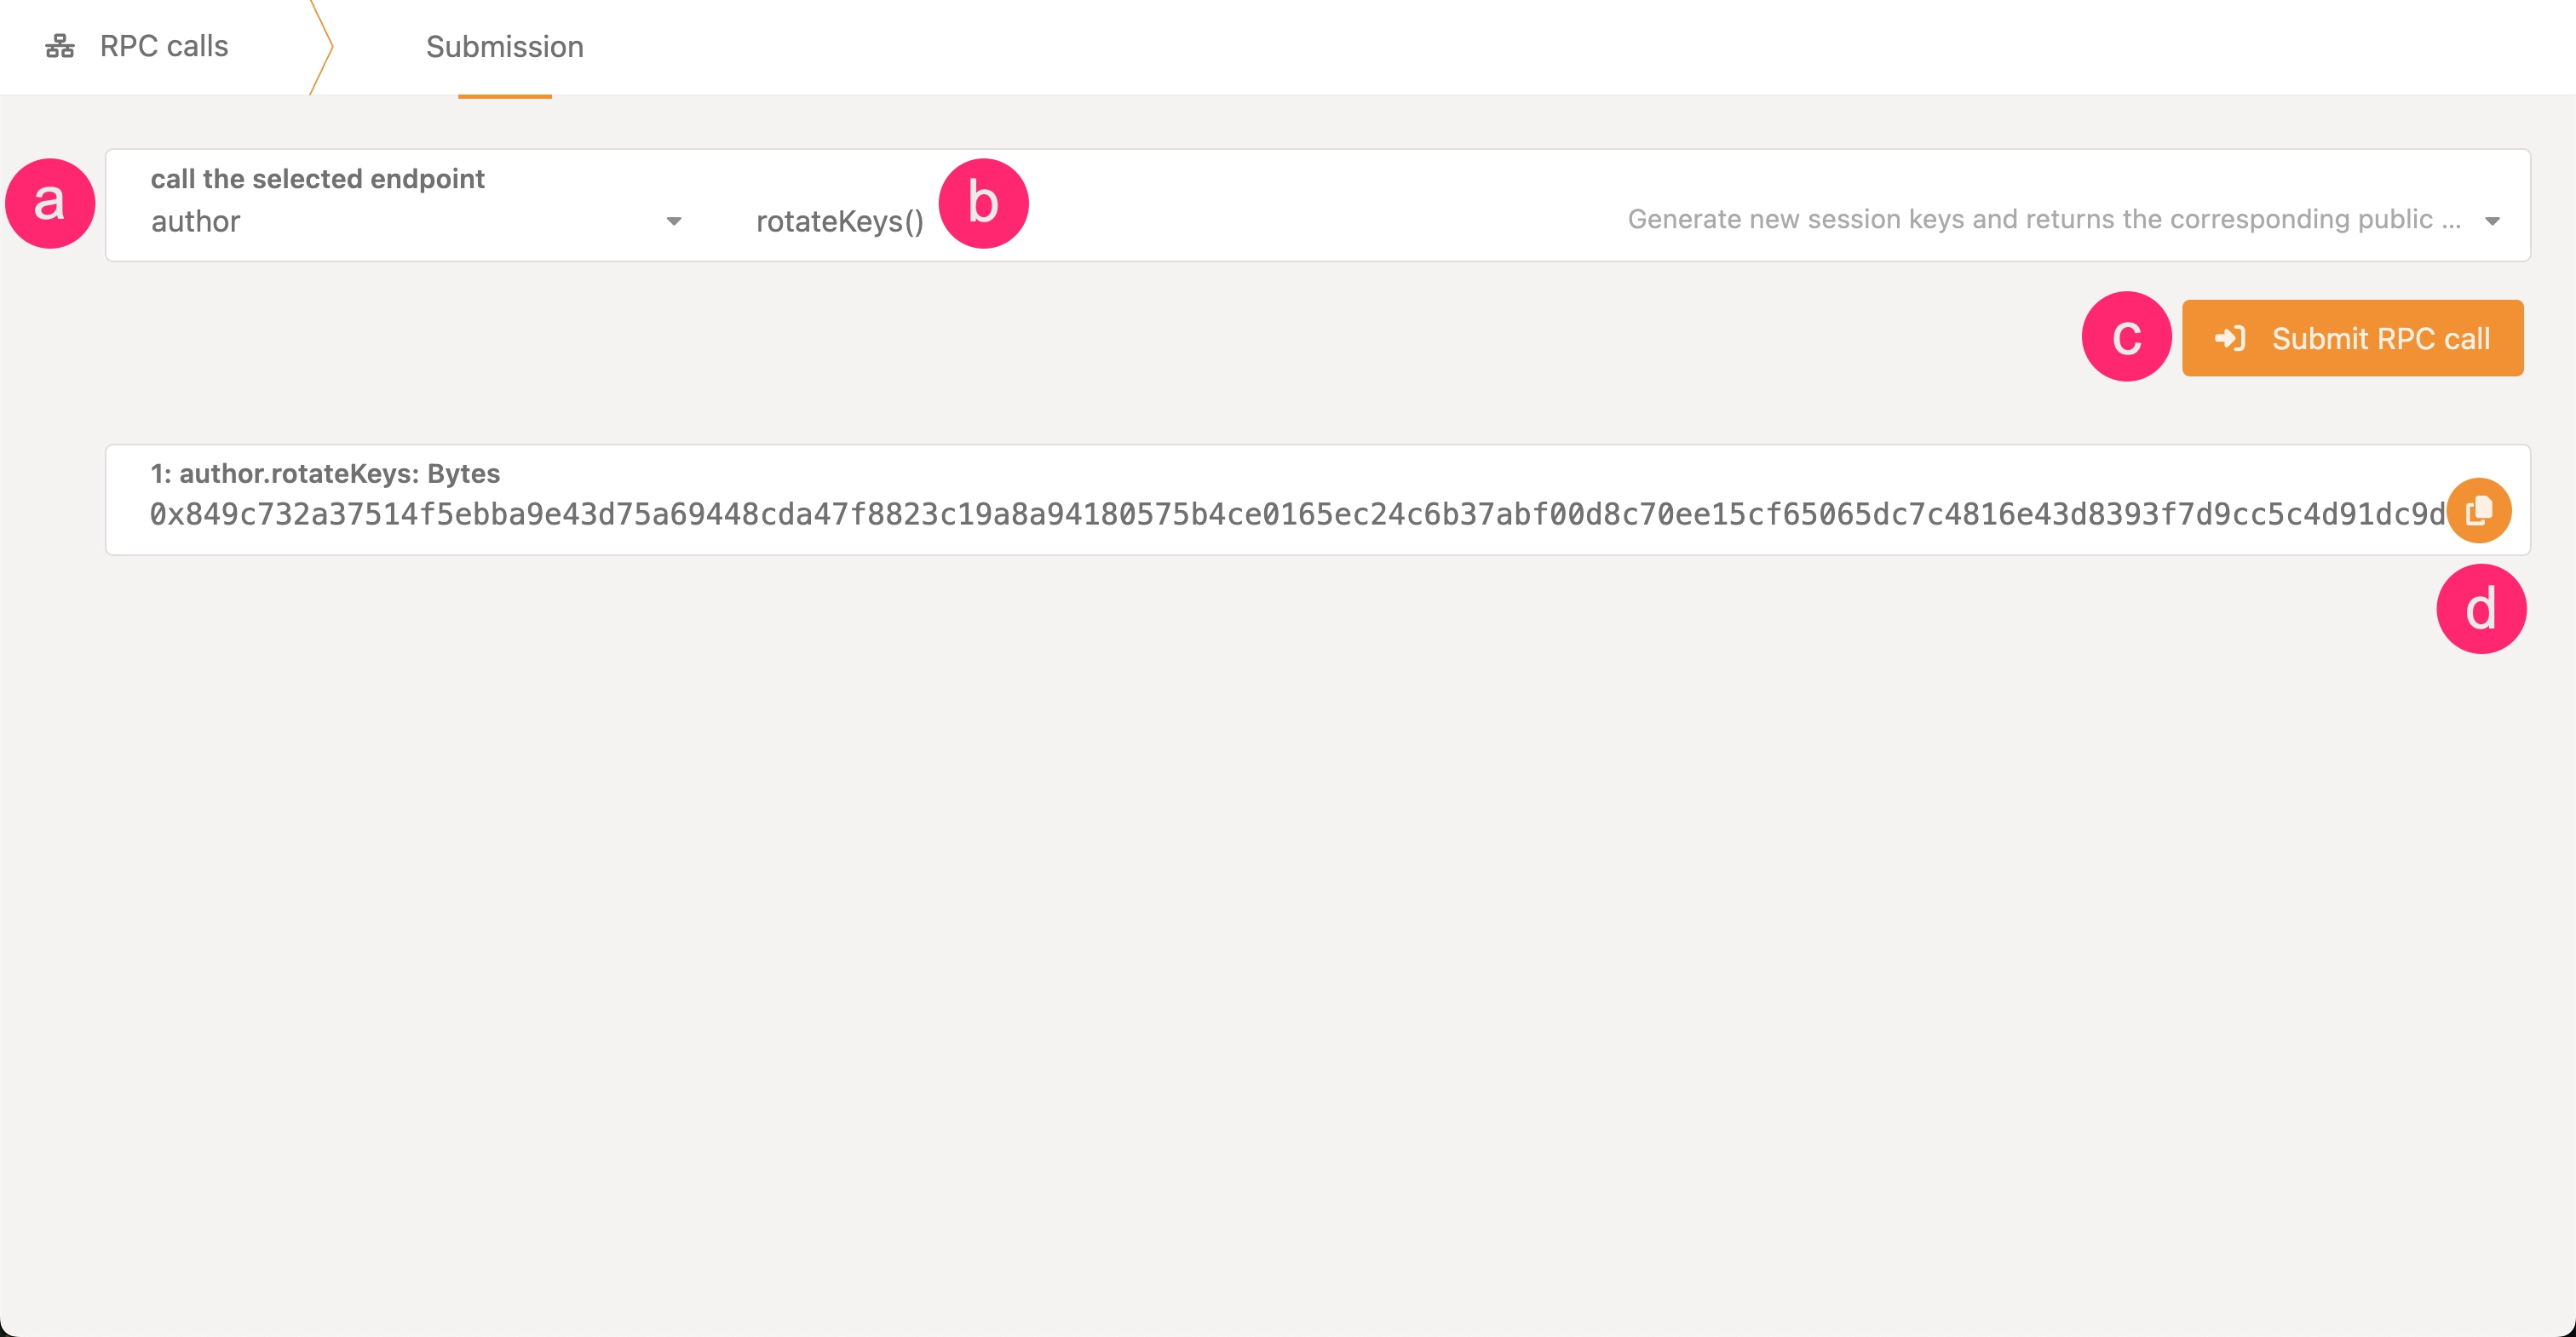
In Polkadot.js Apps, connect to your local node, navigate to the Developer dropdown, and select the RPC Calls option.
-
Construct an
author_rotateKeysRPC call and execute it:- Select the author endpoint.
- Choose the rotateKeys() call.
- Click the Submit RPC Call button.
- Copy the hex-encoded public key from the response.
Generate session keys by running the following command on your node:
curl -H "Content-Type: application/json" \
-d '{"id":1, "jsonrpc":"2.0", "method": "author_rotateKeys", "params":[]}' \
http://localhost:9944
This command will return a JSON object. The result key is the hex-encoded public part of the newly created session key. Save this for later use.
To create a keypair for your node's session keys, use the subkey generate command. This generates a set of cryptographic keys that must be stored in your node's keystore directory.
When you run the command, it produces output similar to this example:
Secret phrase:       twist buffalo mixture excess device drastic vague mammal fitness punch match hammer
  Network ID:        substrate
  Secret seed:       0x5faa9e5defe42b201388d5c2b8202d6625a344abc9aa52943a71f12cb90b88a9
  Public key (hex):  0x28cc2fdb6e28835e2bbac9a16feb65c23d448c9314ef12fe083b61bab8fc2755
  Account ID:        0x28cc2fdb6e28835e2bbac9a16feb65c23d448c9314ef12fe083b61bab8fc2755
  Public key (SS58): 5CzCRpXzHYhuo6G3gYFR3cgV6X3qCNwVt51m8q14ZcChsSXQ
  SS58 Address:      5CzCRpXzHYhuo6G3gYFR3cgV6X3qCNwVt51m8q14ZcChsSXQ
To properly store these keys, create a file in your keystore directory with a specific naming convention. The filename must consist of the hex string 61757261 (which represents "aura" in hex) followed by the public key without its 0x prefix.
Using the example above, you would create a file named:
And store only the secret phrase in the file:
When submitting setKeys, use 0x00 as the proof parameter.
Save your session key output immediately
You must save these session keys as you'll need them for on-chain registration. Calling author_rotateKeys or author_rotateKeysWithOwner generates new keys every time — it does not return previously generated keys. If you lose the output, there is no way to retrieve it. You will need to call the RPC again, which generates a fresh set of keys, and then re-submit setKeys with the new result.
Register Collator for Selection
System parachains use different mechanisms for selecting collators. A quick breakdown of each mechanism is as follows:
| Method | How it Works | Requirements |
|---|---|---|
| Invulnerables list | Fixed list defined through governance. Most common for system parachains. | Permissioned via governance |
| On-chain selection | Runtime automatically selects eligible collators. Some parachains use pallet-collator-selection. | Semi-permissionless (criteria-based; may require bonding tokens) |
| Fellowship decisions | Technical fellowship may manage some system parachain collators. | Permissioned via Fellowship |
Registration Process
Collator registration authorizes your node to produce blocks on the network. The parachain's collator selection mechanism uses this on-chain registration to determine which nodes are eligible to author blocks.
The registration process varies by system parachain. General steps include the following:
-
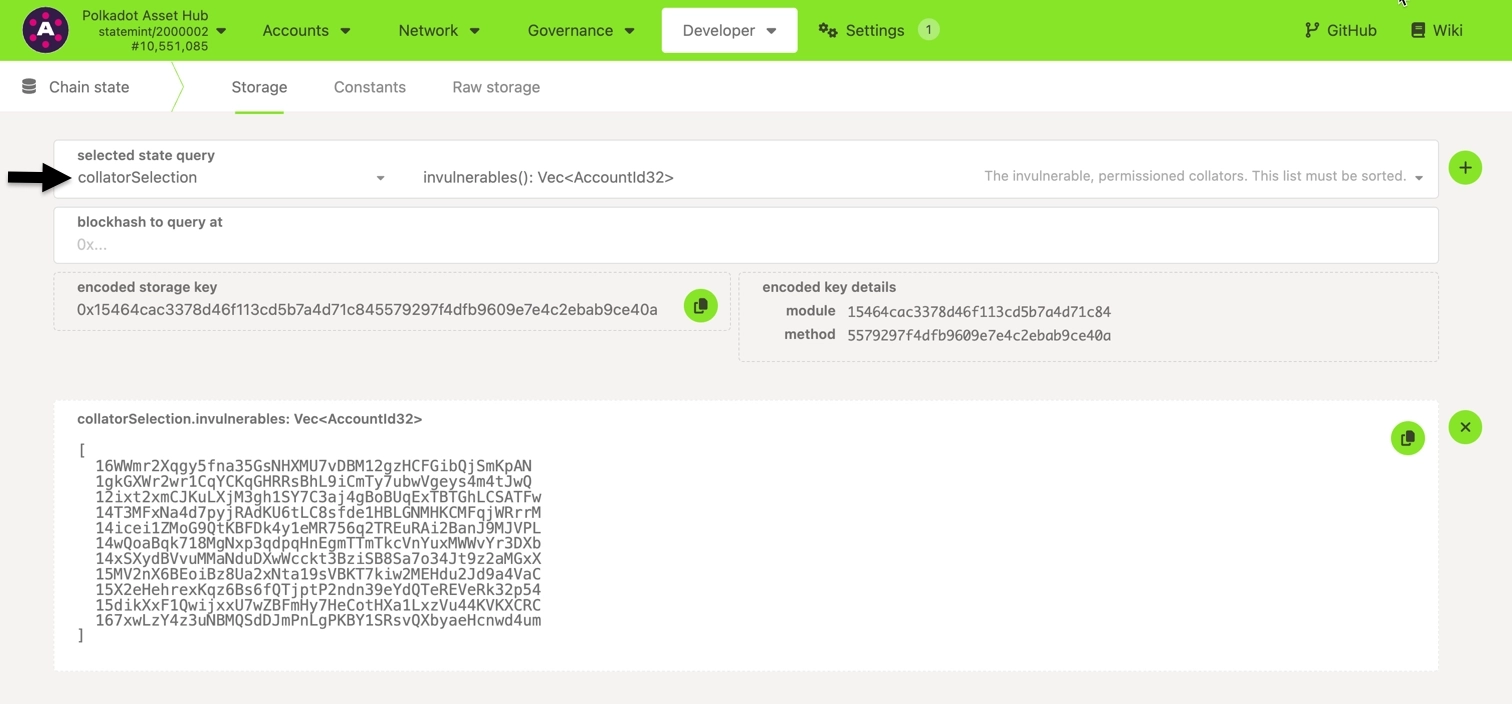
Check the existing collators for your target parachain:
- Navigate to Polkadot.js Apps and connect to your system parachain.
- Locate Developer > Chain State.
- Query
collatorSelection.invulnerables().
-
Prepare a governance proposal for invulnerables-based selection, including the following information:
- Draft proposal: Explain why you should be added as a collator.
- Technical details: Provide your session keys and account ID.
- Infrastructure: Describe your hardware and monitoring setup.
- Experience: Detail your relevant experience.
Submit the proposal to the relevant governance channels.
-
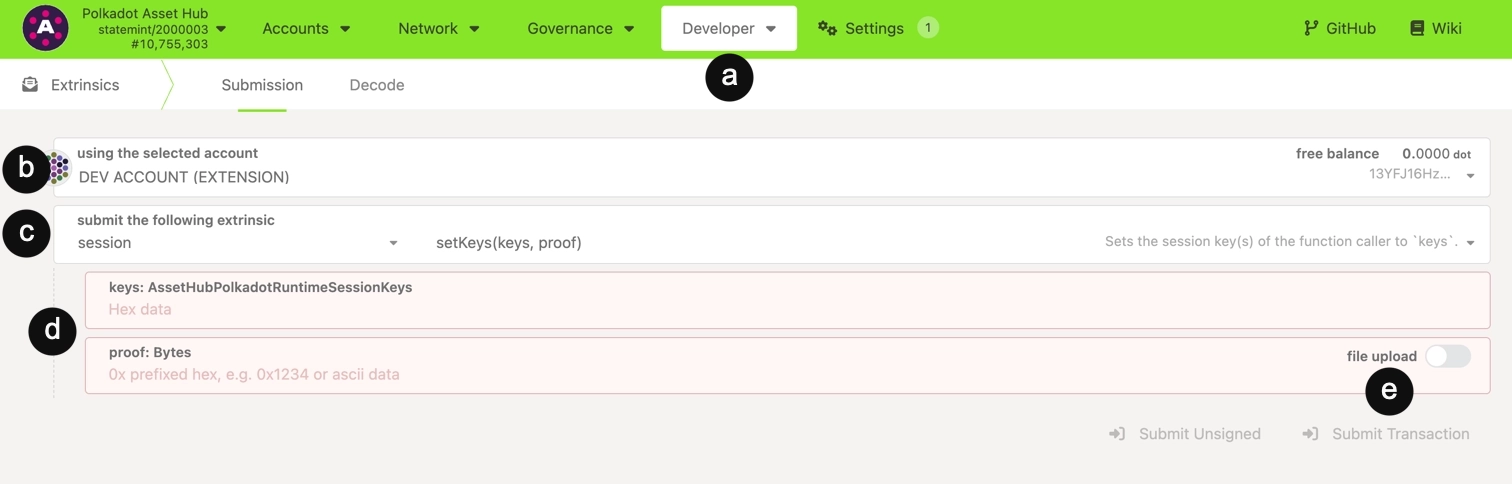
Once approved (or if using on-chain selection), follow these steps to register session keys using Polkadot.js Apps:
- Locate Developer > Extrinsics.
- Select your account.
- Choose the
session.setKeysextrinsic. - Enter the values returned by Generate Session Keys:
keysproof
- Click Submit Transaction and sign the transaction.
-
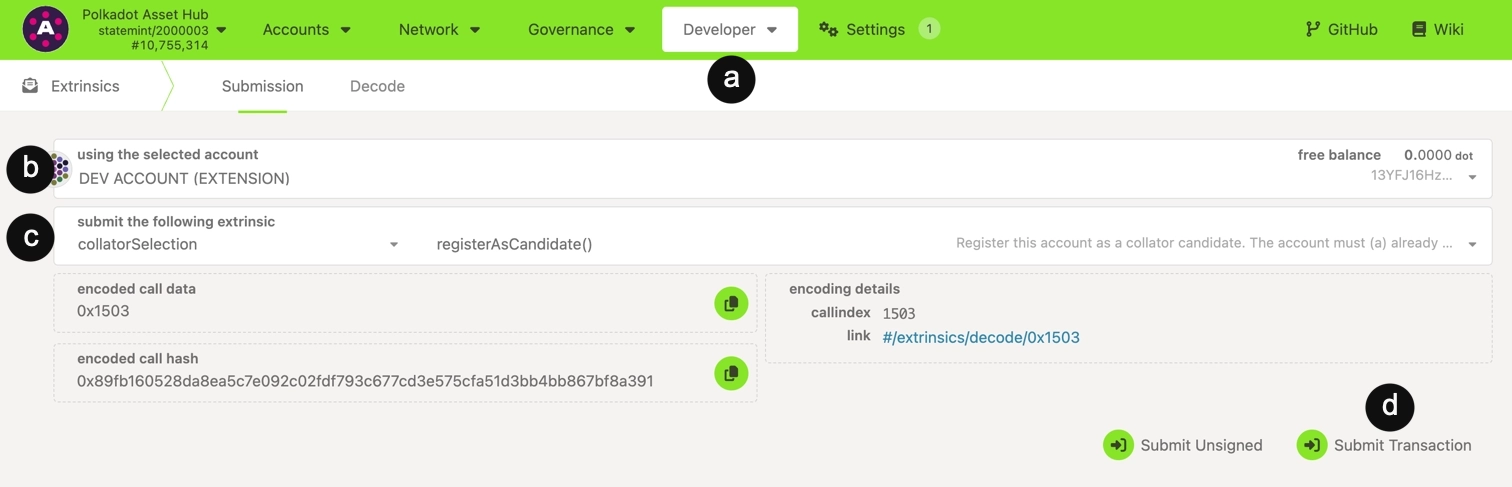
(Optional - primarily for non-system parachains) If the parachain uses on-chain bonding for collator selection, register as a candidate using Polkadot.js Apps:
Note
Most system parachains use invulnerables lists exclusively and do not require this step. Skip to step 5 if you're running a collator for a system parachain.
- Locate Developer > Extrinsics.
- Select your account.
- Select
collatorSelection.registerAsCandidate. - Click Submit Transaction and sign the transaction. The required bond amount will be automatically reserved from your account based on the pallet's configured
CandidacyBond.
-
For system parachains using invulnerables lists, await governance approval for your proposal. Once approved, your collator is added to the invulnerables list and will begin producing blocks in the next session or era.
-
Verify your collator is active by monitoring logs for block production messages like "Prepared block for proposing" and "Imported #123". See the Log Management section for commands for log viewing.
Commands for Node Management
Use the following commands to manage your node:
-
Stop container:
-
Start container:
-
Remove container:
Commands for Log Management
Efficient log management is essential to ensure collator performance and uptime. Use the following commands to help you manage logs to monitor and maintain your collator:
-
View logs:
-
View recent logs (last 100 lines):
-
Filter for errors:
-
Filter for block production:
Database Maintenance
Check database size periodically using the commands for your selected setup:
The collator node automatically prunes based on configuration.
Updates and Upgrades
Updates or upgrades can happen on either the runtime or client. Runtime upgrades are automatically applied via on-chain governance and do not require any manual action on your part. Client upgrades do require a manual binary update process performed via terminal commands as follows:
-
Stop the service:
-
Backup data (recommended):
-
Pull the new Docker image:
-
Update the image tag in your systemd service file:
-
Reload systemd and restart the service:
-
Verify the service is running:
-
Stop the service:
-
Backup data (recommended):
-
Download the new binary from GitHub releases:
-
Verify
polkadot-parachainversion to confirm successful update: -
Restart the service:
-
Verify the service is running:
Conclusion
Running a collator node is essential for parachain operation and network security. By following this guide, you have set up a production-ready collator that:
- Produces blocks for your parachain and maintains network consensus.
- Implements comprehensive security measures to protect keys and operations.
- Supports robust monitoring and alerting for reliable performance.
- Follows best practices for both Docker and systemd deployments.
As a collator operator, you play a vital role in your parachain's infrastructure. Regular maintenance, security updates, and monitoring will ensure your collator continues to perform reliably. Stay engaged with your parachain community and keep up with updates to maintain optimal performance and security.
| Created: January 14, 2026